Solved: AirDrop not working on Mac
Are you wondering why is Airdrop not working? It's a frustrating yet surprisingly common issue that most of us will encounter at some point.
AirDrop first made an appearance back in 2011 with the release of OS X Lion and iOS7. It's since become one of those Apple features many of us simply can't live without.
AirDrop uses a close-range wireless communication method, so you can share and receive an array of files and data, including images, text, locations, and playlists wirelessly, to mention a few, via Bluetooth and Wi-Fi to other Apple devices. There's no size limit as long as your device can handle the incoming data.
If you use this feature daily, and it suddenly stops, you'll be looking for quick answers on how to get it working correctly again. And that's where we come in.
Before we start with the fixes, let's talk about what kind of issues AirDrop users run into.
Why is AirDrop not working on my Mac?
Do any of these issues sound familiar?
-
AirDrop keeps saying it's waiting
-
Mac not showing up on AirDrop
-
Unable to detect other devices around you
-
Slow transfer of files
-
AirDrop fails to save an item
-
AirDrop cancels or declines transfers
Luckily, most of the issues with AirDrop can be resolved relatively quickly. Head down to the next section for the fixes.
Solved: Why can't I AirDrop to my Mac
Before we get carried away with troubleshooting tips, let's first check that your Apple devices are actually compatible. As I mentioned earlier, AirDrop has been around for a while, so it's unlikely these days that your devices wouldn't be compatible, but you never know, so here it goes:
Mac
MacBooks released in 2012 or later can use AirDrop if running OS X Yosemite or later.
iPhone
iPhone 5 or later running iOS 7 for AirDrop to work.
iPad
All devices must be running iOS 7 or iPadOS:
-
iPads released in 2012 or later
-
First-generation iPad Mini or later
-
First-generation iPad Pro
iPod touch
iPod touch from 2012 onwards running iOS 7 or later.
Now, let's start with some troubleshooting tips.
1. Turn on and unlock devices
Let's start at ground zero, are both your devices switched on and unlocked? Yes, I'm aware this might sound alarmingly obvious. Still, it's surprising how many people forget to unlock the recipient device, meaning AirDrop won't be able to find a device or transfer a file — go on and have a quick check.
2. Update your devices
Ensure both of the devices you are trying to use are running the latest operating systems. If there are any bugs or glitches with AirDrop, these will be ironed out in a system update. Here's how to check on your Mac:

- Select the Apple logo, top left > System Settings.
- Select Software Update Available from the sidebar.
- Press Update Now.
Alternatively, go to Apple Menu > System Settings > General > Software Update.
3. Check your AirDrop settings
The AirDrop no people found issue calls for you to check your AirDrop settings on both devices to ensure you've enabled your discoverability. Here's how to check on a Mac:
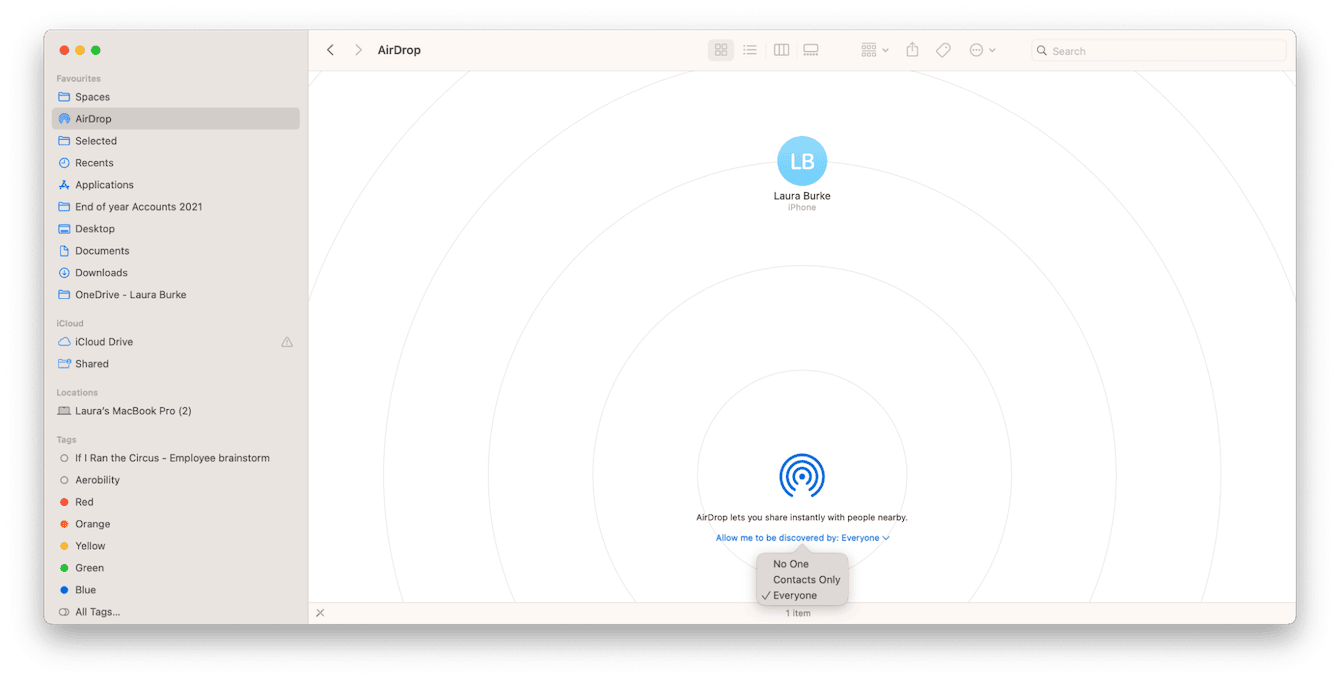
- Open Finder.
- Locate AirDrop in the left sidebar.
- In the dropdown next to Allow me to be discovered by, select Everyone from the list.
- You should now see available devices appear on the screen.
4. Check your Wi-Fi and Bluetooth
AirDrop depends on both Wi-Fi and Bluetooth to transfer files, so it's important these are both enabled on your devices. Sometimes, toggling them on and off is enough to kick-start them. Here's how to do it on a Mac:

- From the top menu bar, first, select the Wi-Fi icon.
- Toggle the blue button into the off position and then back on.
- Now, select the Bluetooth icon from the top menu bar.
- And toggle your Bluetooth on and off.
5. Run some general Mac maintenance
At this point, if the above tips haven't helped, it's worth taking a moment to run some general Mac maintenance. Routine maintenance on your MacBook can solve a variety of issues, often before they even occur. It's a preventative solution that keeps annoying issues like MacBook AirDrop not working at bay.
The most straightforward and quickest way to maintain your Mac is by using a dedicated tool. I like the Performance feature from CleanMyMac. Not only is this application notarized by Apple, but it's also intelligent, fast, and easy to use.
You can run a series of maintenance tasks, like running periodic scripts, flushing the DNS cache, and repairing disk permissions, which all help to fix issues and keep your Mac optimized. If you're not already a CleanMyMac fan, get your free trial here.
How to fix multiple Mac issues in one go:

-
Open the app and click Performance in the sidebar.
- Click Scan > View All Tasks.
-
Go to Maintenance Tasks, and from the list, select the following items:
Free Up RAM
Repair Disk Permissions
Run Periodic Scripts -
Click Run.
6. Turn off Focus Mode
If Focus Mode is enabled on either device, this might be another reason why AirDrop on Mac is not working. Here's how to check it on your MacBook:
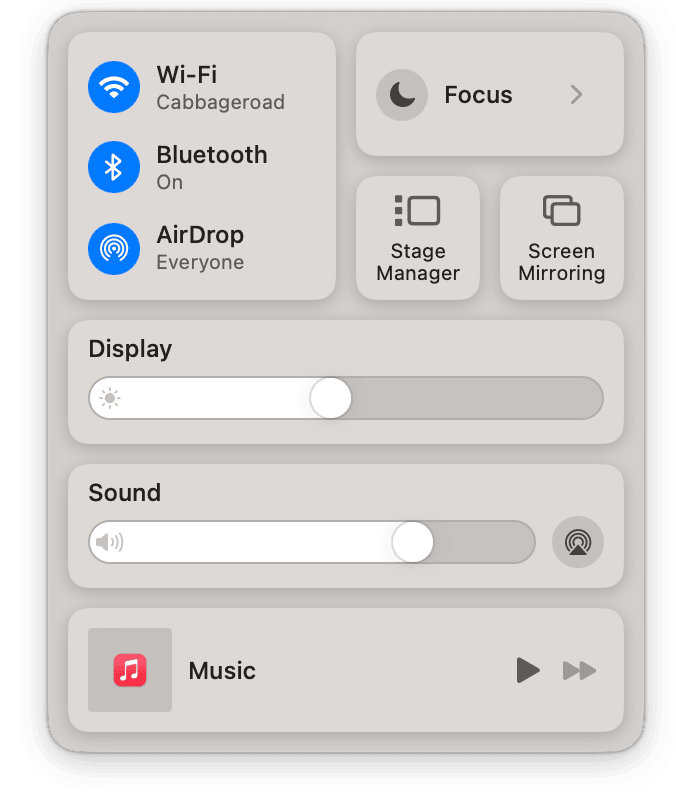
-
From the main menu bar, select the Control Center icon.
-
Ensure Focus is not enabled.
7. Is your Firewall too strict on your Mac?
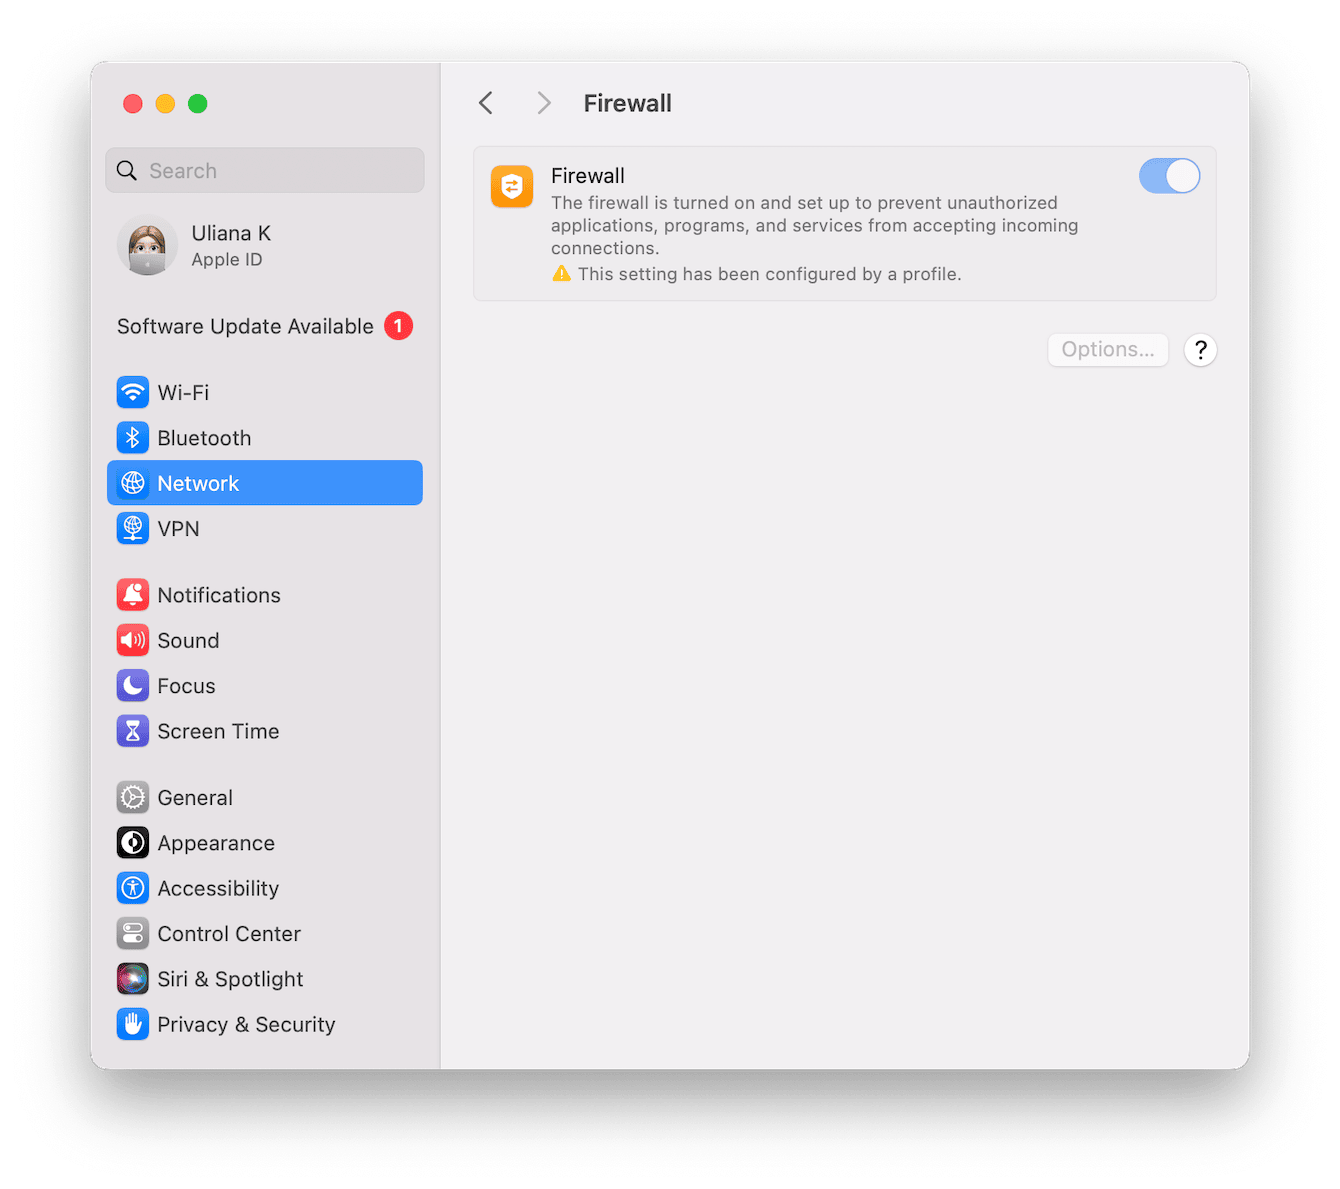
If you are attempting to send a file over AirDrop to a Mac, and it’s not showing up on your other device, it may be due to the Firewall on your Mac.
Here’s how to check and change your Mac’s firewall settings:
-
Click the Apple icon in the upper right corner.
-
Click ‘System Settings’ or ‘System Preferences,’ depending on which macOS version you are using.
-
Choose ‘Network’ or ‘Privacy & Security,’ depending on your macOS version.
-
Click ‘Options’ or click the padlock icon on older macOS versions.
-
Click ‘Firewall Options.’
-
Toggle off (or deselect the box) next to ‘Block all incoming connections’.
-
Toggle on (or select the box) next to ‘Automatically allow built-in software to receive incoming connections’.
-
Try sending a file over AirDrop to test your connection.
If you're still asking why my AirDrop is not working, then it's time to check these items off your troubleshooting list:
-
Move your devices closer together so they are in range.
-
Restart both your devices.
-
Turn off airplane mode.
Is space the reason your MacBook AirDrop is not working?
If your MacBook is running out of space, you won't be able to receive incoming files. Head to the next step to find out what to do.
Why can't I AirDrop to my Mac?
When AirDrop from iPhone to Mac is not working even after you've tried all the standard troubleshooting tips in this article, lack of space could be the culprit. If your recipient device doesn't have enough available storage to receive the incoming files, you might suffer from the following symptoms:
-
AirDrop stalls or gets stuck
-
AirDrop crashes or fails
-
Error messages
Here's how to check your available storage on your MacBook:

From the main Apple menu, select System Settings > General > Storage.
Here you'll see a total breakdown of your devices' available storage and what's taking up space. If you're running low, here are a few ideas to quickly reclaim space on your device to receive AirDrop files.
1. Clean your Desktop
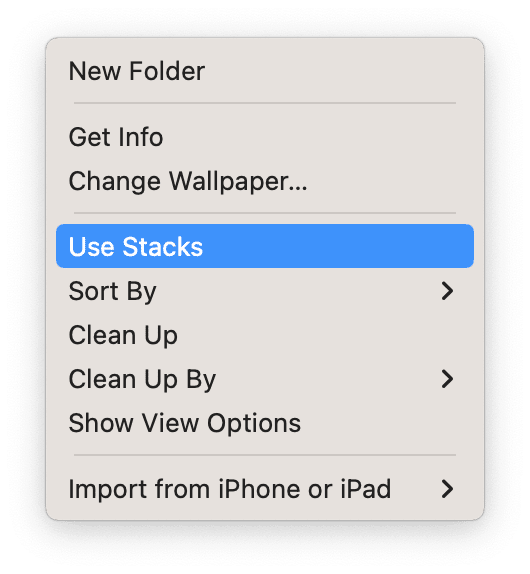
Our Desktops can quickly become dumping grounds for downloads, screenshots, and other unnecessary junk taking up valuable storage space on our Macs. If you use Stacks, it's alarming what can build up when we don't see it. Right-click on your Desktop and choose Use Stacks to reveal the contents of your Desktop. Take your time and sort through your items and remove files you no longer need to the Trash.
2. Delete large files
Another simple way to reclaim storage space is by removing large files from your device. You could spend hours searching forgotten corners of your Mac, or you could use the app I've already mentioned, CleanMyMac, to do the hard work for you. Its My Clutter feature is designed to perform an in-depth system scan and show your large & old files, duplicates, similar iamges, and long-forgotten items. You get a really insightful overview and the chance to mass select and remove clutter for instant space-saving. Here's how:

- Open the application and select My Clutter from the sidebar.
- Press Scan.
- Once complete, look through the categories, select items you no longer need, and click Remove.
3. Delete useless apps
Another quick way to free up space is to remove applications you no longer use. There are a couple of different ways to do this. Let's look.
Delete apps downloaded from the App Store
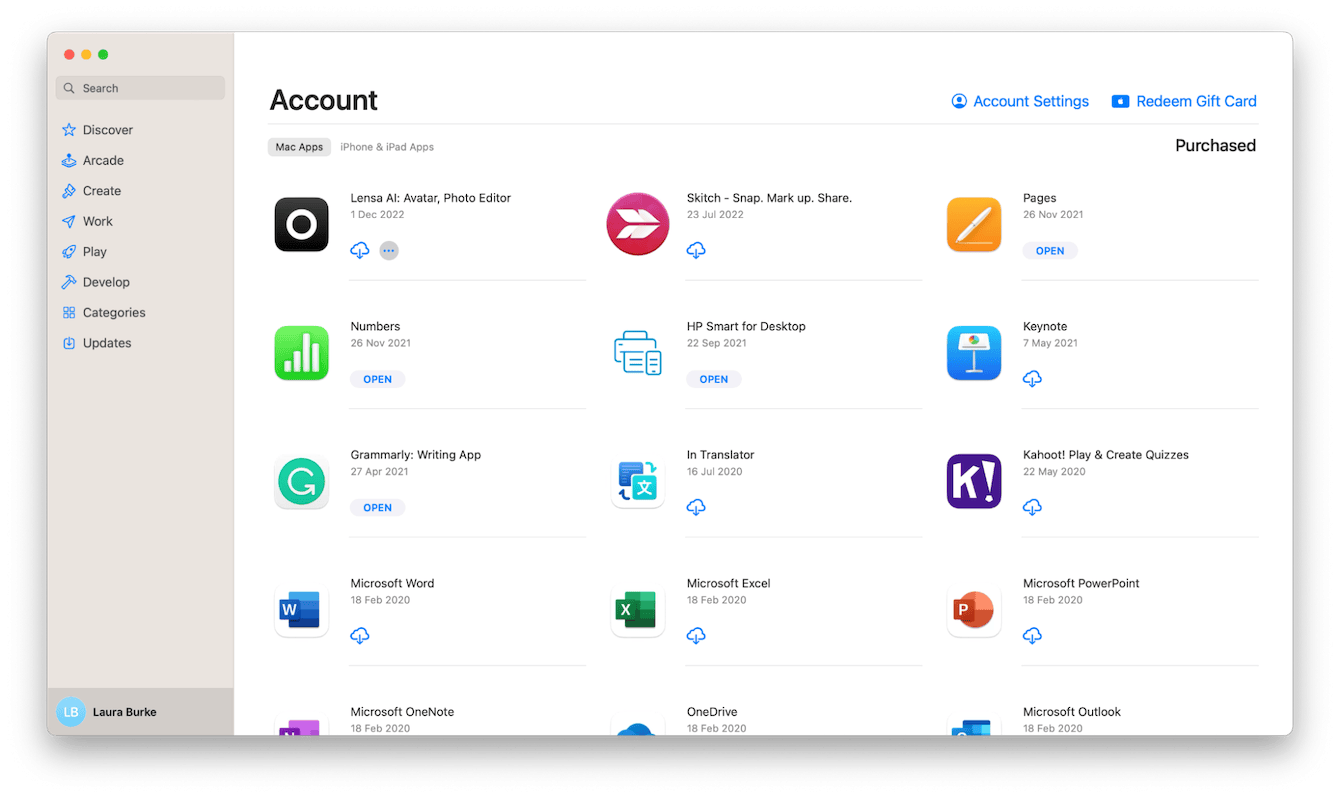
- Open up the App Store.
- Press your profile in the sidebar, bottom left.
- Press the three-dot menu and select Delete App next to any app you no longer want.
Delete apps using Finder
-
Open Finder, and from the sidebar, press Applications.
-
Drag any unwanted apps to your Trash.
-
Empty your Trash.
This method is popular, but it doesn't guarantee all app leftovers will be removed — they hang around on your Mac, consuming space. Here's how to get rid of all app traces:
- Open Finder, click Go from the top menu and hold the Option key.
- Choose Library.
- Type the name of the application you just removed in the search bar and press return.
- Now, select the Library folder to search in the correct location.
- Find all application files, drag them over into your Trash, and empty it when you're finished.
These tips will help you free up space, but if you need more help, check out this great article called nine easy ways to free up disk space on Mac.
So, now you’re no longer asking why is AirDrop not working! You know how to fix it and free up space on your Mac.

