Your guide to Apple M1 benchmarks
Swotting up on Apple M1 benchmarks is a great way to compare devices and specs before upgrading or buying a new machine. Benchmarking is also a great way of testing the performance of your existing Mac's graphics, memory and hard drive, amongst other things, to help you to identify system weaknesses and determine if an upgrade is even required.
But where to start? With all the forum talk and Youtube reviews, it's easy to get lost.
Well, look no further. I'll take a look at some of the latest M1 Macs performance benchmarks and show you how you can run your own benchmark tests and what you can do to optimize your device.
M1 Pro benchmark results
It wasn't that long ago, back in the summer of 2020, when Apple shocked fans by announcing they would stop using Intel processors and start transitioning towards their own in-house built and designed silicon chips.
Fast forward a few years, and the M1, M1 Pro, and M1 Max chips are some of the most robust and powerful chips created by Apple to date.
I like to use the Geekbench browser Mac benchmark charts to find out the latest Apple M1 benchmarks.
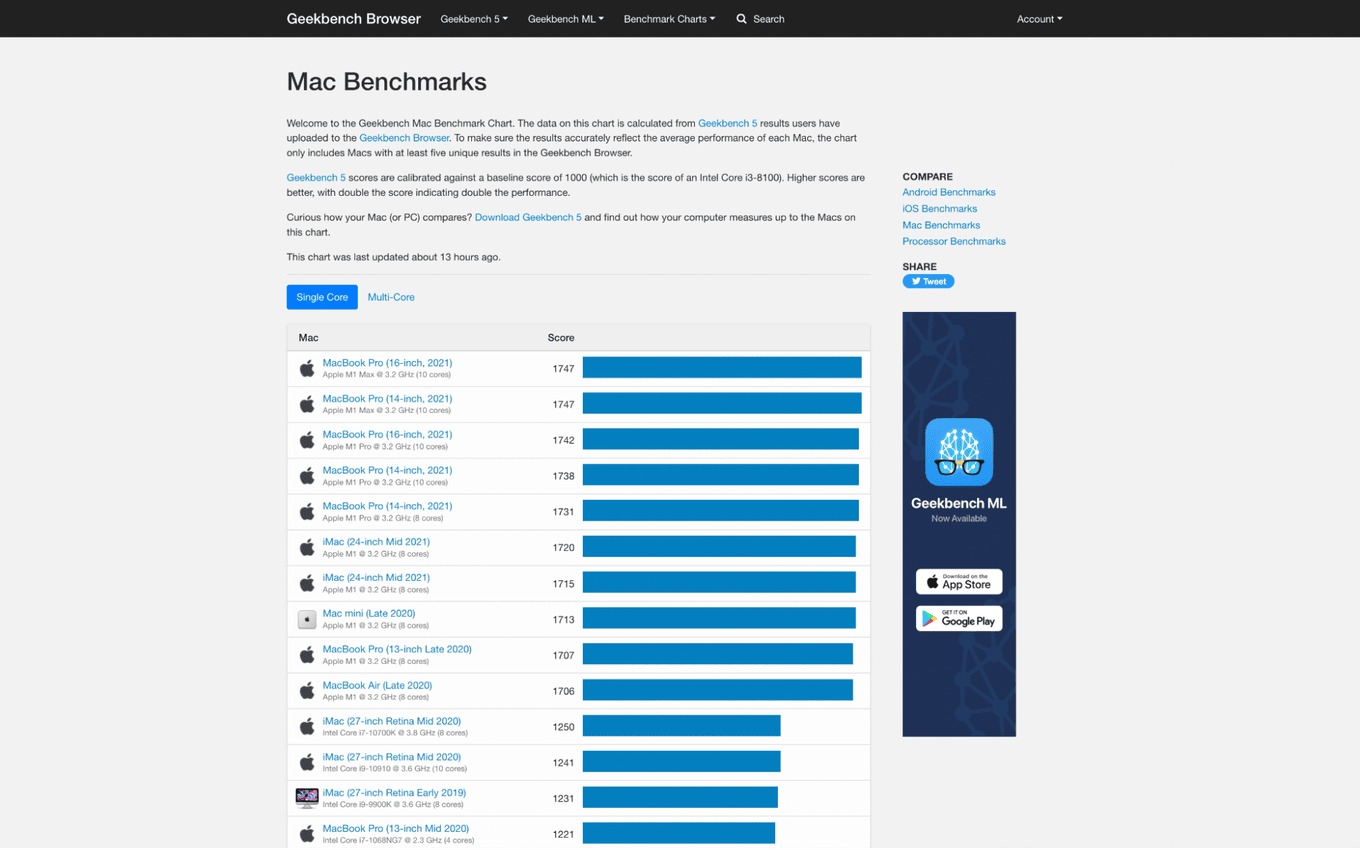
Geekbench is a processor benchmark program for multiple platforms, including macOS. To put it simply, they run a series of standardized tests and gather a performance score for your Macs processor.
Users can then upload their scores, giving data comparisons and performance benchmarks for identical devices. Their baseline score is 1000, so the higher the score, the better the processor performance.
Charts are updated daily; as users globally upload their data, let's look at some of the latest M1 Pro benchmarks:
-
MacBook Pro (16-inch, 2021) - Apple M1 Max 3.2 GHz (10 cores) - 1747
-
MacBook Pro (16-inch, 2021) - Apple M1 Pro 3.2 GHz (10 cores) - 1742
-
iMac (24-inch Mid 2021) - Apple M1 3.2 GHz (8 cores) - 1720
Apple has undoubtedly proved their M1s live up to expectations, but although benchmarking is super insightful, it won't actually speed your Mac up or increase performance. Jump to the next section, and I'll show you how do just that.
How to optimize your Mac’s performance
To increase your Mac's performance, you'll need a tool like CleanMyMac, the notarized Apple application that can tune up, up, and optimize your device in just a few clicks.
It has a powerful Maintenance module that can help you enhance efficiency and system output by improving drive performance, freeing up RAM, resolving numerous application errors, and running multiple scripts. Here's how to optimize your Mac:

-
Launch the app—download the free version here.
-
Select Maintenance from the sidebar.
-
Press View All Tasks and select the following: Free UP RAM, Free Up Purgeable Space, Run Maintenance Scripts, Repair Disk Permissions.
-
Finally, press Run.
What I like about this tool the most is it saves time and runs multiple tasks that would take me hours to do manually.
If you'd rather not use a third-party tool to optimize your device, here are a couple of manual tips to get you started.
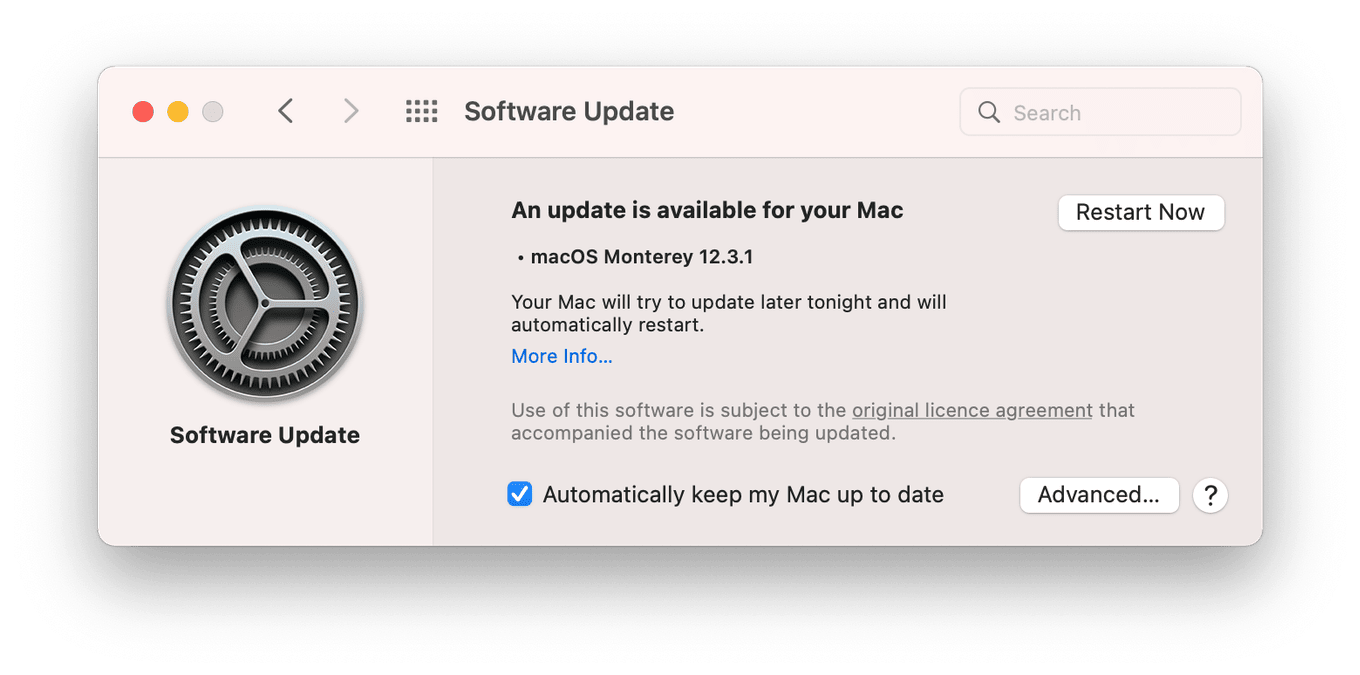
1. Update your Mac
Yes, it's obvious, but it needs to be said. Keeping your Mac updated will help you stay ahead in the optimization game and benefit from all the latest software improvements, fixes, and patches. Here’s how to check for updates:
-
Select the main Apple menu > About This Mac > Software Update.
-
If an update is available, follow the on-screen instructions.
2. Tidy your Desktop
If you use Stacks, it's easy to forget what's hidden away, consuming space in those neatly organized piles. Take a moment to check your Desktop and clean up any unnecessary files.
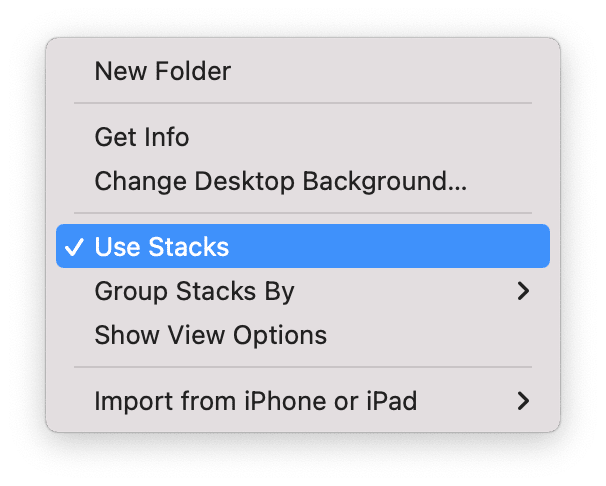
To enable Stacks, right-click anywhere on your Desktop and press Use Stacks.
3. Remove unused applications
Applications take up valuable space, so if you haven't used them for a while, consider removing them to give your Mac some extra breathing room; here's how:
-
Open Finder and select Applications.
-
Right-click any unwanted app and select Move To Trash.
-
Don't forget to empty your Trash afterward.
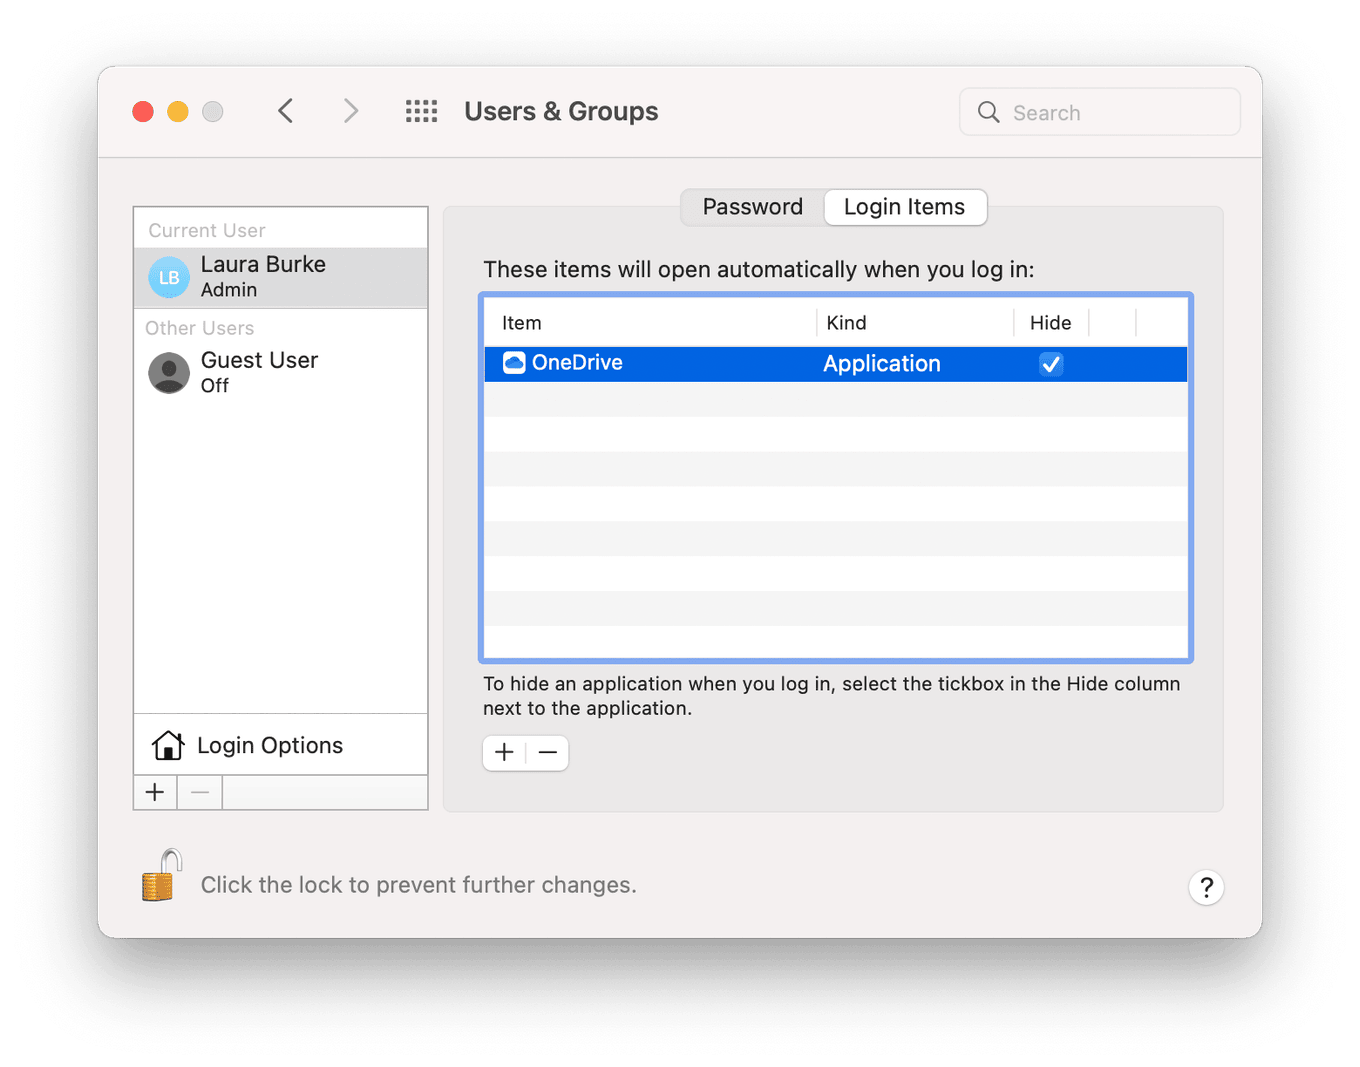
4. Reduce your startup items
Reducing your startup items is another simple way to keep your Mac optimized and running smoothly. Many items that launch when we startup our devices are not necessary. Here's how to disable those:
-
Select the main Apple menu > System Performance > Users & Groups.
-
Select Login items.
-
Now press the lock icon bottom left to make and save changes.
-
From the list, select any items you want to remove and press the minus button.
5. Clear your Downloads folder
Forgotten folders and duplicate files like to get cozy in your Downloads folder; it's a place that always gets cluttered. Take a moment to see what's hanging around in your Downloads folder and delete anything that's no longer needed.
6. Enable Apple's optimization tool
The built-in optimization tool from Apple provides some simple, basic storage optimization tools to increase your Mac's performance. Here’s how to find and enable them on your Mac:
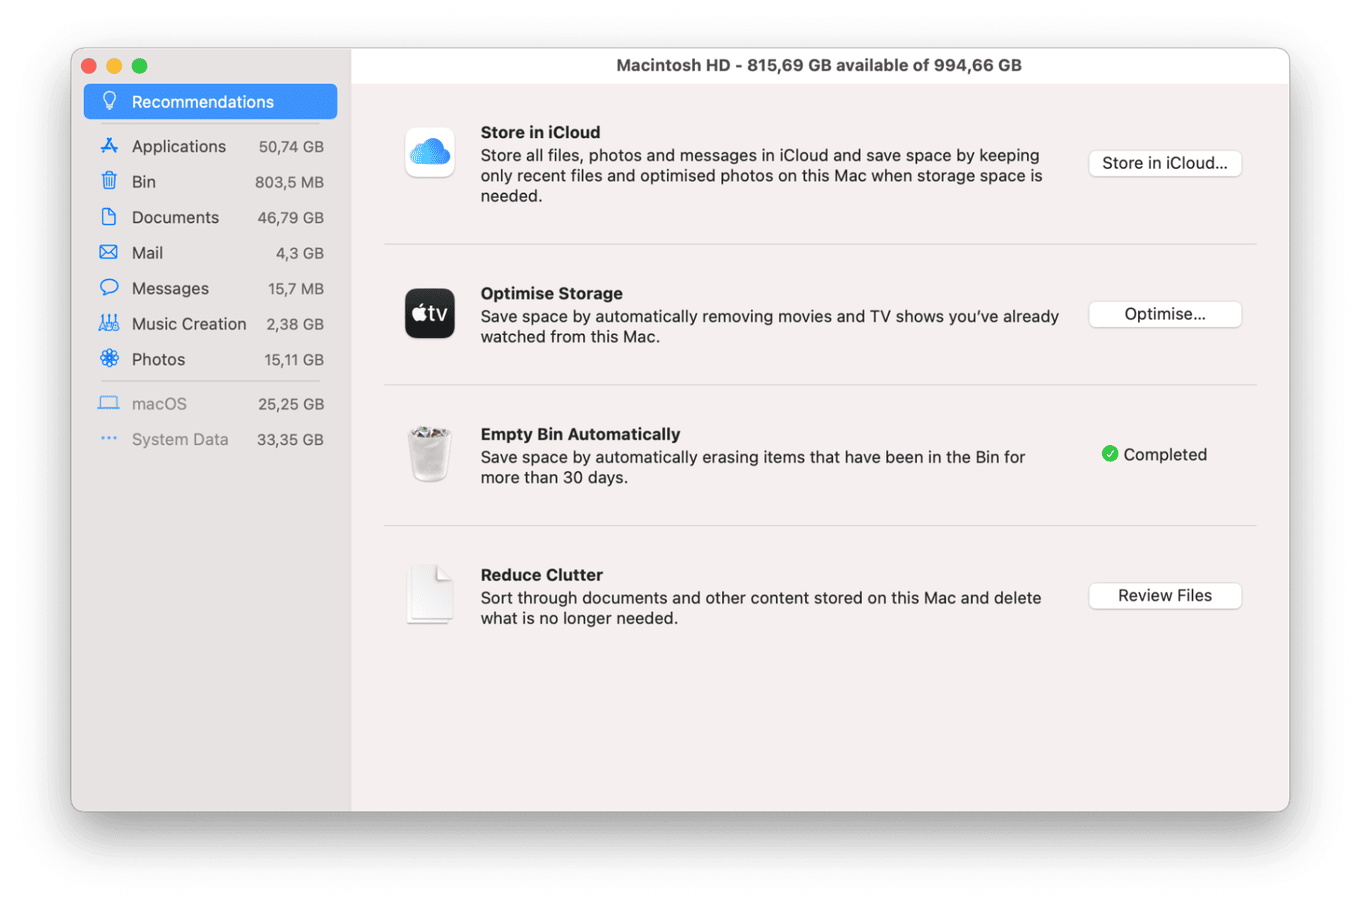
-
From the main Apple menu > About This Mac.
-
Select Storage > Mange.
-
Select Recommendations from the sidebar and follow the on-screen instructions to enable the optimization tools.
Now you've optimized your Mac; it's time for some benchmarking; jump to the next section.
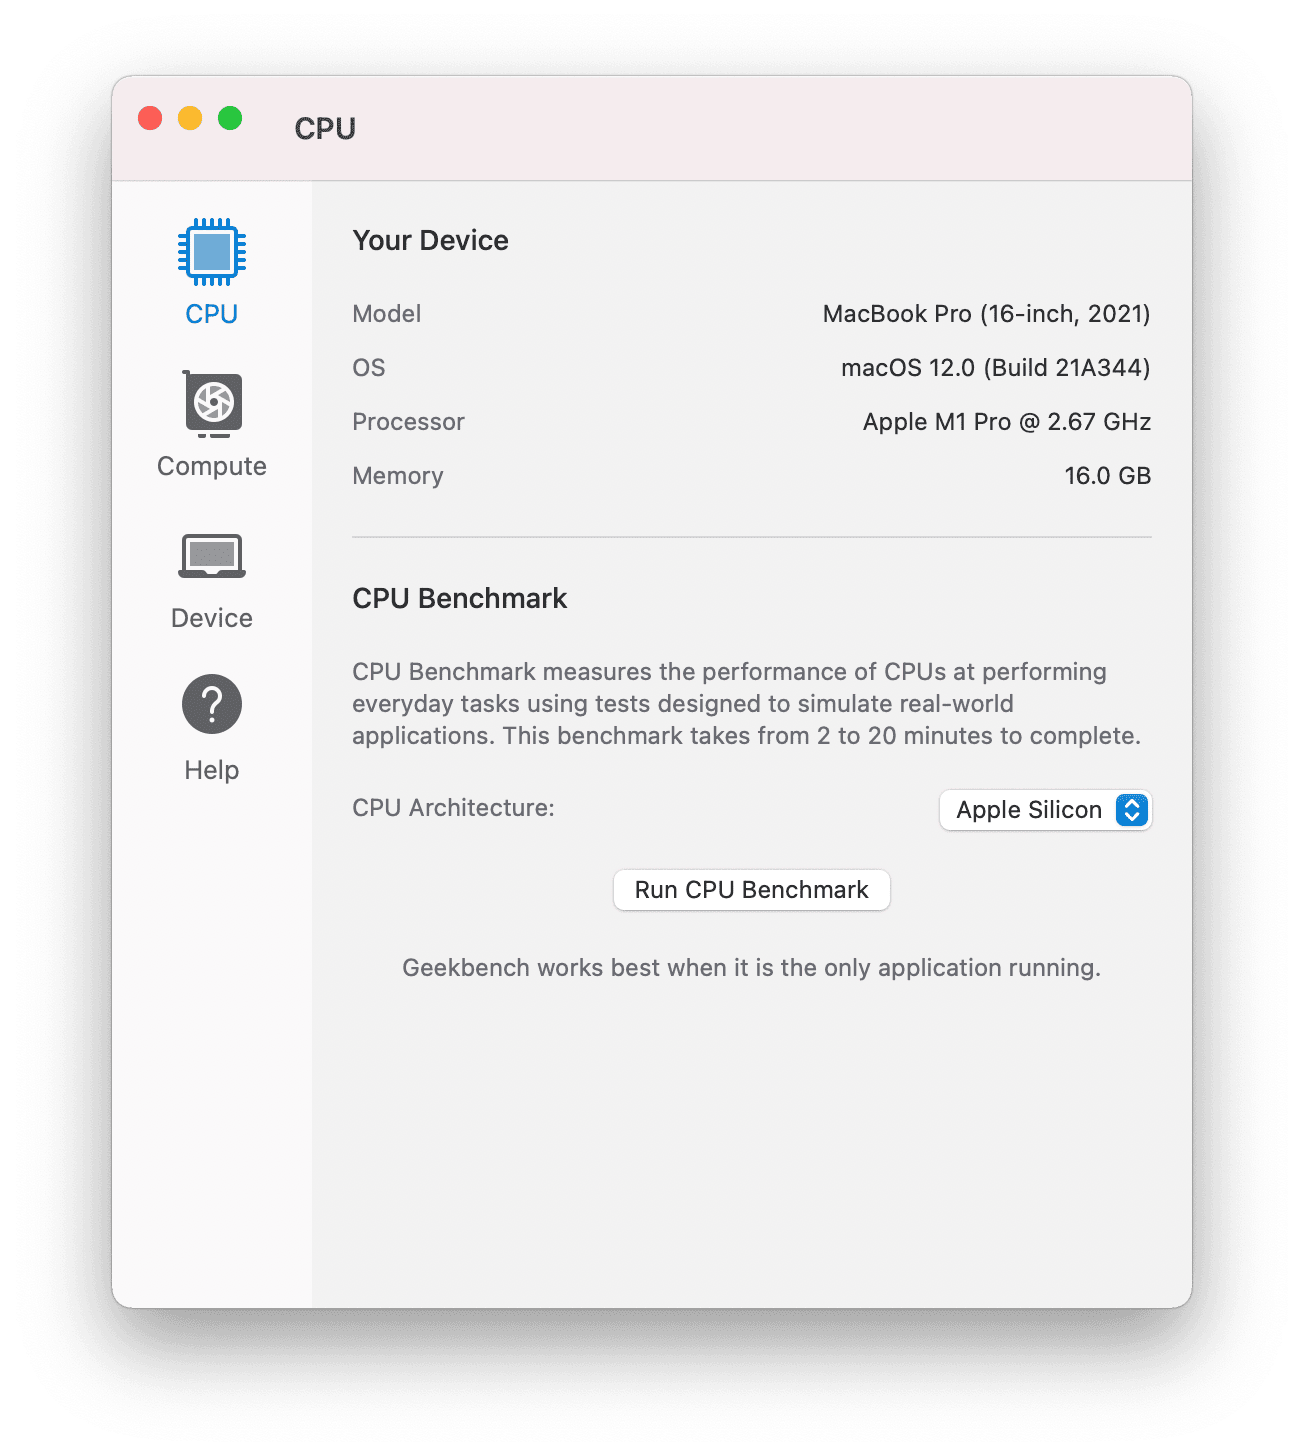
Take an M1 chip benchmark test
After seeing the Geekbench charts earlier in the article, if you're curious about your own Apple M1 Max benchmark, simply download their application, run the test, and check how well your Mac performs everyday tasks in comparison to other users, here's how:
-
Open the application and select CPU from the sidebar.
-
Click Run CPU Benchmark.
-
Once complete, your score will be uploaded to their browser.
Depending on your device, the test can take up to 20 minutes, so don't be alarmed if it takes a while.
So, we've come to an end. Now you know all about M1 Pro benchmarks and how to keep your Mac fully optimized.