Simple ways how to check storage on a Mac
Knowing how to check your Mac storage comes in handy when you want to know what's taking up valuable disk space or when you need to know how to manage a crowded drive.
If you've received the much-dreaded "your startup disk is almost full" warning message, or you're simply curious about managing your disk space, this article has everything you need.
It's well-documented that a Mac needs at least 10GB of free space to perform well — your Mac will start to slow down and feel sluggish if you're struggling for storage space. In general, the more available space your Mac has, the more its overall performance will improve.
Apple loves to give us choices, and there are plenty of ways to monitor your storage. I'll cover them all right here and throw in some simple tips on managing precious space with the help of CleanMyMac (a dedicated Mac cleaner) or manually. So, let's get started.
How to check Disk space on a Mac with Disk Utility
The Disk Utility application is an excellent resource for checking and monitoring your disk space. Here's how it works:
-
Open Finder > Applications > Utilities > Disk Utility.
-
From the left sidebar, select your drive.
-
From the graph, you'll be able to see exactly how much available space you have and how much is in use.

This gives you a great overview, but if you're looking for a more in-depth overview — like what exactly is consuming your space — head to the next tip.
Checking your storage is not the only thing you can do in Disk Utility; you can also manage your external storage devices, format drives, create disk images for backups, and combine multiple disks into one. It's a handy tool.
How to check Mac storage via "About This Mac"
For macOS Monterey and earlier, the "About This Mac" method for checking storage is straightforward — it lets you quickly access the storage graph showing which categories of files take up the most space. Here's what to do:
-
Select About This Mac from the main Apple menu.
-
Press Storage and wait for the graph to load.

If you just upgraded to macOS Ventura, using the "About This Mac" method to check your storage is slightly different now. Go to Apple menu > About This Mac > More Info > Storage Settings.
Or, instead, select System Settings > General > Storage from the main Apple menu.
Once the storage overview is open, you'll see a colorful breakdown of precisely what is consuming your available disk space on your Mac.

Unlike Disk Utility, this breakdown is much more in-depth. Hover your cursor over the different colors to see what they represent. All but one seem self-exploratory — System Data is frequently seen as the most mysterious part. Also labeled as other in older macOS versions, it includes temporary files and cache, disk images, extensions, plug-ins, and application leftovers.
This method is helpful if you're looking for ways to reclaim storage. For example, in the picture above, I can see that Documents consume the most space on my Mac. Meaning spring cleaning my saved Documents would be a great place to start in the battle for storage space.
How to check storage on a Mac Pro with Finder
Regardless of the macOS version, there is another simple way to view storage on a Mac using Finder and the Get Info tool.
-
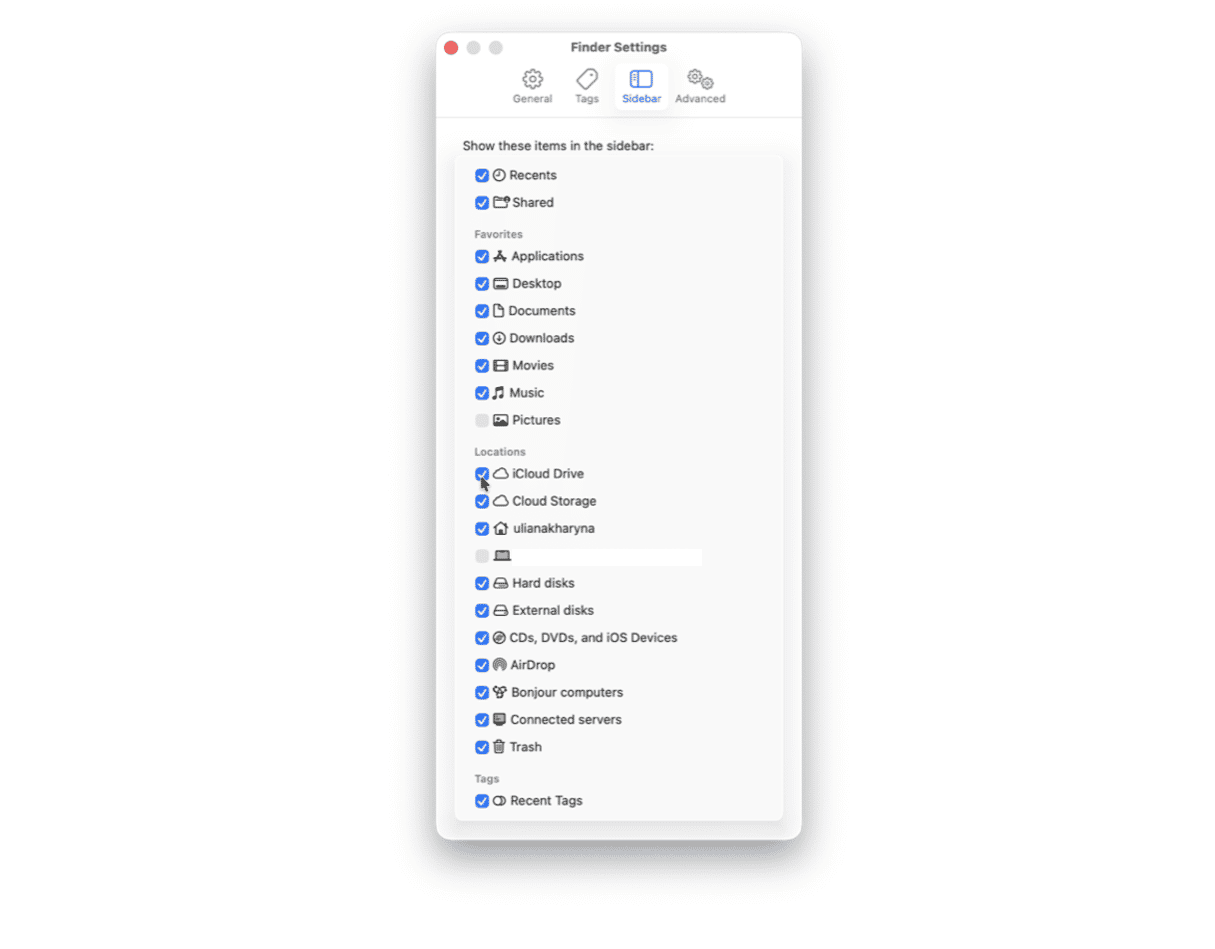
Open Finder, and from the top menu, select Finder > Settings.
-
Select Sidebar from the top and ensure Hard Disks are selected as visible.
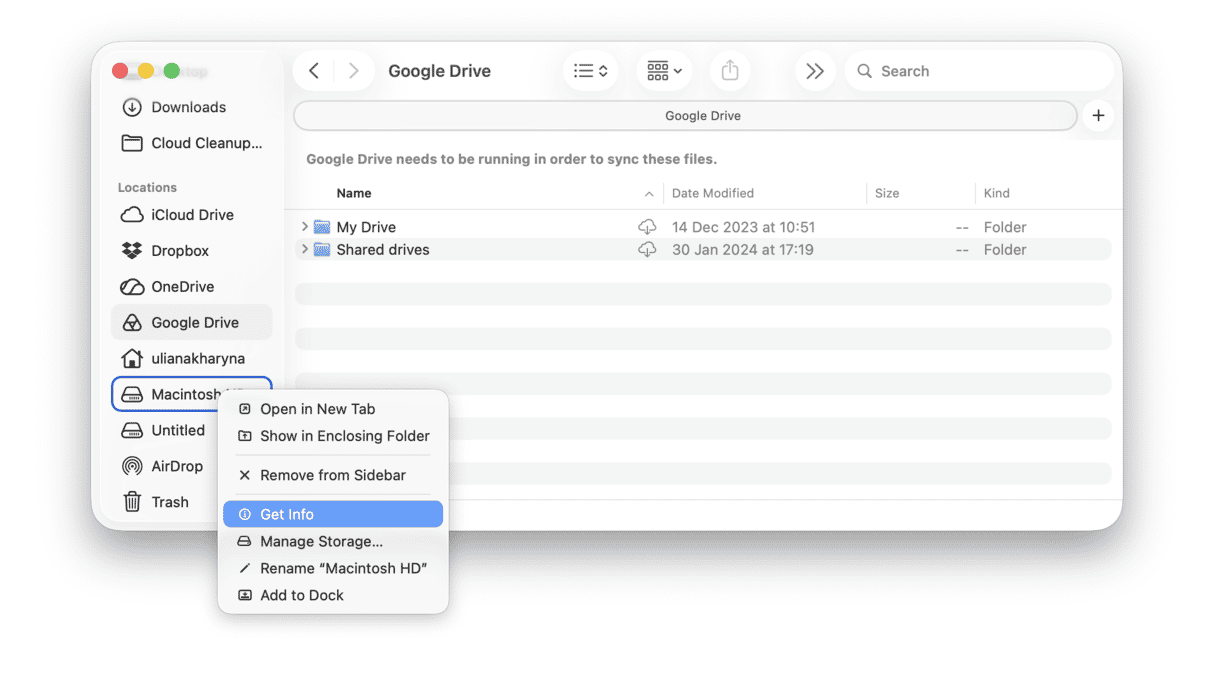
-
Exit the settings panel, and back in the main Finder window, right-click your Macintosh HD under Locations section in the sidebar and select Get Info.
-
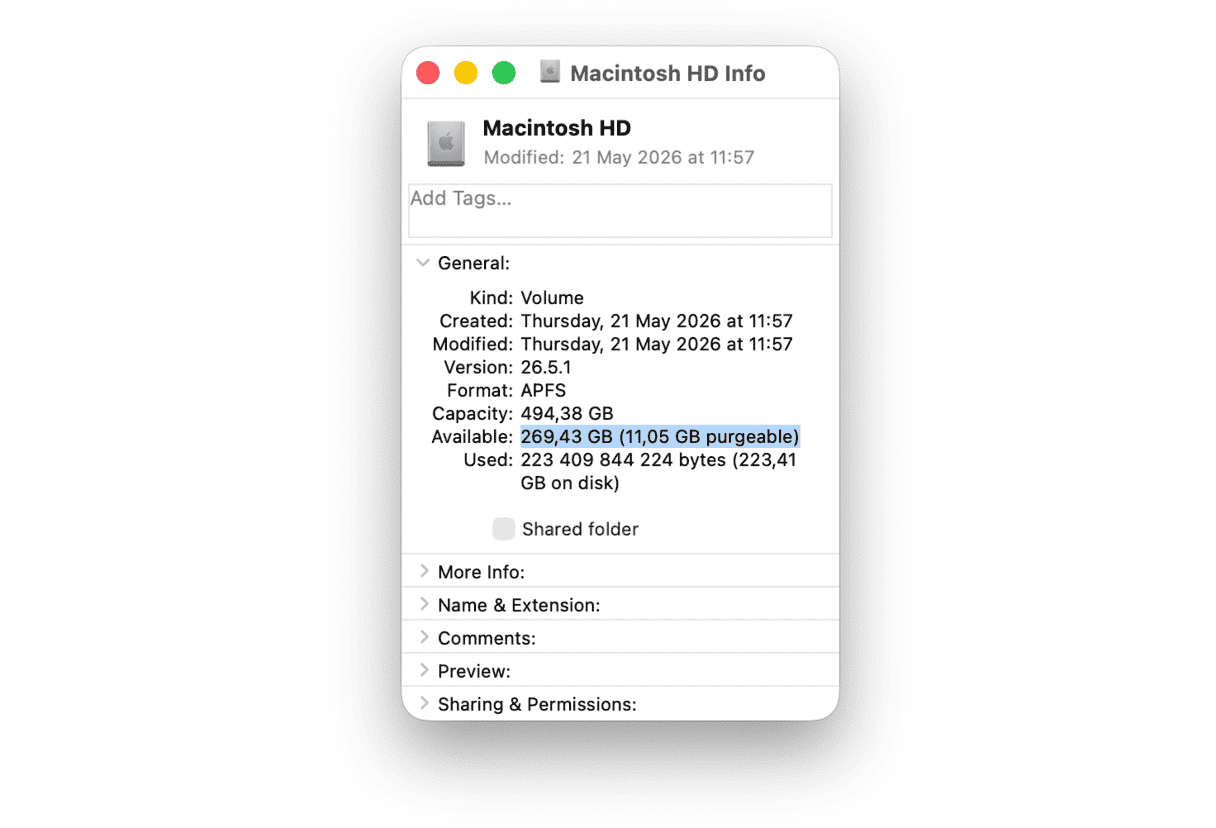
Under General, you can view your disk space information.


Well, that's three easy ways how to see what's taking up space on Mac.
How to manage storage on Mac
If your device is loaded with unnecessary files, barely used applications and programs, piles of forgotten cache, and system junk, your Mac will undoubtedly, over time, begin to show signs of slow performance, and so you will need to free up drive space. Thankfully, there's a lot you can do, from deleting junk files to clearing up the Downloads folder.
1. Use a Mac cleanup tool
By far, the easiest way to remove tons of built-up system junk is with a dedicated Mac cleanup tool. There are lots of options on the market, but my preferred app is CleanMyMac. Its Cleanup feature is easy-to-use, powerful, and quick, freeing up valuable drive space and optimizing your Mac.
Locating gigabytes of system junk, like cache, broken and temporary files, useless language files, and system log files, that to reach manually would be next to impossible. This tool packs a punch, removing it all in one fell swoop. Another reason to rate this tool is that it's also notarized by Apple, meaning it is absolutely safe to use, as long as you download it from the official website or the App Store. If you haven't tried it yet, you can test it for 7 days — get your free trial here.
The easy way to free up space:
- Open the application, and from the left sidebar, select Cleanup.
- Click Scan. Once the scan is complete, press Clean.

The benefits of using CleanMyMac
- Based on internal reports, on average, users find and remove 9 GB of safe-to-delete junk files: logs, caches, temp files, etc.
- Comes with 25+ other tools that help you keep your Mac clutter-free: you can uninstall apps with a click, delete duplicates and similar images, and remove large and old files
- Trusted by users in 150+ countries
Try CleanMyMac for free — see how many gigabytes of space you can reclaim within minutes.
2. Apple's Optimize Storage feature
If you'd rather not use a third-party tool to manage your Mac's storage, no problem; you can use the storage optimization tool from Apple and free up some space easily. Our Macs come with native storage management recommendations when enabled. They can help to optimize your Mac's storage. Here's how:
-
Select System Settings from your main Apple menu.
-
Press General > Storage.
-
Below the storage overview, you'll see the Recommendations section.
-
You can optimize your storage by enabling various options.
Let's take a look at what all the options mean.
- Store in iCloud: Store your messages, files, videos, and photos in your iCloud Drive to save space on your Mac.
- Optimize Storage: Automatically remove Apple TV movies and shows that you've already watched, and only keep recently received email attachments on your device to save space.
- Empty Bin Automatically: Automatically erase items located in your Trash bin for more than 30 days.
3. Clear up your Downloads folder
Another really simple way to manage your Mac's storage is to clear your Downloads folder regularly. Left unchecked, this can become a hotspot for forgotten ZIP archives, unnecessary DMG files, and more. Here's how:
-
Open Finder and press Downloads from the sidebar.
-
Sort through your files and folders (we suggest filtering by size so that you can spot the largest files first) and remove unneeded items to your Trash or Bin.
-
Empty your Trash or Bin once finished.

Alarmed by what you found here? Large, old, and forgotten files can hide in many locations on your Mac, taking up space and weighing your Mac's performance down. Finding them manually can take a lot of work.
But you could use the My Clutter feature from CleanMyMac, the app I mentioned in tip one, to locate and sort through all the folders on your Mac. This clever tool simplifies reviewing files — one of the most challenging cleanup tasks.
No scouring the depths of your device — this feature enables you to see everything in one place. By grouping together all your folders by last accessed date, kind, and size, you get an instant overview of the items hogging priceless storage space on your Mac for instant removal. And it also finds duplicates and similar images.
Here's how to review your files with ease:
- Launch the application and from the sidebar, locate My Clutter.
- Click Scan > Review All Files.
- Once complete, work your way through the categories, selecting items you no longer want to keep, and finally, press Remove.

4. Delete unused apps
Do you really use every single app downloaded on your Mac? If the answer is no, a quick way to save space and boost performance is to remove unused applications. There are a few different ways to do this.
Apps downloaded from the App Store
-
Open the App Store.
-
Select your profile bottom left in the sidebar.
-
Next to any app you want to remove, press the three-dot menu and select Delete App.

Remove apps using Finder
- Launch Finder and press Applications from the sidebar.
- Drag any unwanted applications to your Trash or Bin.
- Empty your Trash once finished.

Although this method removes the application, it doesn't ensure all application files and leftovers will be removed; they can still hang around on your Mac, taking up space. Here's how to remove them:
- Open Finder, press Go from the top menu, and hold down the Option key simultaneously.
- Now, press Library.
- Enter the name of the app you removed in the search bar, press Return, and select the Library folder, so the search happens in the correct location.
- Now, find all the related application files and drag them to your Trash, emptying it once you're finished.
5. External or Cloud Storage
My final tip for managing your Mac storage is to consider using an external storage device or investing in Cloud storage. You can use both methods to house videos, photos, files, and folders, which would relieve your Mac of pressure, freeing up space and improving its performance.
For cloud storage, there are some great options out there, such as Dropbox, OneDrive, and Google. For external devices, the sky is your limit, be sure you check reviews.
If you choose cloud storage, make sure it is clutter-free. Once again, CleanMyMac is here to help. It comes with the Cloud Cleanup feature that lets you scan your connected cloud account for large files and remove or unsync them. If you use it regularly, you will be able to stay on the minimum plan without having to upgrade, thus avoiding unnecessary spendings.

We might have reached the end, but now you know how to see how much storage on Mac is available and how to expertly manage it.
If nothing helped, check this guide on how to free up space on Mac.