How to clean MacBook hard drive: 7 top tips
Nearly full hard drives perform 17% slower — that’s calculated by MacWorld in a test. When you first start up a new Mac, it’s clean, free from junk files, and runs smoothly. However, over time, as you surf the web and install applications, that begins to change. Your Mac accumulates more files — some temporary, some not so temporary — and slowly, they take up valuable space and start to impact the performance of your computer. In this article, we’ll tell you what these files are and, more importantly, how to clean up your Mac’s hard drive so it runs smoothly again.
Why clean your Mac’s hard drive?
The most obvious reason is that you’re running out of space on your boot disk. And while there are many things you can do to free up disk space, including using Apple’s own storage management tools, it’s a good idea to start by getting rid of the junk that’s accumulated and that you don’t need. That way, not only will you free up space, but you will also give your Mac a boost and help it run more smoothly.
But what files can be deleted safely? These are application libraries, preferences files, launch agents, temporary cache files, log files, and browser cache, history, and cookies. All these files take up space and could slow down your Mac. Follow the steps below to get rid of them.
1. Use automated junk detector
There are a number of things you can do by yourself to clean up files on your Mac’s main disk. However, we’ve found that the quickest and easiest way is to use a tool designed specifically for the purpose. There are several available, but we use CleanMyMac because it has a ton of great features and it’s notarized by Apple. Here’s how to use its System Junk tool to get rid of junk files.
Here you can start your free 7-day trial.
- Open CleanMyMac.
- Choose Cleanup from the sidebar.
- Click Scan > Review All Junk > System Junk.
Now you can review what it’s found. To get rid of it, just click Clean Up.
Here is what we were able to find on our Mac:
That’s more than 16 gigs of very odd technical files that are almost impossible to dig out by yourself.
Tip: CleanMyMac can also identify and remove malware, which will also help keep your Mac’s drive clean.
You can also use CleanMyMac Assistant to get instant advice for all your cleanup needs. This AI-powered helper offers easy-to-follow support for removing junk files, freeing up space, and keeping your Mac clean and fast.
2. Use Apple’s storage management tools
Apple has realized in recent versions of macOS that users who swap a computer with a 1TB hard drive for 128GB or 256GB SSD are going to have issues with storage. And to that end, they have created a storage management tool that recommends ways in which you can save space and provides options for discovering what’s taking up space and helping you do something about it.
Here’s how to access and use it:
-
Click on the Apple menu and go to System Settings.
-
Select General > Storage and check Recommendations under the colored bar: Store in iCloud, Optimize Storage, or Empty Trash automatically.
-
Under Recommendations, read through the list and turn on any that is relevant to you.
-
Now, check the categories of files under Recommendations. Click i next to each of them to reveal more details.
-
If you see any files you don’t need, click Delete.

Tip: Don’t forget to empty your Trash after you’ve deleted some files.
3. Uninstall applications
Some apps come with their own uninstallers, and where that’s the case, the best way to uninstall them is to use that. However, most applications don’t have such a neat solution. And many of us still think that simply dragging an app’s icon to the Trash will uninstall it. It won’t. Instead, it will leave tens, or even hundreds of files scattered in various folders on your drive, taking up space and possibly causing conflicts later on.
The best way to get rid of applications that don’t have their own uninstaller is to use a general uninstaller, like CleanMyMac. It’s not the only uninstaller around, but it’s the one we prefer to use because it’s quick, easy to use, and has lots of other functions, too.
Luckily, if you’ve already started your CleanMyMac trial (see above), it’s easy to uninstall all apps and their remainders completely.
-
Open CleanMyMac — start your free trial here (Apple-notarized version).
-
Select Applications in the sidebar > Scan.
-
Choose Manage My Applications > Uninstaller.
-
Locate the app you want to uninstall in CleanMyMac’s main window (Tip, you can narrow down your search by clicking on the name of a developer in the middle window or category).
-
Select the box next to the app or apps you want to uninstall (you can uninstall multiple apps simultaneously) and click Uninstall.

If you are in the mood for some manual removal, open a new Finder window and click Go (in the top menu). Then select Applications. Once again, you can drag your unwanted apps to the Trash. That’s good, but it leaves behind leftovers, as many Mac users know. To remove them, browse the Library folder. Learn more on how to do it in this article.
4. Remove user account you don’t need
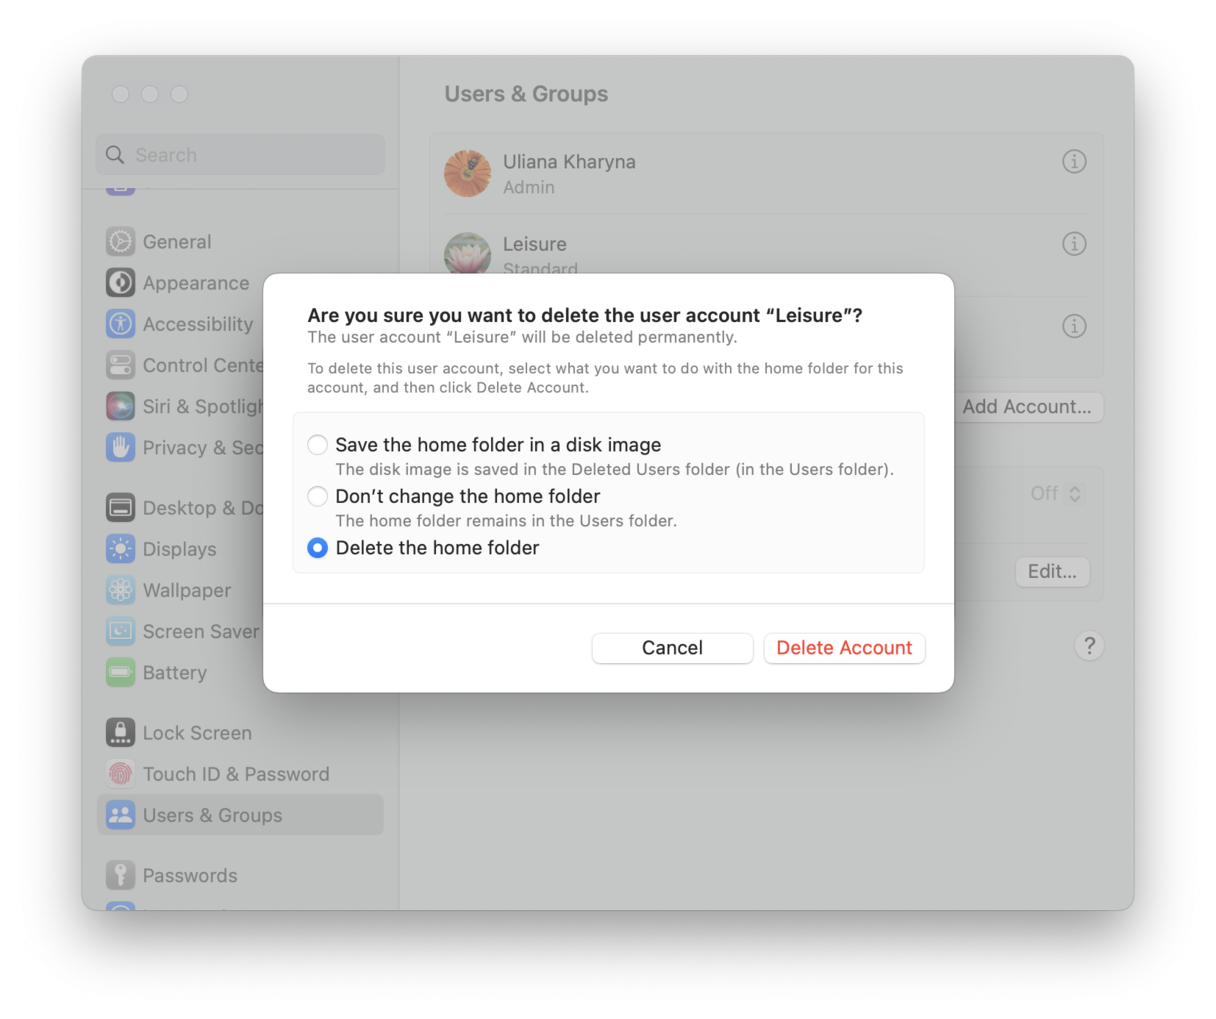
If you’ve had your Mac for a few years, you may have set up multiple user accounts. Perhaps a friend or family member also used the Mac, or maybe you set up one user account for work and one for leisure. Whatever the reason, if there are user accounts on your Mac that you no longer need, getting rid of them will help clean up your Mac’s hard drive.
-
Click on the Apple menu and go to System Settings.
-
Select Users & Groups.
-
Next to the account you no longer need, click the i icon.
-
Select Delete Account.
-
Choose Delete the home folder to get rid of it and free up space. Or Save the home folder as a disk image to keep it. Remember to copy the disk image to another location on an external disk and delete it from your boot drive afterward.
-
Click Delete Account.

The user account and all the files in the home folder of that account will now be deleted – unless you chose to keep the home folder. The great thing about this tip is that each user account contains much more data than you may realise, since each has its own Library folder with possibly thousands of files in it.
5. Delete old iOS backups
While in the Storage pane of System Settings and checking Recommendations, pay close attention to the category named iOS files. If you use your Mac to back up your iPhone, you will find all backups under this category. Click the i icon and check whether there are several of them. Select the backup you are ready to remove and click Delete. Usually, it is safe to keep only the latest one.
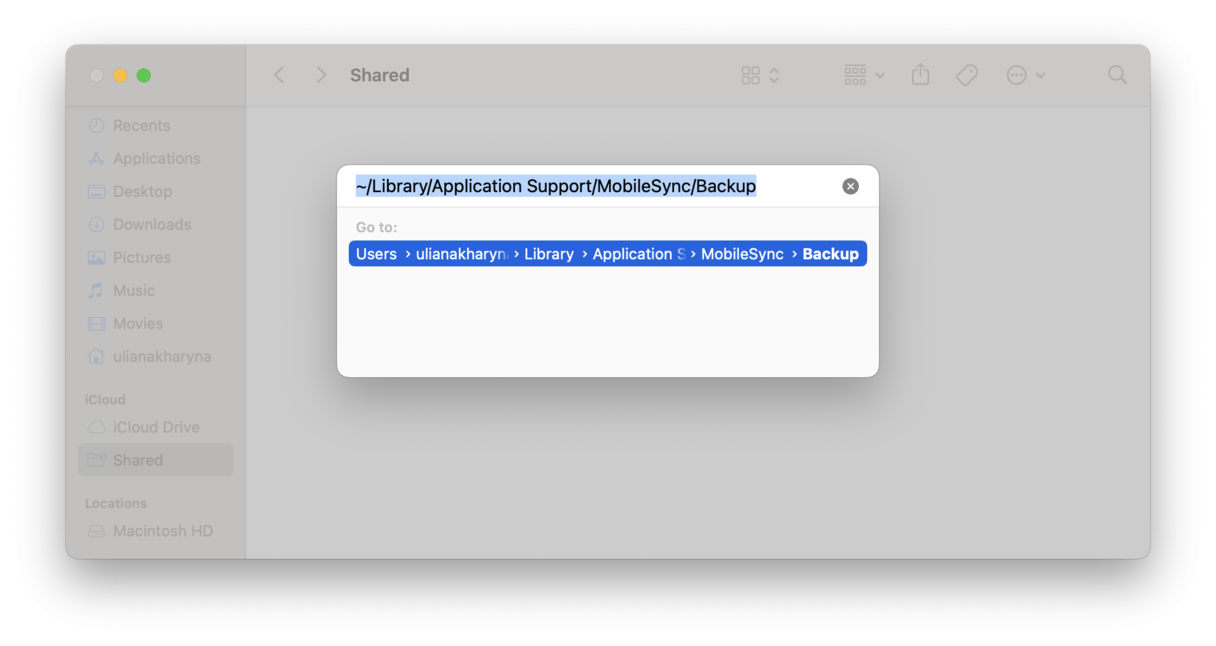
Alternatively, use the Finder:
- Open a new Finder window.
- From the menu bar, click Go > Go to Folder.
- Paste the following path in the window that opens: ~/Library/Application Support/MobileSync/Backup/
- Delete the unneeded backups.

6. Move photos to external storage
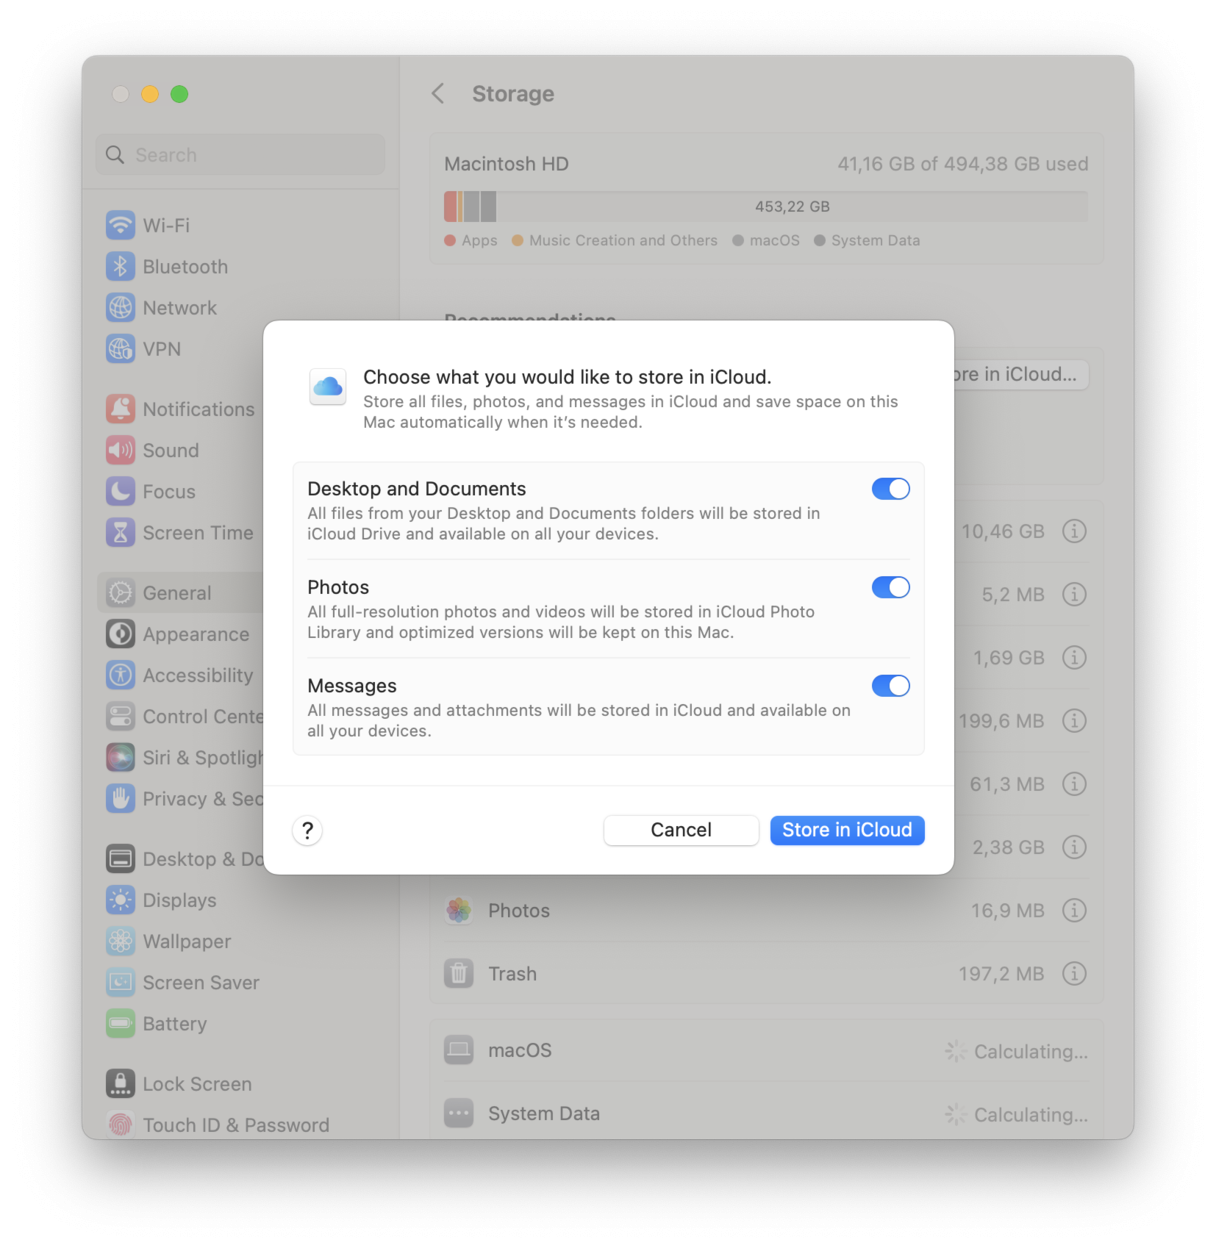
Another step to free up space on hard drive is to audit your media files. Pay specific attention to photos. We understand that not every Mac user is ready to delete them once and for all. These are precious memories, right? For this reason, we recommend moving photos to external storage. You can use an external drive or, as an alternative, any cloud storage. For example, iCloud may be a viable option, and here’s how to use it:
- From the main Apple menu, open System Settings.
- Navigate to General > Storage.
- Make sure that Store in iCloud option is turned on.

This way, you will store full-version photos in cloud storage, and optimized versions will be kept on your Mac. They occupy significantly less space. If it does not work for you, simply transfer your photos to an external drive and remove them from Mac completely. This way, you can always copy them back whenever needed.
7. Compress and archive data
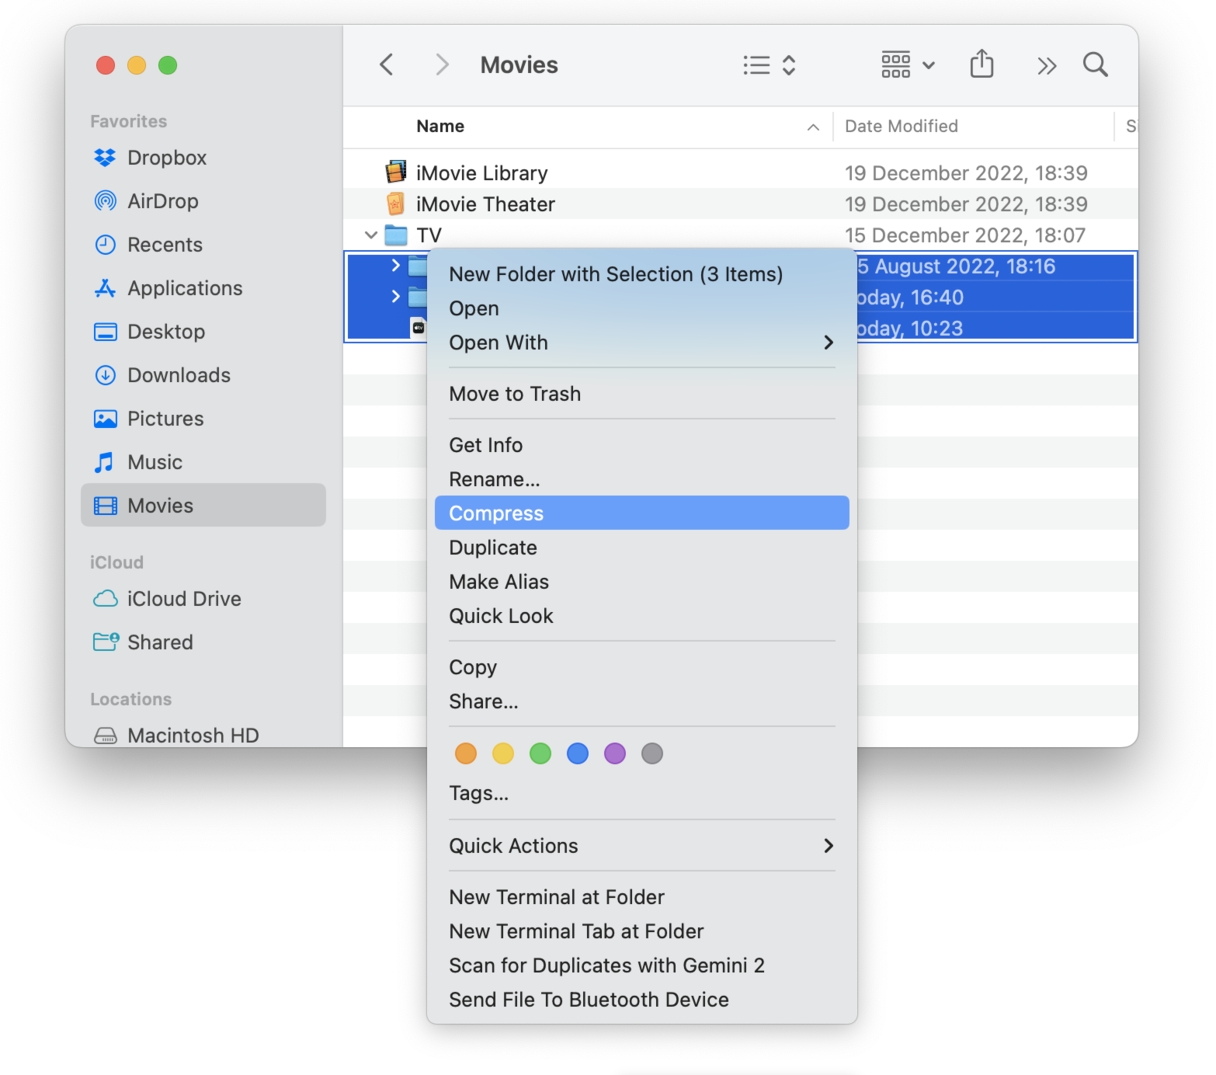
If you do not want to invest in external drive or cloud storage, there is a free and easily available alternative — compressing and archiving data. It is also a great way to avoid permanent deletion of files you rarely access, and it can help save up to 10 percent of the total space occupied. Note, though, that it is more effective with documents, while movies and other media files are harder to compress.
To archive data, follow these steps:
- Open the Finder and go to Documents.
- Command-click a folder or folders you want to compress.
- Select Compress.

Note that compression does not affect original files, meaning that you will have to delete them after creating an archive.
Your Mac’s hard drive can become cluttered with files once you’ve been using it for a while, and, as well as taking up space, these files can slow down your Mac and cause performance issues. Fortunately, it’s easy to clean up your Mac by following the steps above. And it’s even easier if you use CleanMyMac to help.

