How to format external hard drive for Mac
These days, storage is a premium, and knowing how to format an external hard drive for your Mac can come in handy if you're getting ready to transfer files to save space on your computer.
Surprising to lots of Apple users, many external hard drives are built with Windows environments because Windows still maintains the computer operating system market monopoly.
Many Apple users worry that reformatting an external storage device is complicated, but it's actually quite simple.
So if you have purchased a generic incompatible external device, this helpful article will walk you through the steps needed to format it for Mac using Disk Utility. Let's get started.
Format hard drive for Mac: Which file formats are compatible?
In this article, we'll show you how to use Apple's native tool, Disk Utility, to format an external hard drive correctly. This is vital for proper and safe file storage and sharing.
Disk Utility supports many formats; let's understand which file formats are macOS compatible:
-
APFS (Apple File System) — format for macOS 10.13 and later.
-
MS-DOS (FAT) and ExFAT — works for file systems compatible with Windows.
-
Mac OS Extended — best suitable for macOS 10.12 or earlier.
Ultimately, if you own a newer model MacBook, APFS is the best option for formatting a hard drive for Mac. The only logic to choose Mac OS Extended is if you're running a pre-Sierra macOS.
For more detailed information on these formats, Apple has a helpful support article here.
Alternate options: how to format a hard drive for Mac
If your external hard drive is full, and that's the reason you're looking to erase or reformat it, there's another more straightforward option — cleaning up some valuable space.
That's right; perhaps an external hard drive spring clean is all you need instead of committing to the whole external hard drive formatting process.
Sorting through files might seem like a mountain of work to some, but it couldn't be easier with the new Connected Devices Monitor from CleanMyMac.
This newly released monitor gives users full-status updates for all devices connected to their Macs, including external drives, iOS, and Bluetooth devices.
It also provides valuable information on the external device's available disk space and support for removing device junk.
Here's how to spring-clean your external hard drive:

- If you don't already have the app first, get the free version download here.
- Select the application icon from within your top toolbar — it is a small iMac icon.
- Select Connected Devices to see more options.
- Under External Devices, locate your external storage device to see how much space it has and how much junk it has; hover over the junk indication to clean up your clutter.
- Click organize to launch the Space Lens module within the main app; follow the simple instructions to visually compare your files.
If you're still curious about how to format external hard drive for Mac, head to the next section.
How to format an external drive for Mac
Before you erase or format an external hard drive, back up any files or folders currently contained on it that you might want later. Once you format a disk, you will not be able to recover any previously stored data.
Running a Time Machine backup on your Mac is also recommended, just in case something goes wrong. Here's how to run it:

-
Connect your external backup storage device.
-
Click the main Apple menu and go to System Settings > General > Time Machine.
-
Click Add Backup Disk and select your storage device from the list.
-
Click Set Up Disk and follow the on-screen instructions.
Now, you're ready to reformat an external hard drive on a Mac.
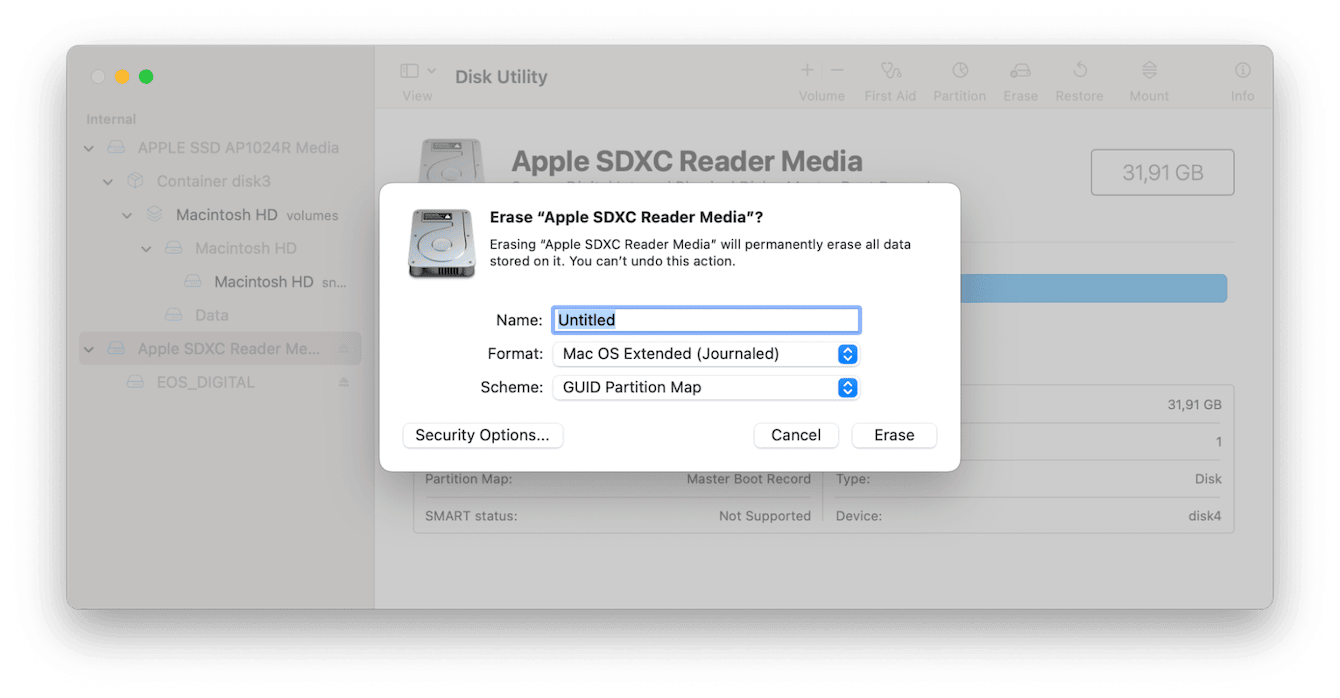
Plug in the external hard drive you want to format on your MacBook and then follow the below steps:
-
Open Disk Utility from Finder > Applications > Utilities.
-
Now, find and select your external device in the left sidebar.
-
From the top bar, click Erase.
-
In the next window, complete the following:
- Name your device.
- Select the desired format from the dropdown based on the version of the macOS you currently have and the tips we provided above (tip: for macOS newer than Sierra, choose APFS).
- Select GUID Partition Map from the Scheme dropdown. -
Click Erase.

The hard drive will now be erased entirely and reformatted. Don't be too alarmed if it takes a while; make sure you stay patient and don't unplug the hard drive until you see the "Erase process is complete" message. Then you can click Done to finish the process.
Now, your newly formatted drive is ready to use. How easy was that!
Troubleshooting: Mac format external hard drive
Occasionally, users run into issues when reformatting external drives; here are a few tips.
Can't find my external drive in Disk Utility
If you can't locate your external storage device in Disk Utility, try the following tips:
-
Try using a different cable.
-
Completely Shut your Mac down and remove all connected peripherals.
-
Try to format your hard drive again in Disk Utility.
"Erase process has failed" error message
Occasionally, users run into trouble when reformatting a disk and find that the process doesn't work, forcing the process failed error message to appear. This frustrating problem requires further troubleshooting; you can read Apple's guide on repairing a Mac disk here.
What hard drive format will work best on both Mac and PC?
These formats will be compatible with both Mac and PC: FAT, FAT32, and exFAT.
So, as you can clearly see from the tips in this article, reformatting external hard drive on Mac is pretty straightforward.
Don't forget to run that Time Machine backup before you get started; there's truly nothing worse than unrecoverable lost data, so don't take the risk.
We'll see you next time for more great Mac tips!

