How to get extra storage on your Mac
Knowing how to get more storage on your Mac is vital for any MacBook user. No matter which model you own, your Mac will start to encounter issues if you run out of storage. It starts with slow performance and often ends up in a completely unusable Mac. The good news is, it's always possible to add a little storage space with your own hands.
How much storage is enough in 2021? The answer is, it’s never enough.
Upgrading your Mac storage: Things to consider
When you purchase a new MacBook, you have multiple options for storage capacity. The more you opt for, the more expensive it becomes, this is usually the reason people opt for lower capacity. But remember, high storage is almost an investment when it comes to your Mac.
If you can afford it, it's always wise to opt for a storage upgrade; this will help to keep your Mac optimized and running smoothly in the long run.
If the price is a sticking point, there are at-home ways to add more storage, let's take a look at your options.
How to add extra storage to MacBook Pro
There are a few ways to add extra storage to your MacBook Pro, but it's worth remembering, it will depend on the model you have.
Older models have the option to upgrade storage internally, but newer models come equipped with an SSD, which means you cannot add storage to your MacBook Pro internally. Instead, you'll need an external option.
External storage options
External Hard Disk Drives (HDD)
These offer a quick and easy solution to extra storage, and they come in all shapes, sizes, and price ranges.
HDDs are traditional hard drives. These tend to be cheaper and have larger storage capacity, but are known to be slower with the possibility of breaking down. HDDs are an excellent option for Time Machine backups, and file storage, but not always the best choice if you're looking to run programs, or run your Photo Library from; you'll be better suited to a speedy SDD.
I personally think it's always handy to have an external hard drive around the house, mine often comes in handy, for backups and data transfers.
The average lifespan of an HDD is 10 years.
Tip: As a way to quickly free up space on your Mac you can get a free trial of the CleanMyMac app. If you critically need space to install something or save a file, this helpful Mac app will delete some amount of junk — in just a few clicks.
External Solid State Drives (SSD)
SSDs (solid-state storage drives) Are super fast and very reliable, they tend to have less storage capacity compared to HDDs and are usually quite expensive.
Their epic read and write speeds are only limited by the speed of their connection to your computer.
Whichever external hard drive you choose, they can upgrade and expand a MacBook Pro storage in minutes. 1 TB (terabyte) SSD should cover minimal storage needs. SSDs are a bit more vulnerable to temperature and have a limited number of write events (about 50 000). Given that, your data is going to live on a SSD for about 3-7 years, which makes it as reliable as a CD back in the day.
SD CardsFor older MacBooks, you can use an SD card to expand your MacBook Pro storage. This option is not so popular these days, but that does mean SD cards are actually a pretty cheap option.
This option does work if you're looking to store static files, but it's not really recommended if you're looking for storage with read or write capabilities.
Did you know? Some Mac apps can be installed and launched from an SD card. You can install an app on your Mac, and then move it from Applications folder directly to the SD. That’s a very original way to save space but it works.
Cloud storage
Another way to add storage to your MacBook Pro is by utilizing Cloud space. This is an excellent way to backup your data. But remember Cloud storage can be slow, depending on your internet speed and there's always a price tag.
Utilize iCloud storage
You can store all kinds of documents in your iCloud Drive and access them easily from all your Apple devices. You can even sync your desktop and document folders to restore in your iCloud Drive automatically.
To get the best out of iCloud storage, you'll most likely need to purchase extra space — you only get 5 GB free.
How to use your Apple iCloud Drive:

-
Click the Apple logo, top-left, and then select About This Mac.
-
Select the Storage tab, and then Manage.
-
Click Store in iCloud to begin the process.
Your macOS will analyze your disk and attempt to save space for you. Follow the on-screen instructions to utilize your iCloud storage.
Tip: Before you can set up your iCloud Drive, you need to make sure that your Mac is running Catalina or later.
Third-Party Cloud Storage
Apple iCloud isn't the only option for cloud storage. Here's a list of some popular third-party providers to consider:
-
Google Drive
-
Amazon Drive
-
OneDrive
-
Mega
No matter which one you choose, shop around and compare prices, it's worth double-checking what space you can get for your money.
How to keep cloud storage uncluttered
Any cloud storage costs some bucks, so it's a good idea to declutter it to avoid unnecessary plan upgrades. Of course, you can remove some files manually, but there's a quicker way to control cloud storage capacity — CleanMyMac and its Cloud Cleanup feature. Once you connect your cloud account, it lets you reveal the largest space eaters and remove them. This way, there's no need to pay more for the cloud storage. Here's how it works:
- Get your free CleanMyMac trial — you can test the app for 7 days at no cost.
- Click Cloud Cleanup and connect your cloud account.
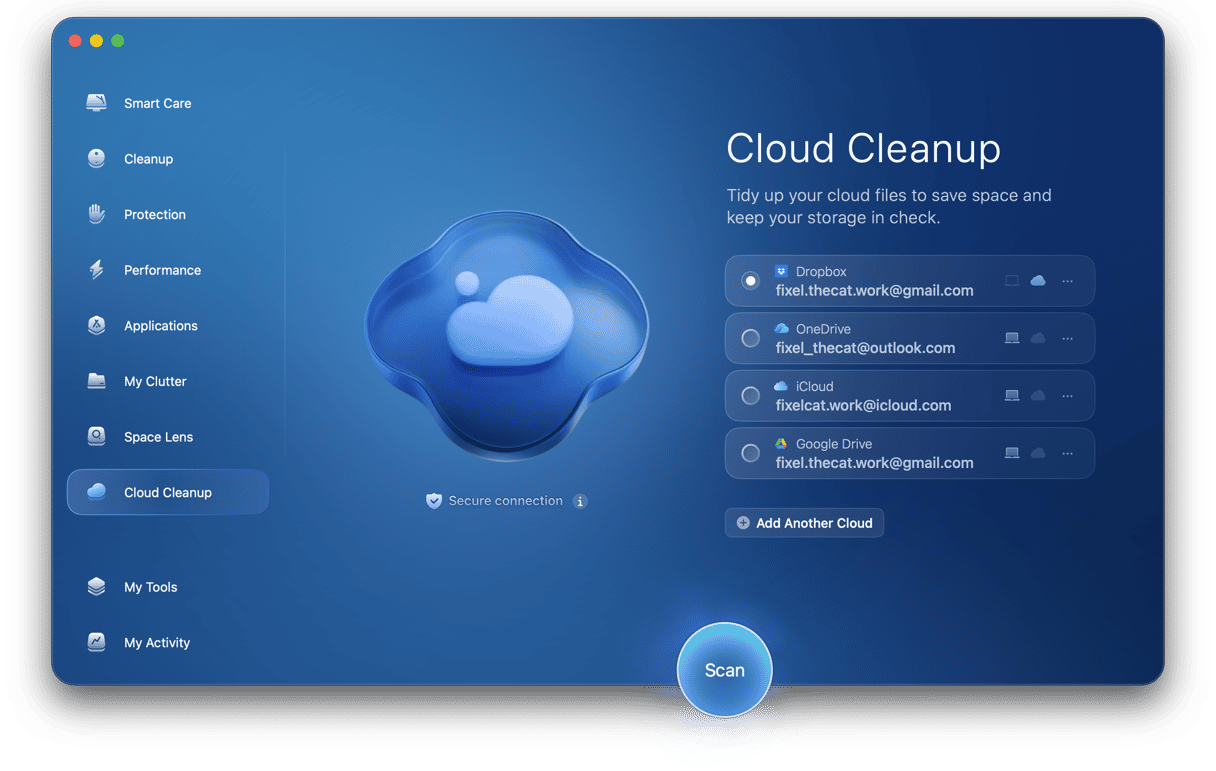
- Run a scan and review the findings.
- Remove or unsync what you no longer need.


Take out the junk (any Mac has some)
The most obvious and easiest way to increase available storage on your macOS is to clean up your Mac. You can reclaim gigabytes of space just by keeping your Mac tidy.
Forgotten files, apps you never use, and invisible junk can seriously weigh down your Mac, taking up tons of storage space. So before you go rushing out, spending your hard-earned cash. Take some time to clean up your Mac, and maybe you can by-pass an additional purchase – sounds obvious, but so many Mac users forget to do this.
Remove system junk (the manual way)
You can manually remove forgotten cache from your system to claw backspace, here's how:

- Open a Finder window, from the Go menu, select Go to Folder.
- Paste in: ~/Library/Caches and press Enter.
- Go through all your Cache folders and delete the contents inside.
- Repeat the same steps above now typing /Library/Caches.
Tip: Don't forget – Open the folders and remove the contents inside, but not the folders themselves. You can always create a copy of everything before you delete, just in case you remove something you shouldn't.
If you don't fancy manually deleting your junk, there's a much easier way. The mentioned CleanMyMac by MacPaw has a system junk cleaner tool, which quickly identifies old cache files and logs, broken downloads, unused languages, and more types of unseen junk. You can expand MacBook Pro storage in minutes with this easy to use tool — it’s good to know this app is also notarized by Apple.
How to remove system junk with CleanMyMac:

-
Open CleanMyMac (get your free trial here).
-
Select Cleanup from the left sidebar and press Scan.
-
Wait for the scan to complete and click Review All Junk.
- Choose files for removal and click Clean Up.
Remove Large and Old Files
Another easy way to add storage to MacBook Pro is to clear out old and large files. These often-forgotten items can take up lots of space.
Checking your Downloads and Document folders is a good place to start, or you can use the app we’ve just used, CleanMyMac. They have a handy Large And Old File tool that quickly does all the work for you.
Here's how to clean out old files with CleanMyMac:

-
Open the app and select My Clutter from the left sidebar.
-
Press Scan > Review All Files.
-
Search through the results, select items for deletion and press Remove.
Chances are, you’ll discover many of your long-lost documents, duplicates and similars using this tool.
If you prefer AI-powered support while cleaning your Mac, you can turn to the CleanMyMac Assistant. It provides fast, easy-to-follow guidance, so expert help is always one prompt away.
Other ideas to add some storage to your Mac
-
Use the built-in Optimized Storage app (found in About this Mac > Storage).
-
Replace your installed apps with their web versions.
-
Switch to a lighter browser (other than Chrome).
-
Send large files to your email using a file transfer service.
Now you know all the tricks to upgrade your Mac storage. Hopefully, I've saved you a little bit of time when it comes to researching and who knows, maybe even some money.
Don't forget a good clean can go a long way when it comes to adding extra storage to your MacBook Pro. Check back soon for more stories from the fascinating world of hard drives.