How to securely use a Wi-Fi on Mac
Recently a colleague of mine returned from Turkey, where she had her money stolen from her credit card. It turns out, she had been using a public Wi-Fi network in the hotel. Such stories only prove that we take our Wi-Fi security too easily. Below we’ll give you some tips on how to secure Wi-Fi network on Mac.
Password-protect your Wi-Fi router on Mac
Go to your router settings First off, you need to go to the Settings page of your Wi-Fi router. Most consumer-level routers have a standard IP address. So paste that in your browser:
192.168.1.1 — paste this into your browser window.
Note: Some router manufacturers like Dlink, TPlink, Netgear, Tenda use a different default address.
192.168.0.1 — an alternative IP-address you can try.
Now, you’ll be asked to enter the login and password for your router. If you don’t remember it, you can google your router’s model and its default password. The default username and password should be something like admin and 12345789. For example, my router is TP-LINK 615 and its settings page looks like this: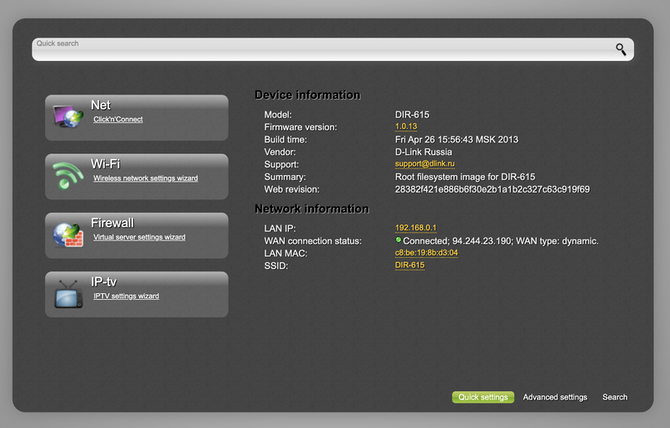
If you can’t perform this step, inspect your router one more time and google its EXACT model. Like this: /TP-link 615/ ip address
Change your password in Wi-FI security settings
Now go to Wi-Fi security settings to locate network protection settings. For each router the path will be different, but you should look for settings that mention protected network, change password, etc. 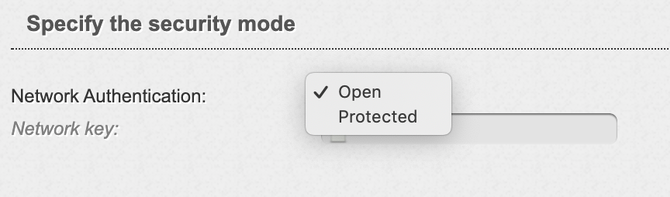
Change the default name of your network
It would be harder for potential intruders to hack your Wi-Fi if it has a unique name. There is even a database online that lists default passwords for most commercial routers along with their default names. TIP: Look up settings for SSID name (service set identifier, or network name). To see if your Wi-Fi is now password protected, click the Wi-Fi icon in the upper bar. The padlock icon should tell you that your protection is now on.
How else to secure Wi-Fi connection on Mac? It’s a good idea to update your router’s firmware. The newer firmware will have more security holes patched.
Make your Mac forget old Wi-Fi connections
Public Wi-Fi spots you’ve used recently might still be exploited with a malicious purpose. It’s worthwhile to delete those spots along with other traces of your recent online activity. I will be using CleanMyMac, because this program has a free version and is itself notarized by Apple. So, download CleanMyMac here. Launch the app and go to the Privacy tab in the sidebar.
Check networks you want to delete. That’s it! Additionally, check out the rest of the tools from the Privacy section. For example, CleanMyMac will delete your browser caches, like tracking cookies. This will prevent advertisers from following you around the web with their ads.
Level up your built-in macOS security
There are a few security weak spots on every Mac. It’s easy to strengthen them in System Preferences.
Disable file sharing
Go to Mac’s System Preferences > Sharing.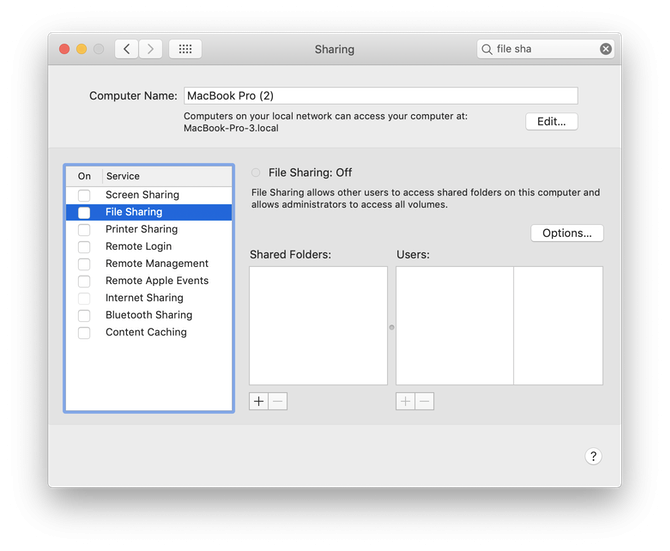
When your file sharing is off, no-one will be able to see your files and access your Mac remotely. Make sure you have no other boxes ticked in the same window. This will maximize your Wi-Fi network security on Mac.
Tip: Never shop online using a public Wi-Fi. Even 2-factor authorization wouldn’t protect your card from being compromised.
Enable Firewall
A Firewall is basically a barrier that prevents incoming connections to your Mac. Some apps rely on incoming connections to work properly so when you enable the Firewall, something might break. That’s why the Firewall isn’t enabled by default on your macOS. So when should you use Firewall?
For example, you are going to use a risky software and don’t want it to install any hidden components behind your back. To turn off Firewall, open your System Preferences > Security & Privacy. Click on the Firewall tab.
Click on the padlock to enable changes and turn on the Firewall — your password will be required. If you go one step further, you can block all incoming connections to your Mac. 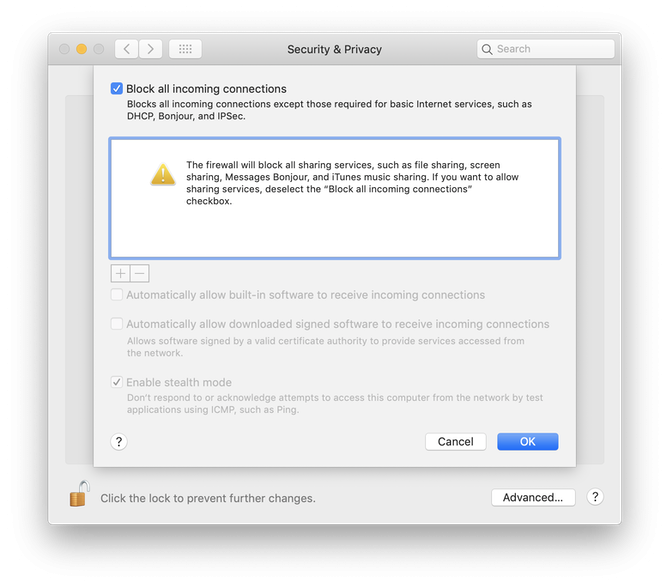
What will happen if you check “Enable stealth mode”? This will make your Mac undetectable when someone tries to connect to it. Just in case something goes wrong and you face issues with network connection, disable the Firewall in the same panel.
Help: Mac won’t connect to public Wi-Fi
Every now and then, your Mac will refuse to connect to a free Wi-Fi spot. This is because your Mac keeps remembering the outdated network settings that need to be refreshed.
- Open your System Preferences > Network.
- Go to Advanced…
- Click on the DNS tab.
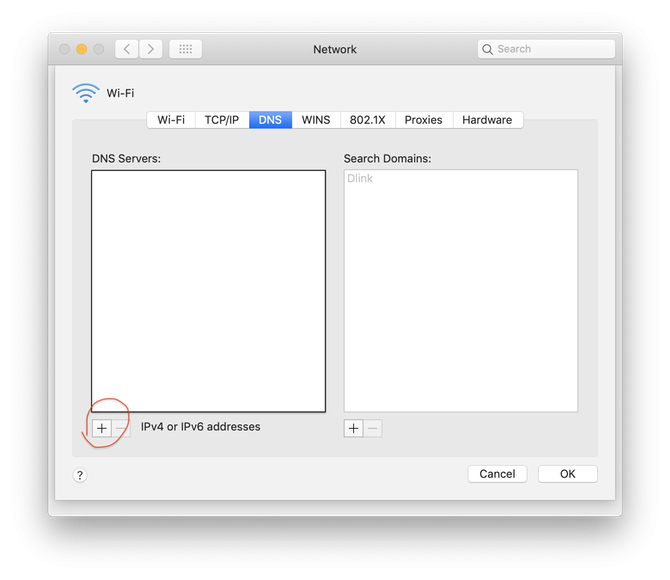
Use the “minus” sign to remove any old DNS records from the list. Now, try to reconnect to the public Wi-Fi once again.
Tip: You can also use a free tool that “flushes” outdated caches and previous settings about DNS.
It also comes with CleanMyMac.
CleanMyMac can be downloaded for free here (Apple-notarized version) According to the developer, you may use this feature when your internet speed slowed down or you can’t connect to certain websites.
More ideas on how to secure Wi-Fi on Mac
Create a strong WPA password
WPA stands for Wi-Fi protected access. This protocol is the most secure one up to date. Instead of just a password, you can create a passphrase — the longer the better.
Get a VPN app
VPN will soon become as ubiquitous as Google or other staples of internet use. It may prevent someone from spying on you — just as easily as it will unblock Spotify in your country.
Refrain from opening http links
Nowadays, most sites have switched to https as their default security protocol. Chrome displays a special warning on non-protected sites. 
After using a network, make your Mac forget it
You can forget a Wi-Fi network using the “—” sign in System Preferences > Network > Advanced. These were tips on how to secure your Wi-Fi connection on a MacBook. Have you already set up a 2-factor authorization on your devices? That’s the first thing you need to when it gets to security. Hope your Mac stays safe and healthy.