How to prevent excessive SSD wear on M1 Mac
In February 2021, multiple Apple M1 Mac users reported excessive SSD wear. Based on the reports, many M1 devices were overusing massive amounts of data in a noticeably short period, leaving users frantic for answers.
Let's get into more details of what has actually happened, how it was solved, and what we can do to avoid this issue.
Apple M1 mac users report excessive SSD wear
Back in 2021, M1 Macs were still relatively new on the scene. Their enhanced design combines the 8-core GPU and CPU, unified memory, image signal processor, Secure Enclave, and SSD controller all on one chip providing an entirely new level of performance. So you can imagine the dismay when M1 Mac users started reporting SSD wear.
Some of the worst cases highlighted on Twitter and community forums indicated that some SSDs had consumed up to 13% of the maximum warrantable total bytes written (TBW). This kind of excessive usage would mean the lifespan of an M1 Mac would be as little as two years.
The more data you write to an SSD, the faster it will slow down and eventually stop working. Internal storage for M1 Macs is soldered to the logic board, meaning you can't pop to the shop and buy a new one: you'd need a whole new device. Thankfully later that year, the issue was solved by Apple with the macOS 11.4 update, but it left users wondering how to prevent M1 SSD wear?
How SSDs work
SSDs (Solid-State Drives) use flash memory to store data in a grid of cells. Unlike HDDs (Hard Disk Drives), they don't have moving parts resulting in significantly faster performance.
The writing and rewriting data process on an SSD can only happen a limited number of times, known as the total bytes written (TBW). When SSDs reach that limit, they slow down, resulting in a sluggish performance. Something like that should happen slowly over time, not in a few weeks or months, like with users who reported M1 Mac excessive SSD wear.
So what can you do to prevent SSD wear? There's no need to read a gazillion of different forums. I've put together everything you need to know right here. Let's start, shall we?
How to prevent M1 Mac excessive SSD wear
Run regular maintenance
This one probably sounds too obvious. Still, a sure way to increase the longevity of your SSD drive is running your regular Mac maintenance. I'm taking, keeping your drives optimized, removing application errors, and repairing permissions regularly. This essential maintenance can help to prevent a reasonable sum of nasty issues.
The only problem with Mac maintenance is that it can be time-consuming, which is likely why so many people put it off. I personally use the Apple notarized tool, CleanMyMac, because its dedicated Maintenance Module regularly runs complete maintenance on my Mac, saving my time & space in just a few clicks. Here's how it works:

-
Launch the app—download the free version.
-
From the sidebar, select Maintenance and press View All Tasks.
-
Next, select Free Up RAM, Free Up Purgeable Space, Run Maintenance Scripts, and Repair Disk Permissions.
-
Now, press Run.
Update your macOS
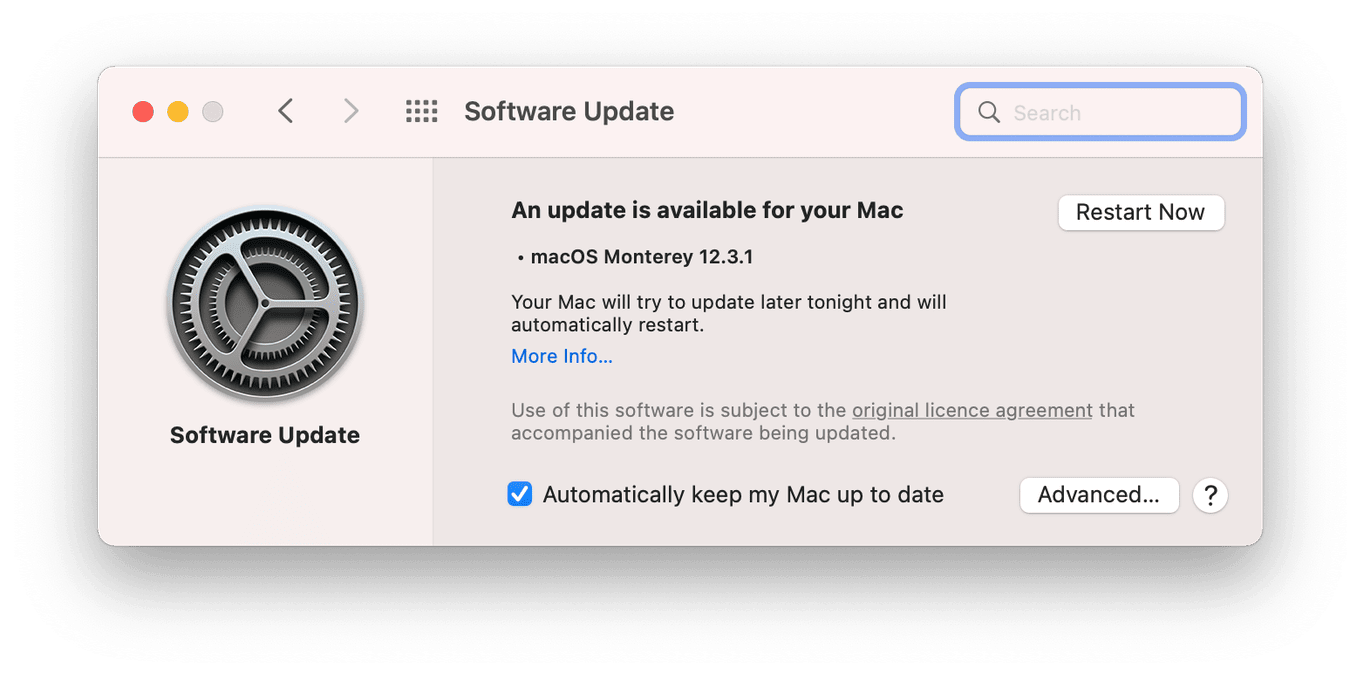
If you're running macOS earlier than macOS 11.4, then it's time for an update. This quick fix will also help to prevent excessive SSD wear. Here's how to update:
-
Go to the Apple menu > About This Mac > Software Update.
-
Follow any on-screen instructions to install the latest update.
Trust me, it's worth keeping your Mac up-to-date. So don’t refuse to benefit from all the latest patches, fixes, and security enhancements.
Disable TRIM
Another great way to prevent future SSD wear is to disable the TRIM.
TRIM is a command that your Mac gives to your SSD disk, telling it which data blocks to erase that are no longer needed by the operating system.
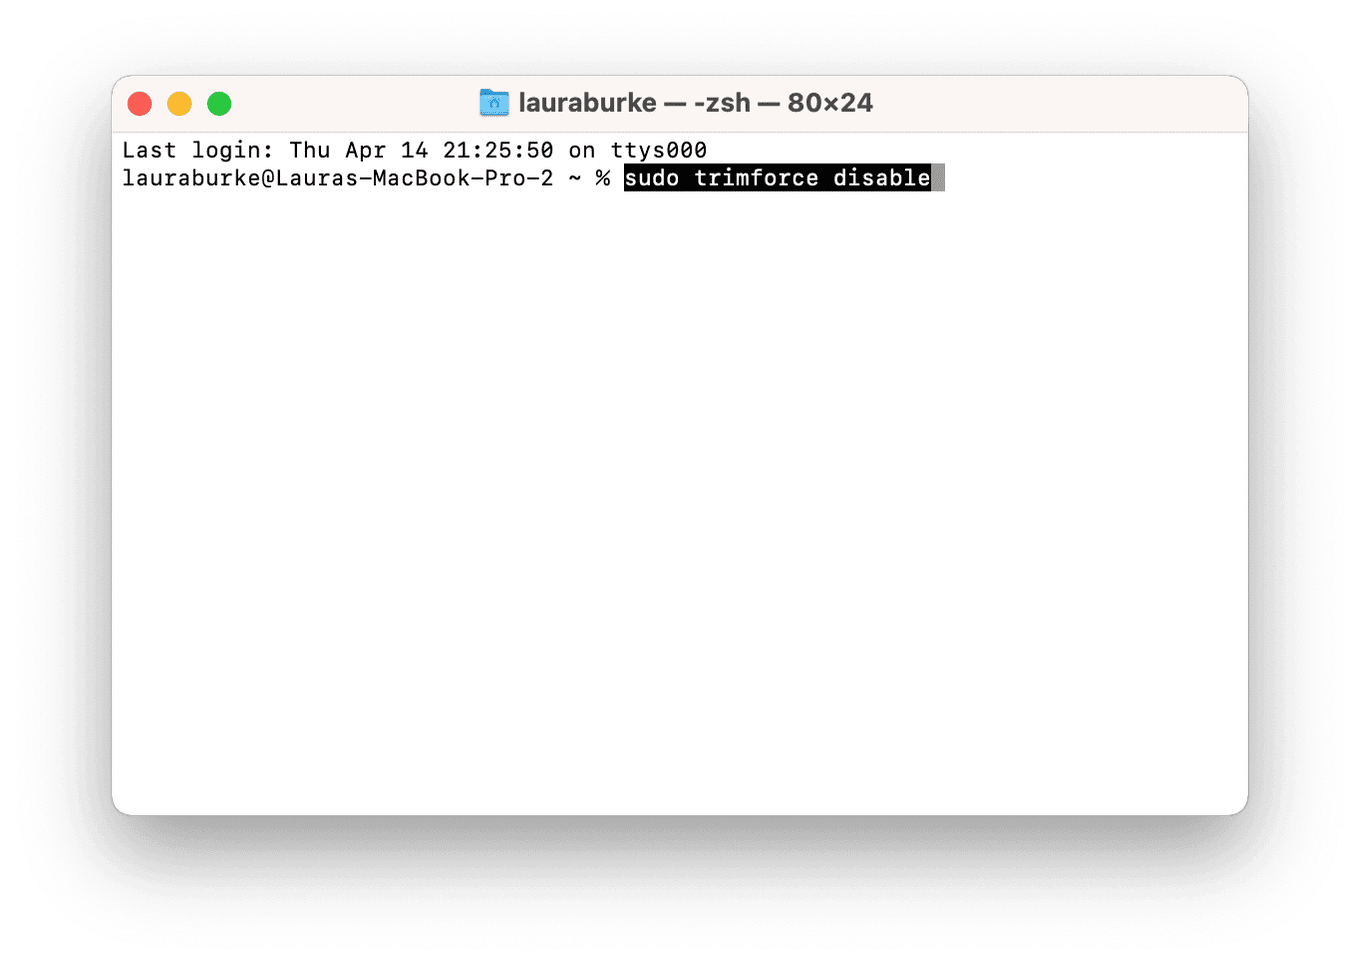
The TRIM command is automatically enabled on M1 Macs with an SSD. Disabling it through the Terminal can help to enhance the SSD lifespan. Here's how:
-
Press Space-Command to open a Spotlight Search and type Terminal.
-
Once the Terminal is open, enter the following command, pressing return afterward.
sudo trimforce disable
-
Enter your admin password if requested.
-
Confirm the disable TRIM command by typing Y and pressing the return key.
If you later decide you want to enable TRIM, follow the exact steps above. Then, use the following command: sudo trimforce disable
Keep your Mac optimized
Another way to prevent M1 Mac excessive SSD wear is to keep your Mac fully optimized, reducing the amount of space that data uses on your Mac's internal drives and increasing your device's performance and lifespan.
Here are a few valuable tips to help you keep your Mac optimized.
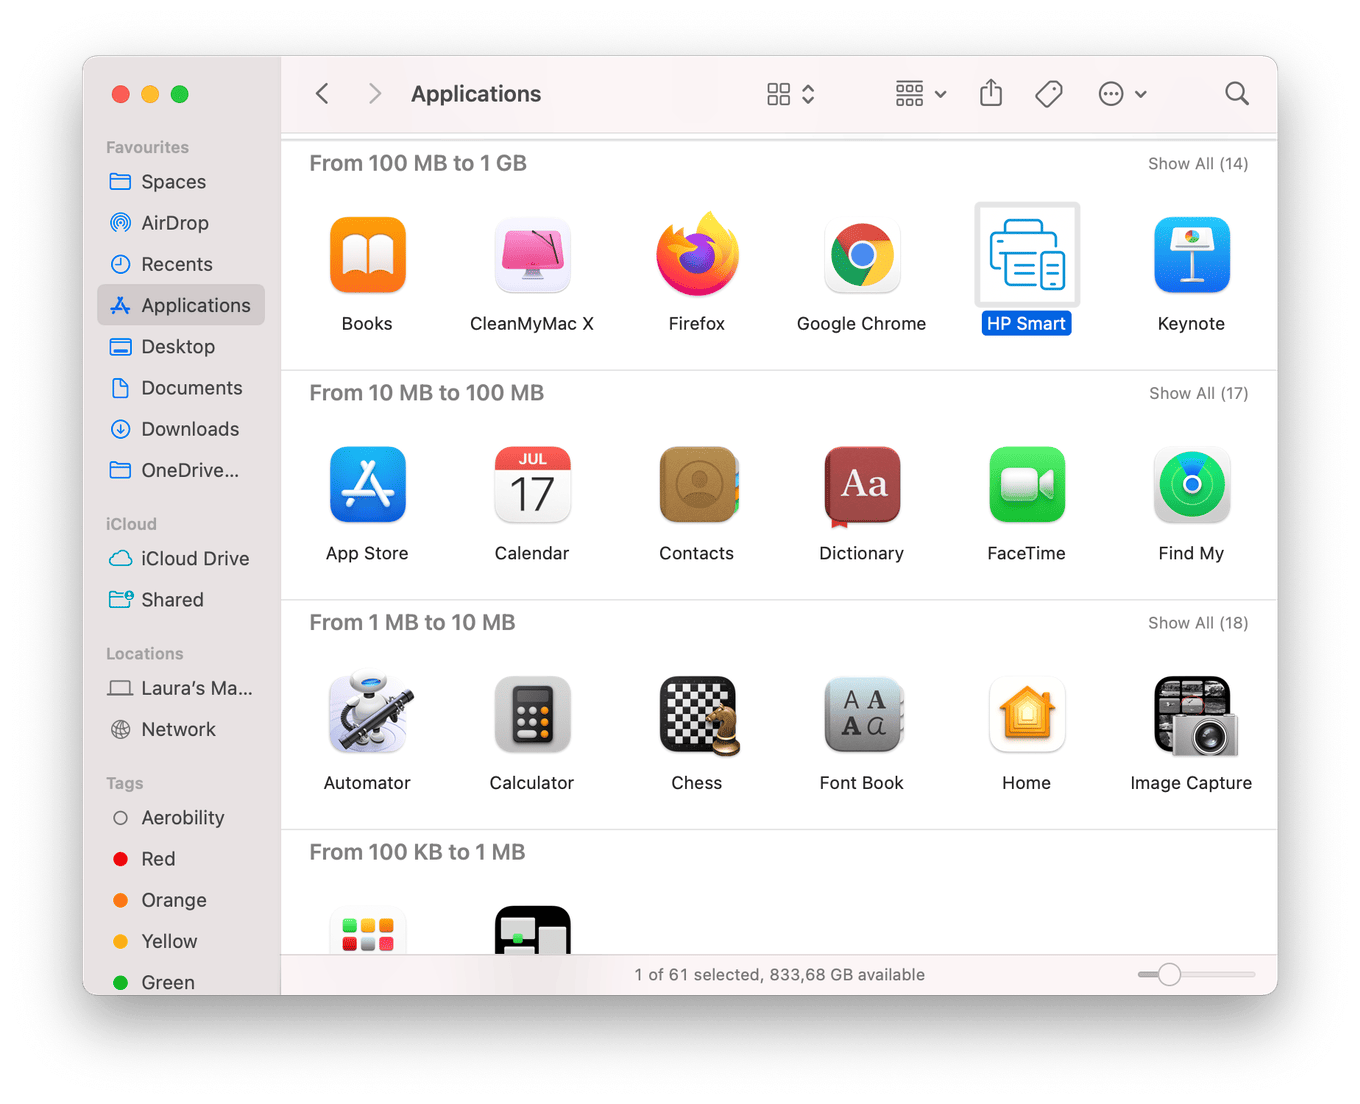
1. Remove unused apps
If you don't use them, remove them. Unused apps take up valuable space. Here's what you should:
-
Open a Finder window, then select Applications from the sidebar.
-
To remove an app, right-click and press Move to Bin.
-
Don't forget to empty your Trash afterward.
2. Check your Downloads folder
Keep an eye on the clutter that accumulates in your Downloads folder. Often it is stored in a place we never check, and over time, masses of duplicates and forgotten folders consume your space and resources. Here's how to check:
-
Open Finder, then press Downloads from the sidebar.
-
Sort and search through files.
-
Drag items to the Trash.
-
Empty the Trash folder afterward.
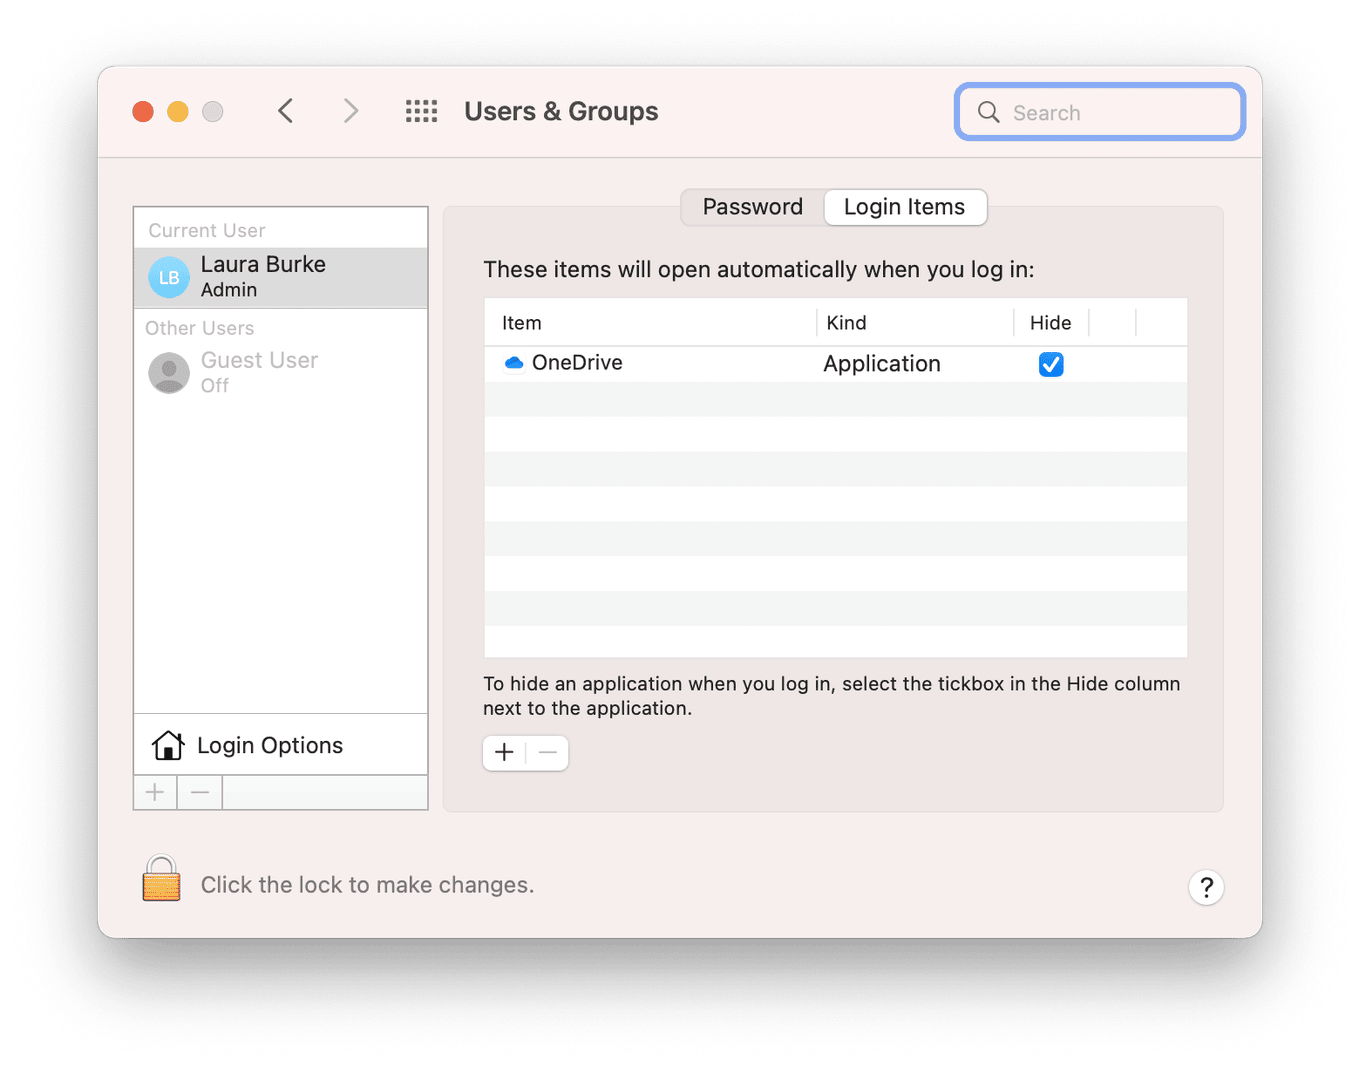
3. Manage login items
When you start up your Mac, applications launch too that can slow down your Mac. Here's how to check and manage your startup items:
-
Go to the main Apple menu > System Preferences > Users & Groups.
-
Select Login Items and press the lock item bottom left to make changes.
-
Select and press the minus button to remove a login item from the list.
To manage login items, you can use the app I mentioned earlier, CleanMyMac. It has a powerful Optimization module to manage login items and launch agents all in one place.
Control your Mac’s performance effortlessly and in no time. Here's how:

-
Launch the tool, then select Optimization from the sidebar.
-
Press View All Items.
-
Select items from within the Login items and Launch Agents categories.
-
Press Remove.
No one wants to encounter an issue like M1 Mac excessive SSD wear. These tips will undoubtedly help you prevent it, so try them out!