Here is why your Mac camera is not working
Since the global pandemic began, our webcams have become an essential part of everyday life. So when your Mac camera is not working, you need to troubleshoot and quick, so you can get back to your online meeting or continue the family catch up.
Thankfully, it's usually a relatively quick fix.
Reasons your camera may not be working
In honesty, there could be multiple reasons why your MacBook camera is not working.
Although it's often quite difficult to pinpoint why, the most common error is this:
The app, like Zoom or Facetime, can’t connect to the camera or is working with errors. The good news is that it's most likely software-related.
-
Your macOS needs to be updated.
-
You need to give a specific app permission.
-
The camera is locked in Preferences
-
Malware.
-
Hardware malfunction
If you've been receiving the "There is no connected camera" error message or the camera disconnected or unavailable alert, you might jump to conclusions and think it's a hardware issue, but that's not always the case.
What to do when you're MacBook camera is not working
Did you know that there aren't specific general macOS camera settings? Instead, each app using the camera has its own configuration settings.
There also isn't an on/off button for your Mac camera, so if you've been wondering how to turn on the camera on Mac, the simple answer is; you can't. When an app that uses the camera launches, it automatically turns the camera on.
So, if your camera just won't work, or you keep receiving error messages, it's time to get down to some good old-fashioned troubleshooting.
Let's get started.
Restart your Mac
This has to be number 1 on the list because a simple restart can sometimes be the answer to all issues; it's worth a try, so if you haven't already, go ahead and restart your Mac.
If that didn't work, keep on reading.
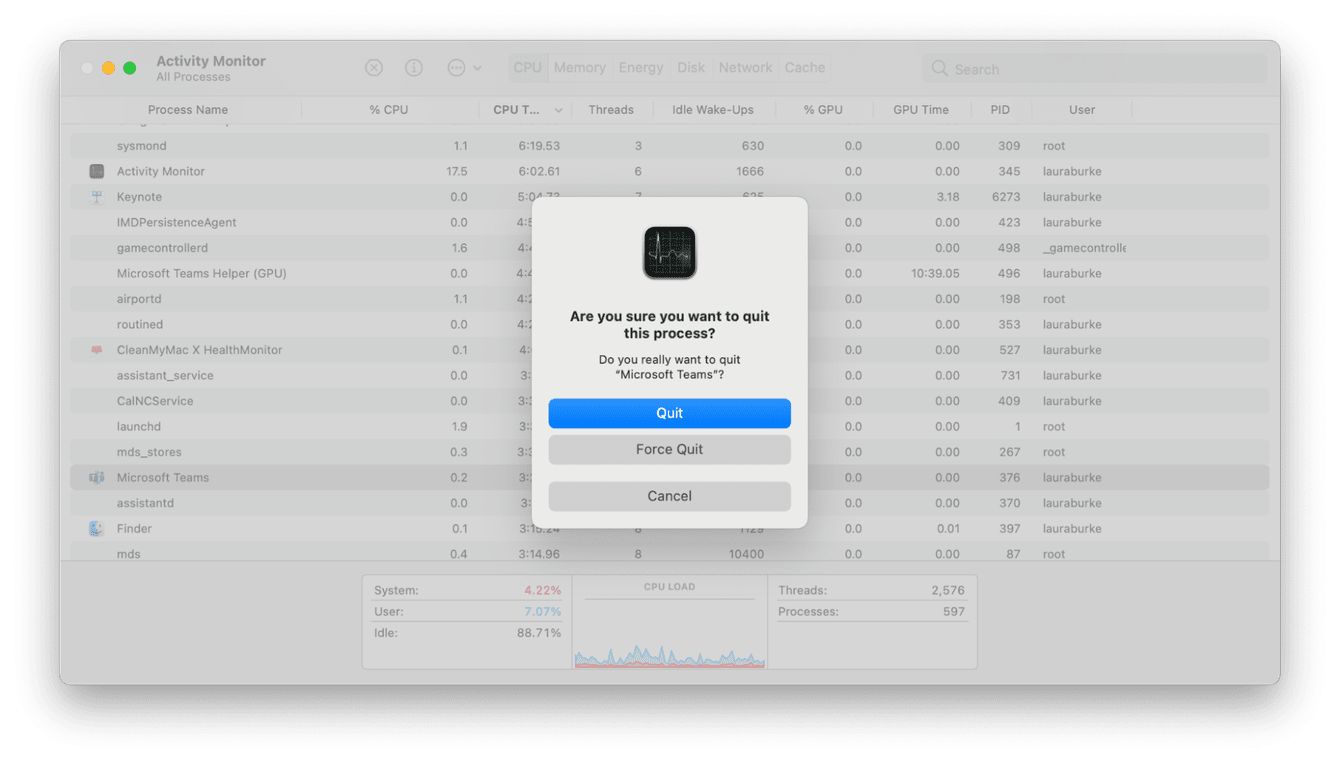
Check for multiple apps trying to access your camera
Only one app at a time can utilize the camera, so it's helpful to make sure that another app isn't blocking your access because it's using it; here's how to check:
-
Open a new Finder Window > Applications > Utlilies> Activity Monitor.
-
Have a look through the list and close any camera-related apps, like FaceTime, Skype, Teams etc.
-
To exit and app, press "X".
-
Now try your camera again.
Tip: The process VDCAssistant is the one responsible for the camera. Try quitting that one.
If that didn't help, don't go anywhere yet, we've got more tips to try.
Allow an app to use camera in Preferences
In System Preferences you can set which apps are allowed to use the camera. Could be, the app you’re trying to use is simply not in the list.
Go to System Preferences > Security & Privacy.
In the left side of the pane, find Camera.
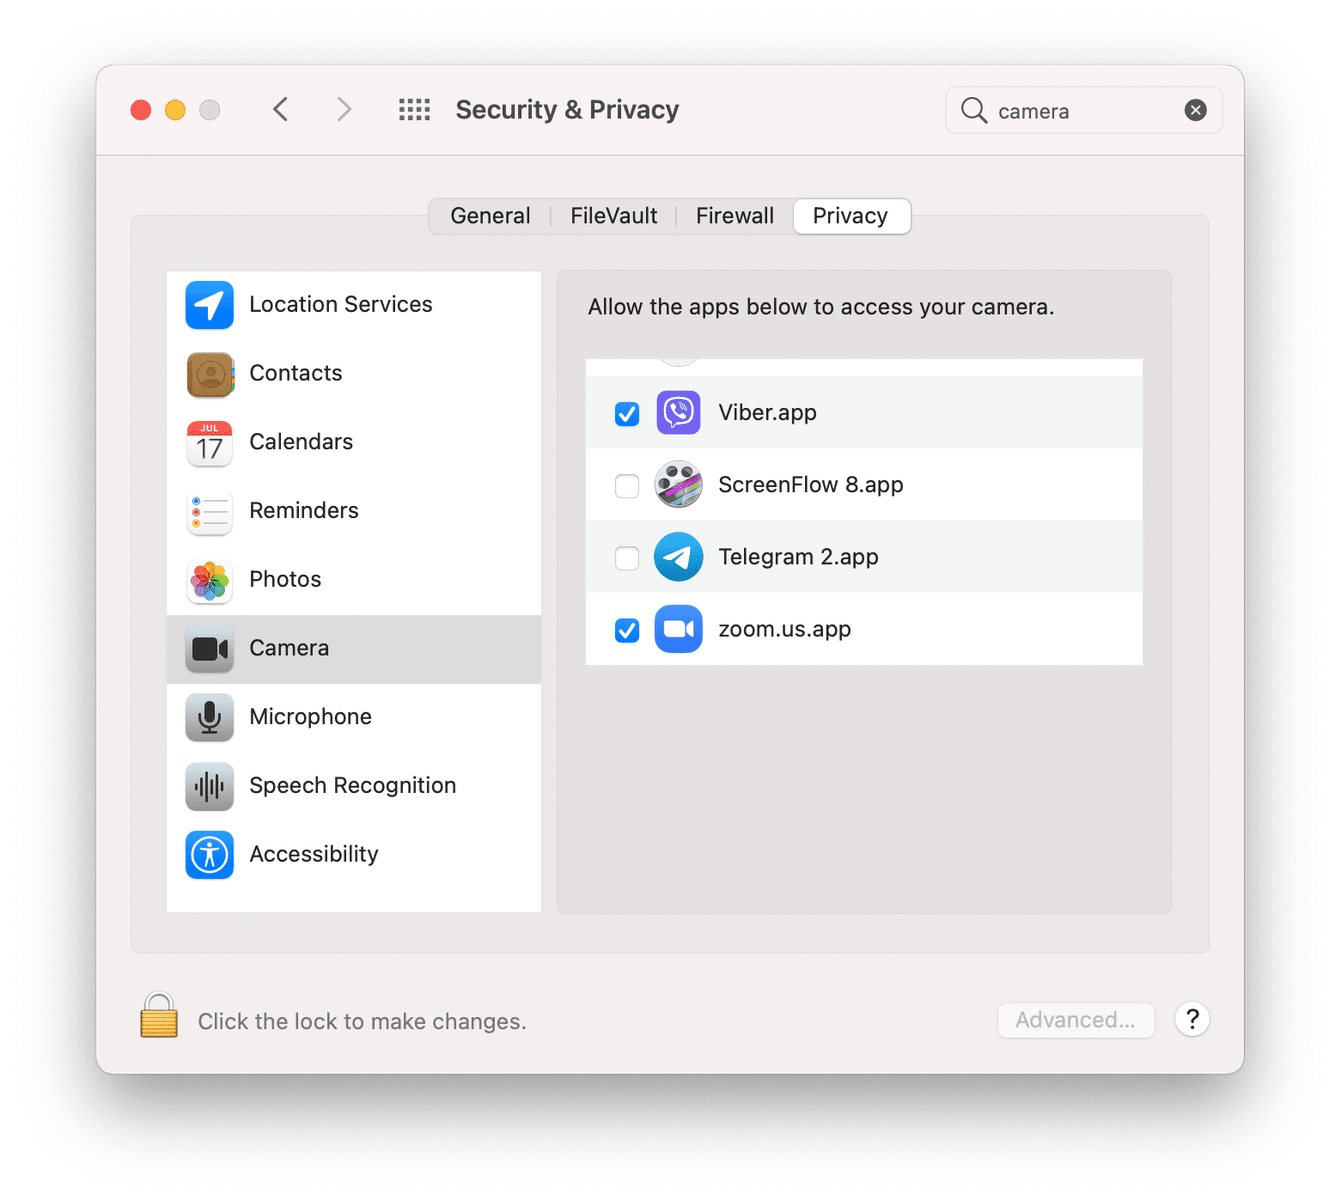
As you can see, I didn’t give these apps, ScreenFlow nor Telegram, the permission to use my camera. But it’s possible to do by checking those boxes.
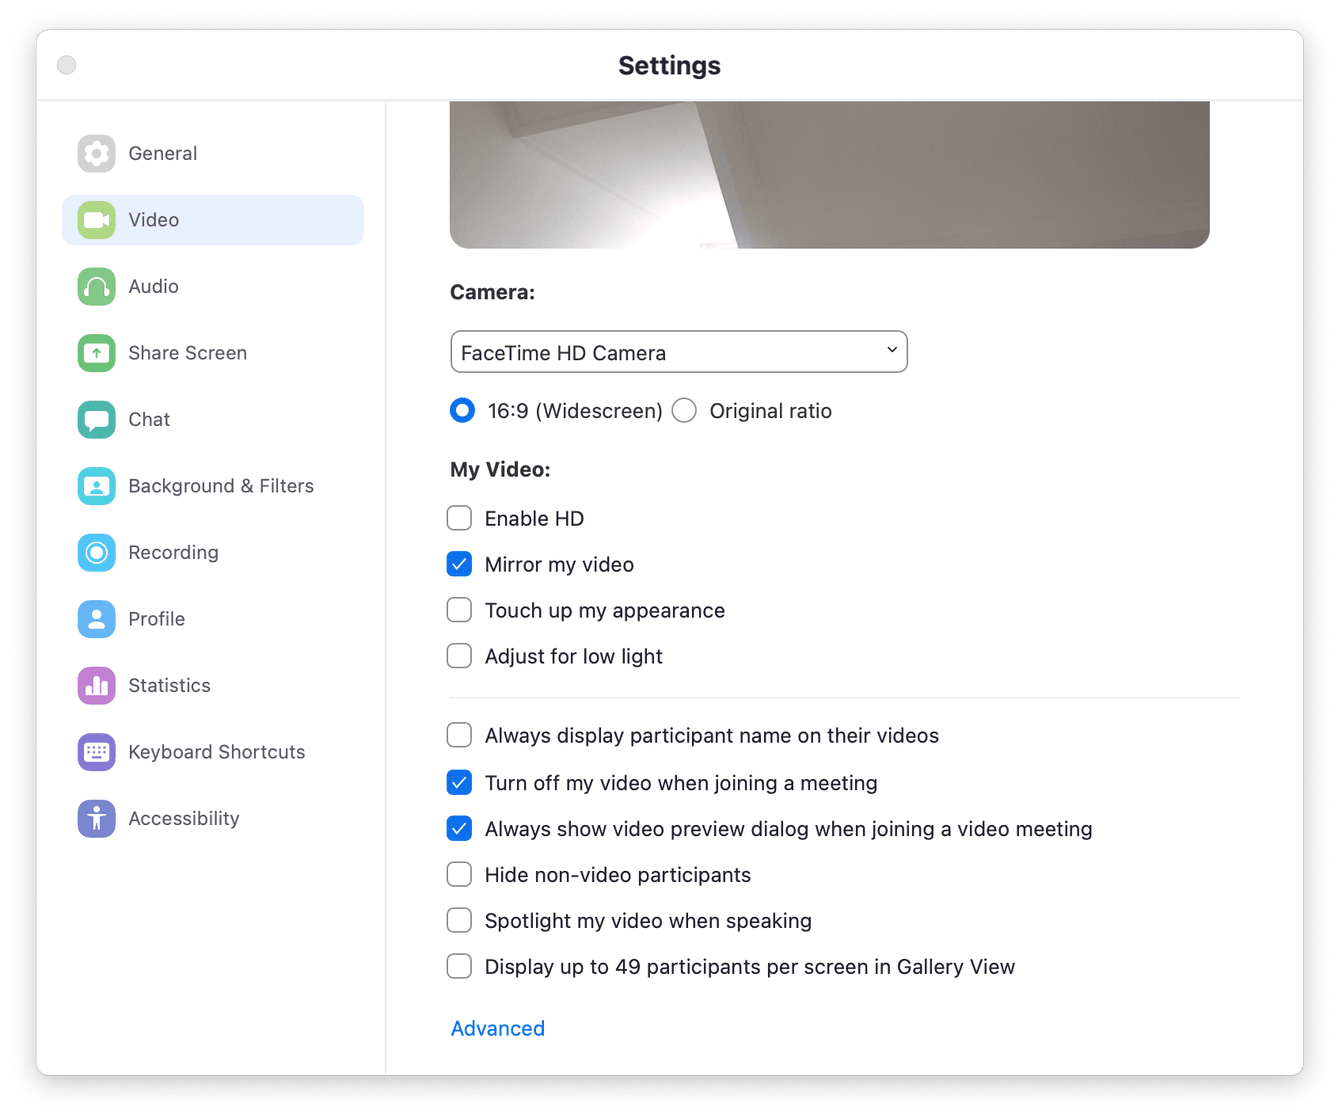
Check the settings of the app you're trying to use
As I mentioned earlier, all camera utilizing apps come with their own settings. When your Mac camera is not working, it's worth checking the app preferences to ensure it's enabled.
For example, let's look at how to do this on Zoom.
-
Open the app and select the Zoom menu.
-
Select Preferences > Video.
-
From the camera drop-down menu, check which camera is enabled.
-
Change if necessary.
Tip: Here you can make a test zoom call https://zoom.us/test and check if your video is working
When camera is locked due to Privacy
On newer macOS versions there is a default app called Screen Time that beyond other things restricts the use of camera. So you want to check if that is the case.
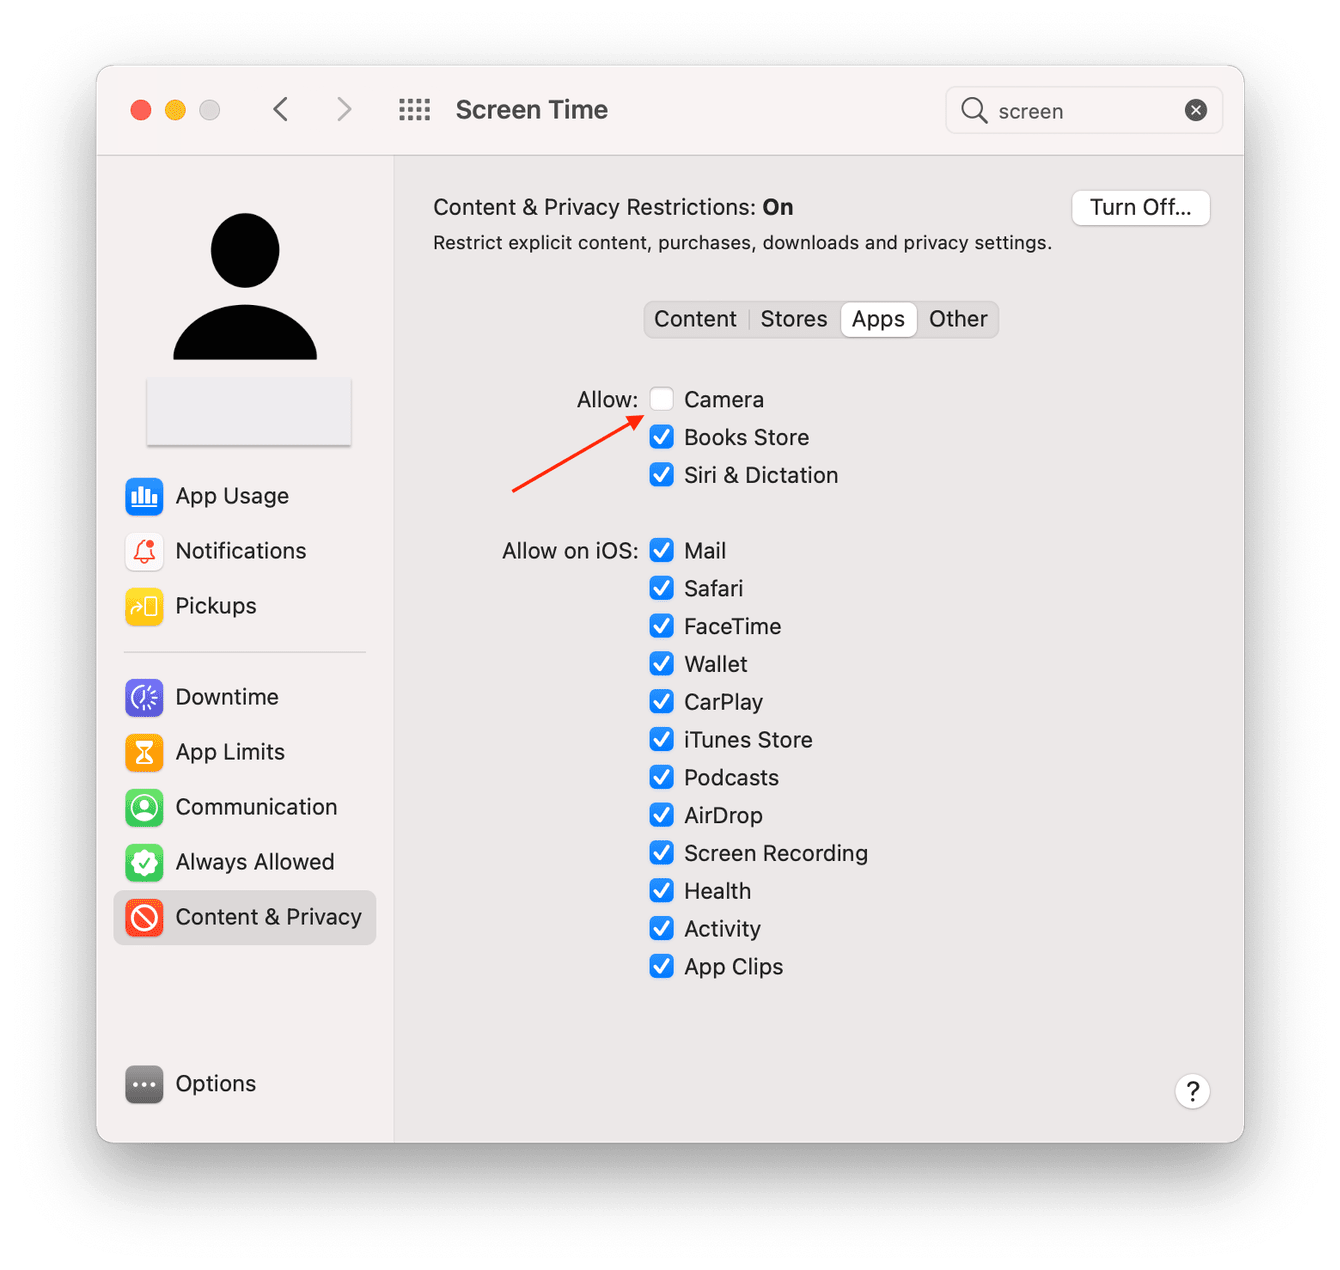
Click on System Preferences > Screen Time.
Navigate to Content & Privacy and make sure the Camera is checked.
Update your Mac
Keeping your Mac up-to-date is essential for ensuring apps are running correctly. When your MacBook camera is not working, it's a good idea to check that you don't need to install any updates.
Here's how to check: Select the Apple menu> About This Mac> Software Update.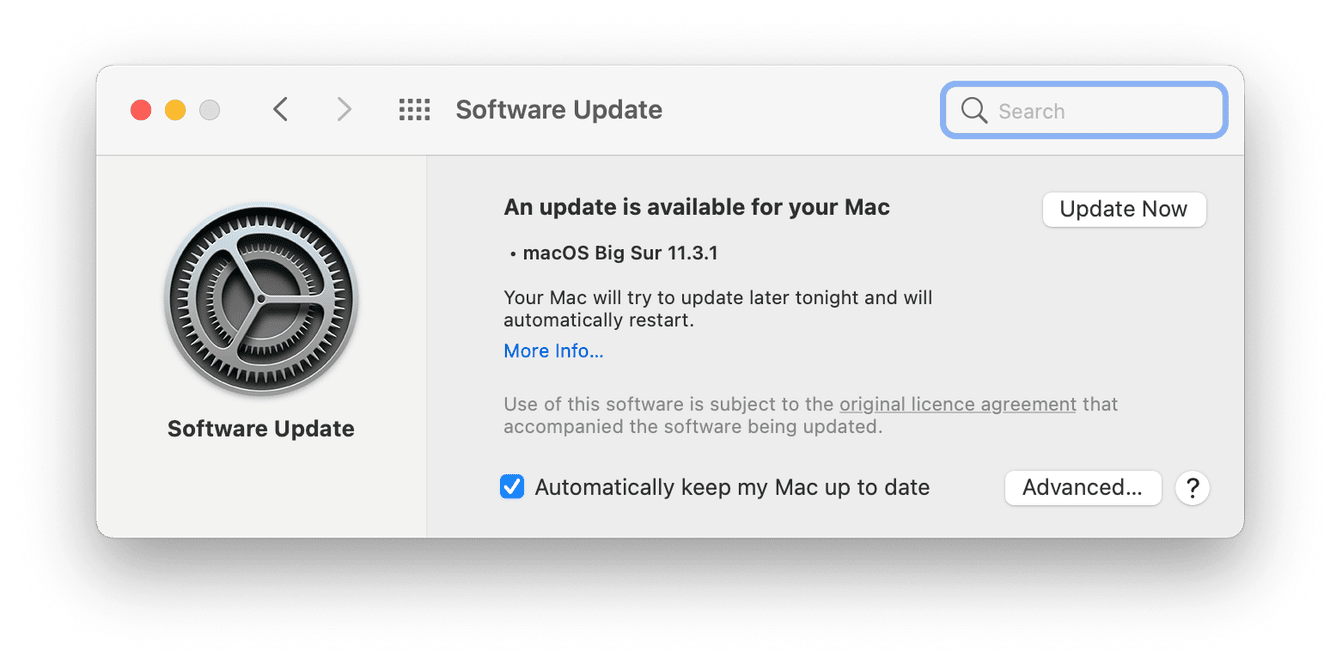
If, like me, you need an update, follow the on-screen instructions. This can actually solve lots of minor issues.
Another good tip is to check to see if there is a specific update for the app you're trying to use. To do this, head over to the App Store then select Updates in the left sidebar. If anything needs updating, you'll see it here. Follow the on-screen instructions.
Keep your Mac optimized for performance
It's annoying when your MacBook camera is not working. It's one of those things and should work most of the time without trouble, but if your Mac starts to get weighed down with unnecessary system junk, this can begin to affect your performance and interfere with things like your Mac’s ability to launch the camera.
Knowing how to keep your Mac properly optimized is pretty essential for any Mac owner to avoid issues.
I like to use a Mac-troubleshooting app called CleanMyMac to help me keep my MacBook going normally. What I love about this simple tool is you can actually run several checks that can help you troubleshoot multiple Mac issues; it's also notarized by Apple, so that's bonus points right there.
Here's a couple of things you can do with CleanMyMac to help you keep your Mac optimized for better overall performance.
Remove Launch Agents
Launch Agents are scripts that extend the functionality of the main app; these are resource-heavy, so removing or disabling these can help to keep your Mac optimized; here's how:

-
Open the app and select Optimization from the sidebar — download the trial here.
-
Select View all Items and select Launch Agents.
-
From the list, select any unnecessary apps and press Remove.
Reset an app that isn’t working
Sometimes, this tool is a god-send because most apps are hard to fix unless you update or reinstall an app completely. But in CleanMyMac, there is a tool to RESET any app, that re-writes certain preferences and logs in the app without deleting it.
So in less than a minute I can get a problematic app back to work.
For example, you might want to reset Zoom, since it works with the camera.
Open CleanMyMac, if you’ll use it just once or twice, you’ll be fine with a free version. Download it here from the developer’s site.
In CleanMyMac, choose Uninstaller from the sidebar.
Select an app and click the dropdown menu under Uninstall.
Choose Reset.
Check out the rest of the tools in this app to optimize your Mac.
Reset your Mac’s SMC
If optimizing your Mac didn't help, it's time to get a little more technical; let's look at how to reset your SMC.
System Management Controller (SMC) controls functions within your Mac, like batteries, fans, and your built-in camera.
Sometimes a quick SMC reset can solve the issue; here's how:
There are two ways to do this; for older Macs, ensure your laptop is connected to a power source, then shut it completely down. Once off, hold down the Shift + Control + Option + Power buttons until your Mac boots back up.
For newer Macs with a T2 security chip (2018 and later), follow the below instructions:
-
Shut down your Mac; once completely off, hold down the power button for 10 seconds.
-
Release, then turn your Mac back on.
-
Now, shut down your Mac again and hold Shift + Control + Option for 7 seconds, then add the power button, now hold for another 7 seconds.
-
Let go of all the keys and, wait a few seconds, then, turn your Mac back on.
Reset your Mac’s NVRAM
NVRAM or Non-volatile random access memory, stores all your local settings, including camera setting, so giving this a quick restart can help to get your camera up and running again, here's how:
-
Shut your Mac down.
-
Turn it back on, holding down Option + Command + P + R.
-
Wait for 20 seconds; you should hear two startup sounds.
-
Release the keys after the second one.
-
Or, if your Mac has a T2 security chip, release keys when you see the Apple logo appear for the second time.
Scan your Mac for malware
In some cases, when your Mac camera is not working, you could have a malware infection.
Yes, as crazy as that sounds, malware can intentionally disable your camera, so this is something worth checking.
The app I mentioned earlier, CleanMyMac, has a Malware Removal Module, which can perform an in-depth scan and safely remove infections if found; here's how:

-
Open the app; from the sidebar, select Malware Removal.
-
Press Scan.
If malware is found, follow the on-screen instructions.
Run the Apple hardware test
If you've tried and tested all of the above troubleshooting tips, and you're still not having any luck, it's time to check if your camera's hardware is damaged.
You can use Apple's built-in diagnostics tool; here's how:
-
Disconnect any wired in devices, like external hard drives and headphones, before you begin.
-
Restart your Mac, holding down the D key.
-
Wait for a screen that displays language options.
-
Pick your preferred language, then wait for the test to complete.
-
If diagnostics returns 1 of these codes, it's time to book your Mac into a service center.
-
NDC001
-
NDC003
-
NDC004
-
NDC005
-
NDC006
Hopefully, one of these tips solved the issue with your Mac camera not working.
Now you can get back to the online work meeting or find another excuse to get out of the family Skype quiz night!