How to share your screen on Mac
Do you know how to screenshare on a Mac? It's no longer just for business calls and presentations; get ready to up your collaboration game and enhance your online get-togethers.
From FaceTime to Zoom, screen sharing is versatile, fun, and not just for work. Whether hosting a virtual meeting, helping a friend with tech issues, or showcasing your latest project, screen sharing allows you to present your screen effortlessly in real time.
So, let's dive in and learn how to make the most of Apple's screen-sharing features.
How to enable screen sharing on Mac
When it comes to knowing how to screen share on a Mac, it all starts with granting permissions to access your screen.
Apps and third-party tools can't simply see what's going on your Mac screen; you need to grant them permission to do so explicitly.
When you install a new app, it should ask for permission to screen record or screen share, but if it didn't, you'll need to manually grant this; here's how to check:
- Go to the main Apple menu.
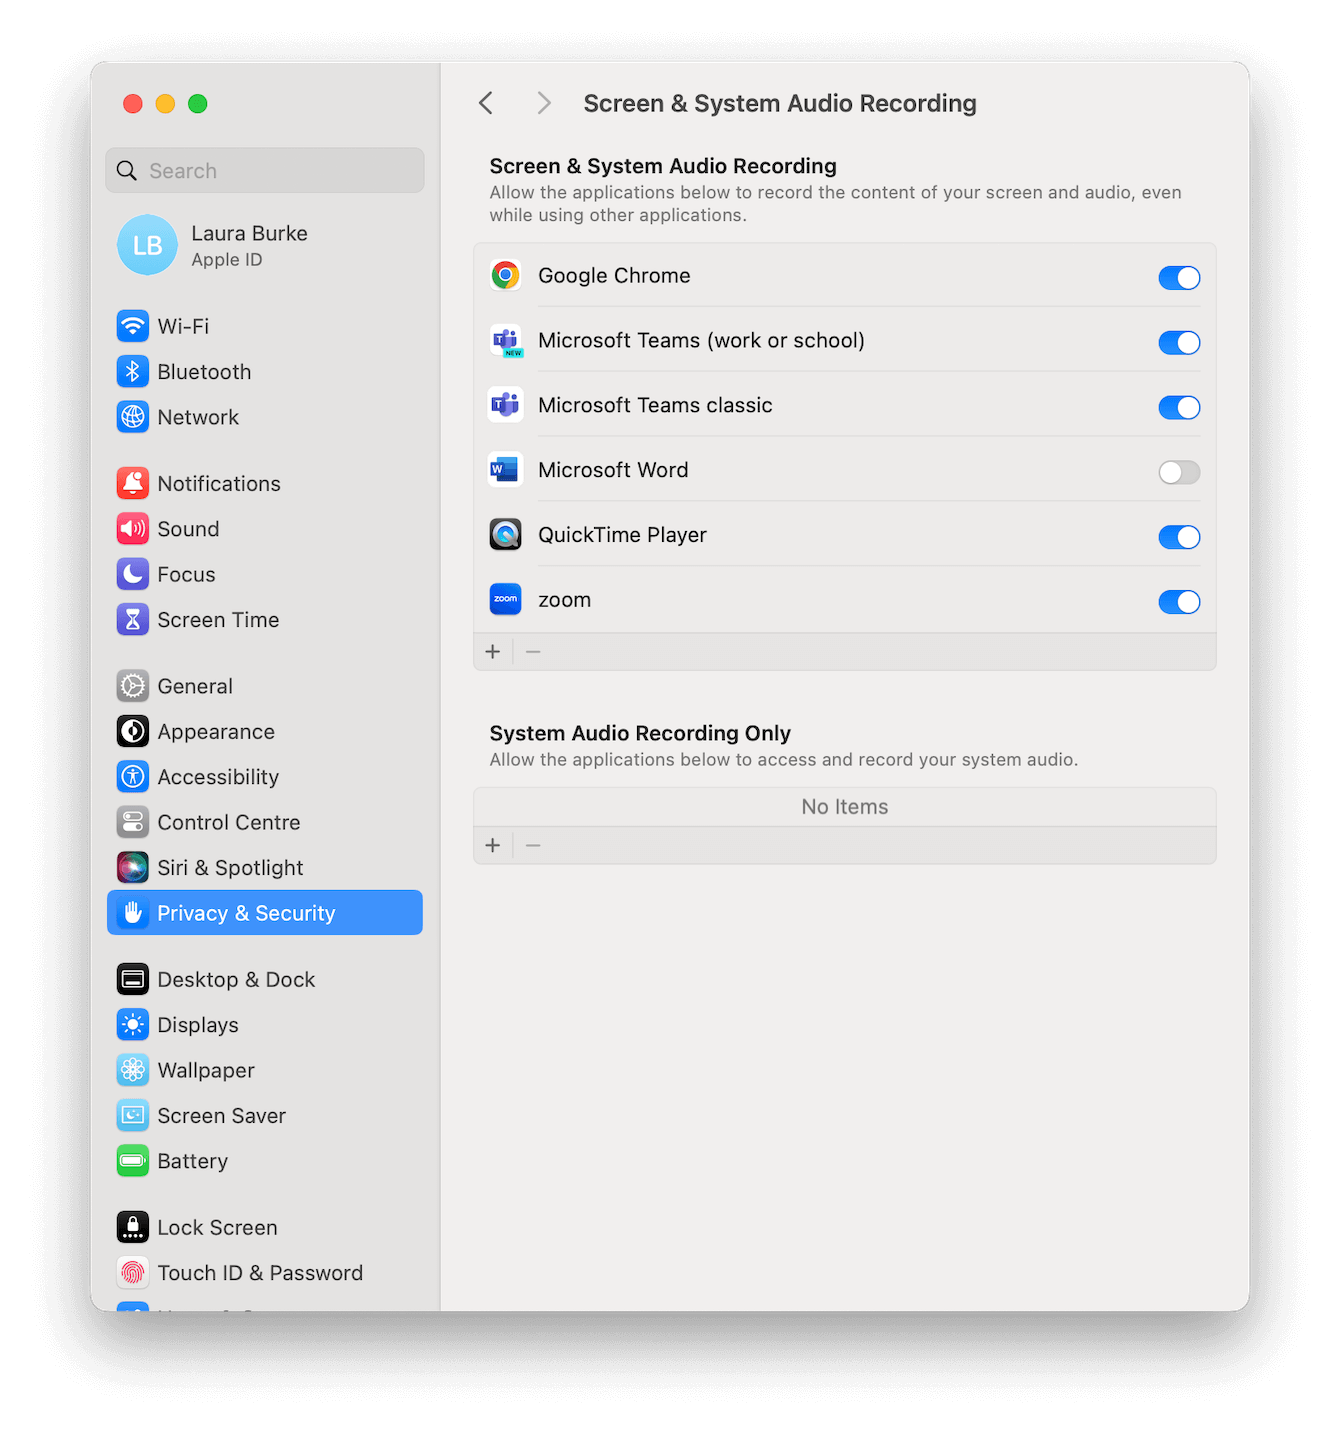
- Navigate to System Settings > Privacy & Security.
- Scroll down and select Screen and System Audio Recording.
Here, you'll see apps that currently have access to screen share. You can toggle access on and off, remove applications by clicking the - button, and add new ones by clicking the + button.
You might need to restart the app if it's open on your Mac. Ok, so let's take a look at how to screenshare in some of our favorite applications.
How to share screen in FaceTime on Mac
Lots of users still don't realize you can screenshare inside a FaceTime call. This handy feature from Apple appeared mid-COVID-19 and is a great way to share and view photo albums, videos, and web pages with your friends and family. Here's how it works:
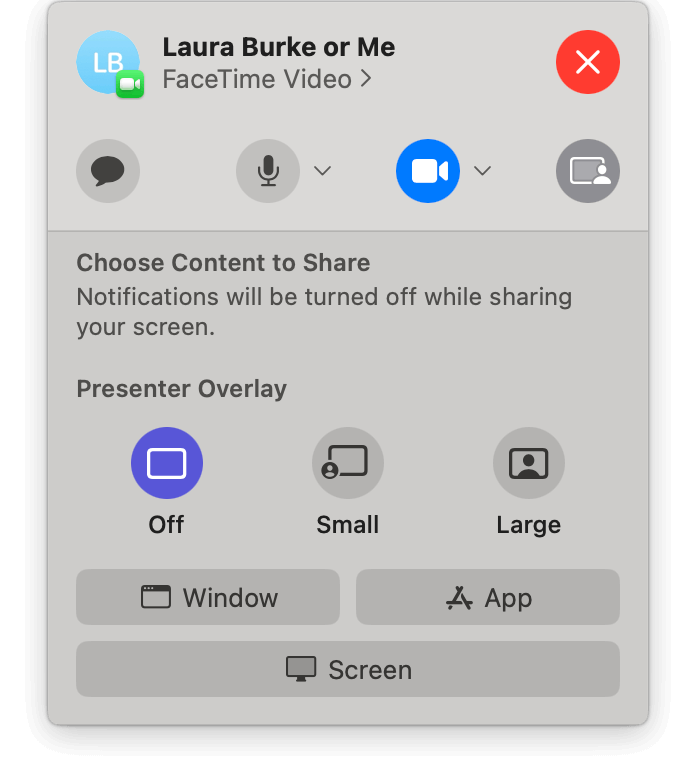
- In an active FaceTime call, look for the screen share icon (bottom left).
- Next, choose what you want to share; this can be a specific window, app, or entire screen.
- When you're done, just click the screen share icon again to stop it.
If your Mac starts to feel a bit slow while screen sharing, then it's probably a good idea to run cleanup tasks to keep it optimized. There's nothing worse than a spinning wheel or unresponsive window while you're trying to showcase your screen; we've got you covered with a tip below.
How to optimize your Mac
Well, you know how to share a screen on a Mac, but you might also discover that it can be a bit demanding on your device's resources.
You can quickly overcome this by utilizing a dedicated tool, like CleanMyMac, to run some basic cleanup tasks for you.
This app comes with a powerful Smart Scan Module that quickly checks for malware threats, speed issues, and system junk. You can even test it for free for seven days first; here's how to get started:
- Open the app and select System Scan.
- Click Scan > Run.

How quick is that? Ok, now back to screen-sharing tips.
Zoom: how to share screen on MacBook
Zoom reports over 300 million daily active users. Screen sharing is one of its most valued features, It's really easy to use, let's take a glance at how it works:
- Open Zoom on your Mac.
- Start or join a call.
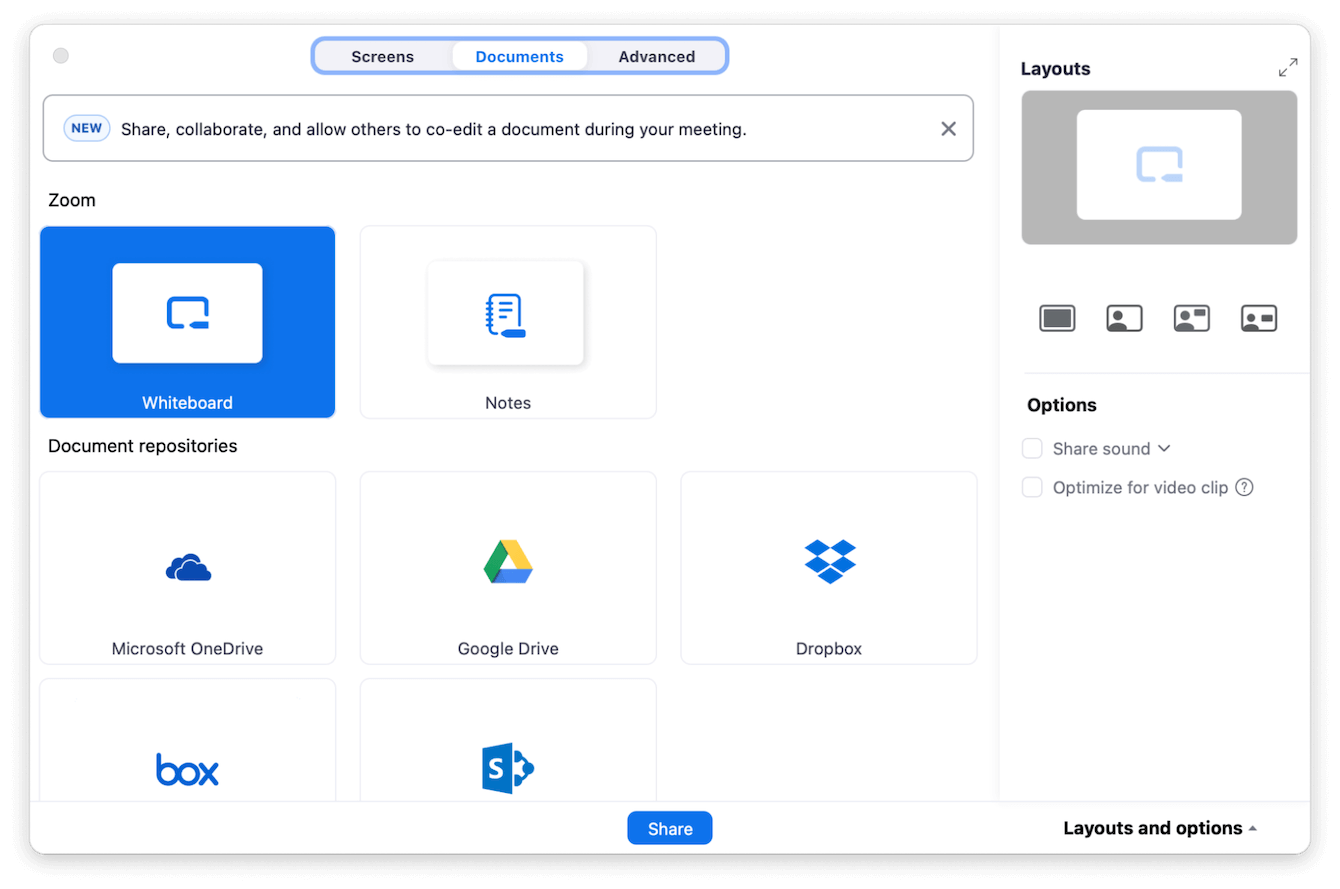
- Along the bottom of the screen, click the screen share icon.
- Now, choose what you want to share from the top of the window; you can pick from Window, Document, or Advanced.
- To stop screen share, click Stop screen sharing.
How to screen share in other apps
Zoom and FaceTime aren't the only apps that offer screen sharing. Each app has its own specific method for sharing your screen, but they all generally follow a similar pattern: look for a screen share icon or button to initiate the feature. Here's a quick overview of how to screen share using these tools:
- Microsoft Teams: During a meeting, click the Share icon located in the meeting controls, choose the screen or window you want to share.
- Skype: While on a call, click the Share screen button (two overlapping squares) and choose the screen or application you wish to share.
- Google Meet: In the meeting window, click Present Now at the bottom-right corner.
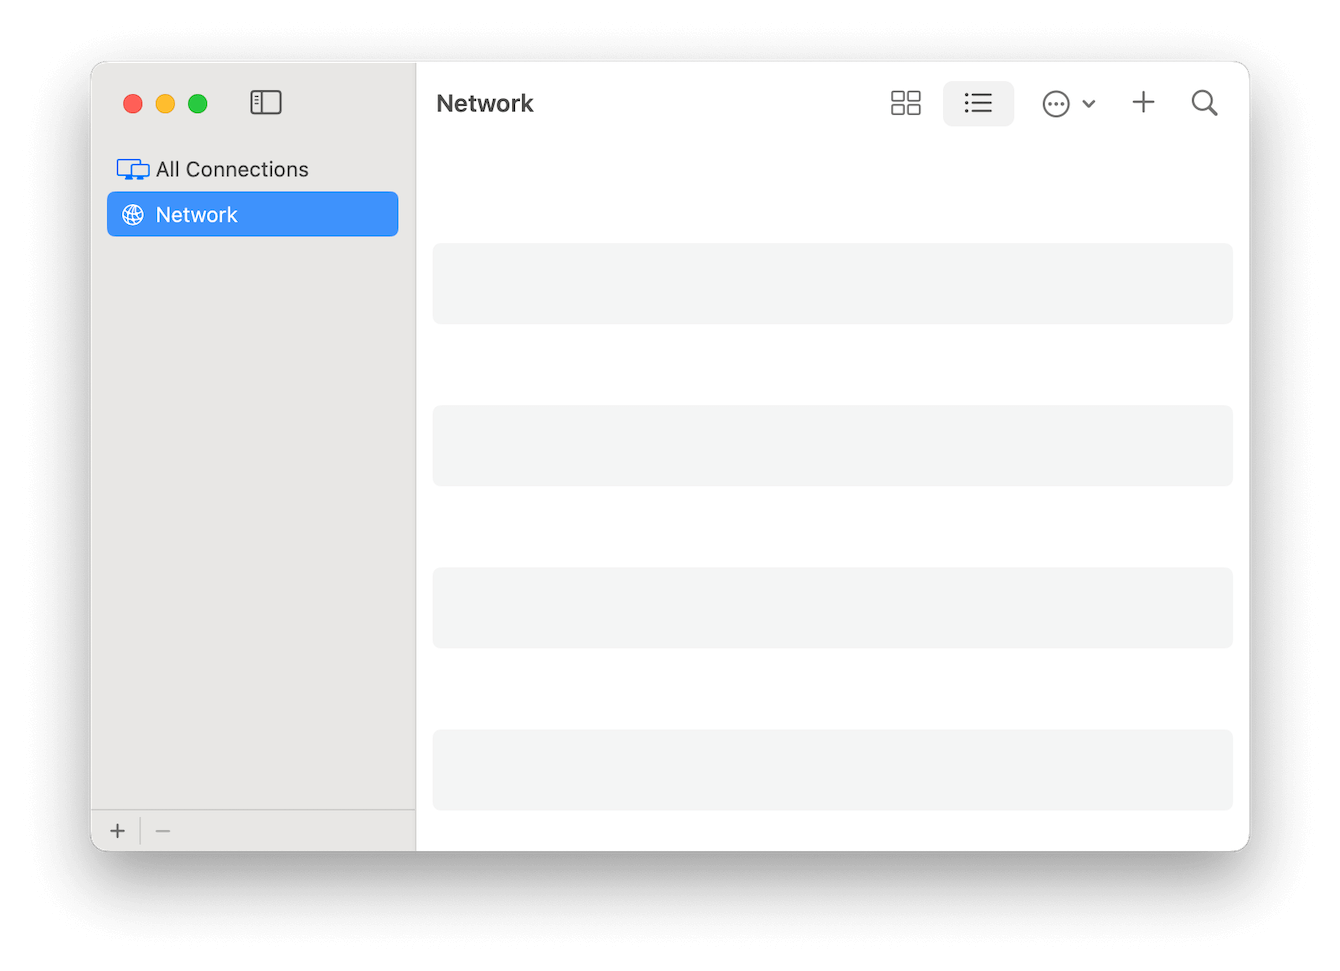
- Mac to Mac: Open the Screen Sharing app from Finder > Applications. Click Network, select the computer you want to access.
All of these tools make it easy to share your screen for presentations, collaborations, and troubleshooting. They're all great; it just comes down to personal preference.
FAQs: How to enable screen sharing on Mac
Is screen sharing safe?
Generally, but you should always only ever share personal or private information with people you trust. The security feature from Apple, enabling screen sharing with specific apps, also helps to ensure that no rogue or malicious apps can take control without your knowledge.
Why is my screen sharing not working?
First up, check which apps have permission, follow the steps outlined in this blog in the how to enable screen sharing on Mac section. Then, you'll need to review your network for any outages and make sure your Mac is running the latest software.
Can I screen share with non-Mac users?
Absolutely, you can screen share with non-Mac users using some of the apps we mentioned here, like Zoom, Microsoft Teams, Google Meet, and Skype.
So, as you can see, screen sharing on a Mac is super simple and useful, opening up a world of possibilities beyond just presentations. Thanks to the tips in this article, you now know how it works and how to keep your Mac running smoothly if screen sharing is weighing it down.