How to do a split screen on Mac: an ultimate guide
Figuring out how to do a split screen on Mac is a productivity game-changer if, like me, you juggle between browser tabs, Finder windows, and Slack messages; this built-in feature from Apple often gets overlooked, but it can seriously save you from drowning in desktop disarray.
If you are writing in Google Docs while referencing PDFs or editing photos while answering emails, I'll walk you through how to split your screen, plus some troubleshooting tips and a couple of other tips I've learned along the way.
What is Split View on Mac?
Split View is a built-in window-snapping feature from Apple that lets you view two apps side by side without resizing them manually.
It's not as fancy as Stage Manager or some of the third-party tiling window managers, but it's clean, minimal, and gets the job done without the need to pay or download extra tools.
When I'm researching and writing at the same time, I always use Split View, and it's become one of those little functionalities I can't work without. Split View is still part of Mission Control's broader ecosystem, but with slightly smoother transitions compared to previous versions. I've noticed fewer bugs switching between desktops since updating.
How to Split Screen on Mac
Let's walk through two practical ways how to set up a split screen on a Mac. I've tested both on my 16-inch MacBook Pro and a Studio Display, and the process works equally well across different screen sizes.
Method One: Use Split View via the Full Screen button
This is the fastest way to activate Split Screen, and honestly, it's the one I use almost every day.
-
Open your two chosen apps you want to work with side by side. Don't worry about resizing them yet.
-
Hover over the green button (officially called the Full-Screen Mode) in the top-left corner of one window.
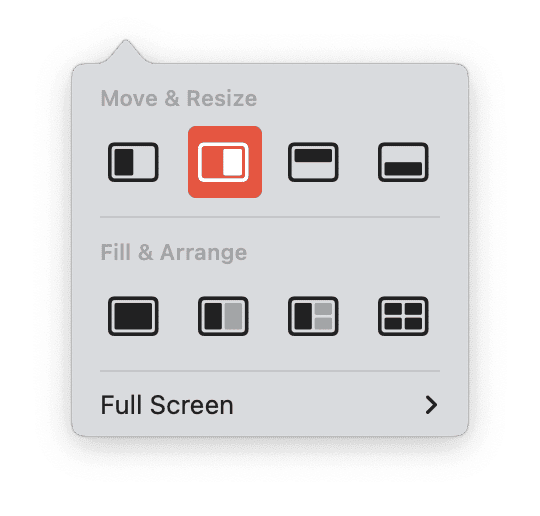
- When the little visual menu appears, choose either the tile window to the left or the right of the screen.
- Your screen will shift into Split View, and you'll be prompted to select the second app to fill the opposite side. If not, then just repeat this process for the second app and choose the opposite side this time.

In macOS Sequoia, this whole flow feels snappier. The transition into Split View is smoother than it was in Ventura, and the responsiveness has improved. One thing I've noticed is that it even remembers your previous app positions if you repeat the same layout often.
Heads up: Not every app plays nice with this feature. If the green button doesn't show those tiling options, it means the app doesn't support Split View; this happens to me sometimes with utilities like Zoom or certain non-native tools.
Method two: Use Mission Control to arrange windows manually
This method offers more control, especially if you don't want full 50/50 splits.
-
Open Mission Control (swipe up with three fingers on the Trackpad),
-
Drag one app window to the top to create a new desktop space.
-
Drag a second app onto that new space, and you'll now have both apps side-by-side on one virtual desktop.
This way does feel a bit more hands-on.
Useful tips about how to do Split Screen Mode
How to exit Split Screen mode
When you're ready to go back to normal view, just click the green button again to return to single-window mode.
Can you use Split Screen with more than two apps?
Apple has quietly expanded multitasking support, and if you've seen the new layout grid that appears when you hover over the green Full-Screen control, you've probably noticed you're no longer limited to just two windows.
Now, you can:
-
Select from a 2-up, 3-up, or even 4-up layout directly from the green button's menu.
-
Instantly snap up to four windows into clean, evenly spaced zones, no dragging, no resizing, no fuss.
-
Use Stage Manager or Mission Control to add even more flexibility, especially if you prefer overlapping windows or want to mix in Slide Over.
The four-window layout isn't just a gimmick; it's genuinely useful. When I'm writing, I'll stack Safari, Pages, Notes, and Music all at once without any performance drag.
Apple isn't calling this a full window manager yet, but it's heading there. And frankly, with how visual and dead-simple this new layout menu is, I rarely need third-party tools anymore.
All you need to do is use the Full Screen button method, but select the layout you desire; it is simple.
Troubleshooting Split Screen not working on Mac
Here's what I ran into and how I fixed it.
The green button doesn't show layout options
Make sure the app supports full-screen mode. Some menu bar utilities and outdated apps just don't play nice.
Can't drag a second window into Split View?
Restart your Mac. No joke. I've had this bug come up a couple of times after waking from sleep.

Mission Control behaving weirdly?
I recommend using the Performance feature in CleanMyMac. It runs simple yet important maintenance tasks on your Mac, which can sometimes interfere with smooth window behavior. After running it, Mission Control and Split View tend to snap into shape. One more way to keep your Mac from feeling sluggish. Here's how it works:
-
Open the app and click Performance > Scan.

- Click View All Tasks and see what's available.

- Select any items and click Run.


App windows stuck or overlapping weirdly?
Check System Settings > Displays > Resolution. Sometimes, scaled resolutions throw off Split View proportions.

Well, I think we can safely say we've covered everything there is on how to split screen on a Mac. We'll keep this updated if any new features or changes come along, but for now, enjoy your streamlined view.