How to uninstall Dropbox on your Mac
First released in 2008, Dropbox is undoubtedly a great cloud storage tool. It allows account holders to store, back up, and sync files across multiple devices. Today, it's used by over 700 million users worldwide, and an estimated 1.2 billion files are uploaded daily.
Removing unnecessary applications is a great place to start if you're looking for easy ways to reclaim disk space. There's not much benefit to having the Dropbox application on your Mac unless you need offline access because the web login is so simple to use.
Fortunately, you can uninstall Dropbox from Mac to save space, and it won't delete your Dropbox account. This will come as great news to those MacBook users fighting the battle against a full hard drive or a glitchy application.
In this article, we'll show you two fool-proof ways to remove Dropbox completely and walk you through how to reset Dropbox if you're encountering glitches or problems with the app on your Mac.
How to remove Dropbox from Mac in one click
When it comes to removing applications from your MacBook, the quickest and most effective way is by using the Applications feature from CleanMyMac. Not only can you remove Dropbox from Mac in one click, but this smart tool ensures no application debris is left behind.

If you're yet to test this tool, get your free trial here, then follow the steps below to get started.
-
Open CleanMyMac.
-
Locate and select Applications from the sidebar.
-
Run a scan and click Manage My Applications.
-
In the Uninstaller section, select Dropbox from the list and click Uninstall.

That's it; Dropbox is now completely and safely erased from your Mac.
If you need to access your Dropbox account, just head to the Dropbox login page on their website.
This simple process can also be used to remove any other apps hanging around, taking up space on your device that you no longer need.
How to uninstall Dropbox from Mac manually
So, not everyone is comfortable using third-party tools; if that's you, then here's how to remove Dropbox manually.
It's important to mention that simply dragging undesirable apps to your Trash or Bin does not ensure all file leftovers and hidden content is removed from your Mac. The icon may no longer be visible, but leftover digital clutter remains and continues to take up space.
There are a few steps to removing apps manually; let's take a closer look.
Step one: Remove the app
This is the step most users are familiar with, but here's a quick reminder for those new to the world of Mac.

-
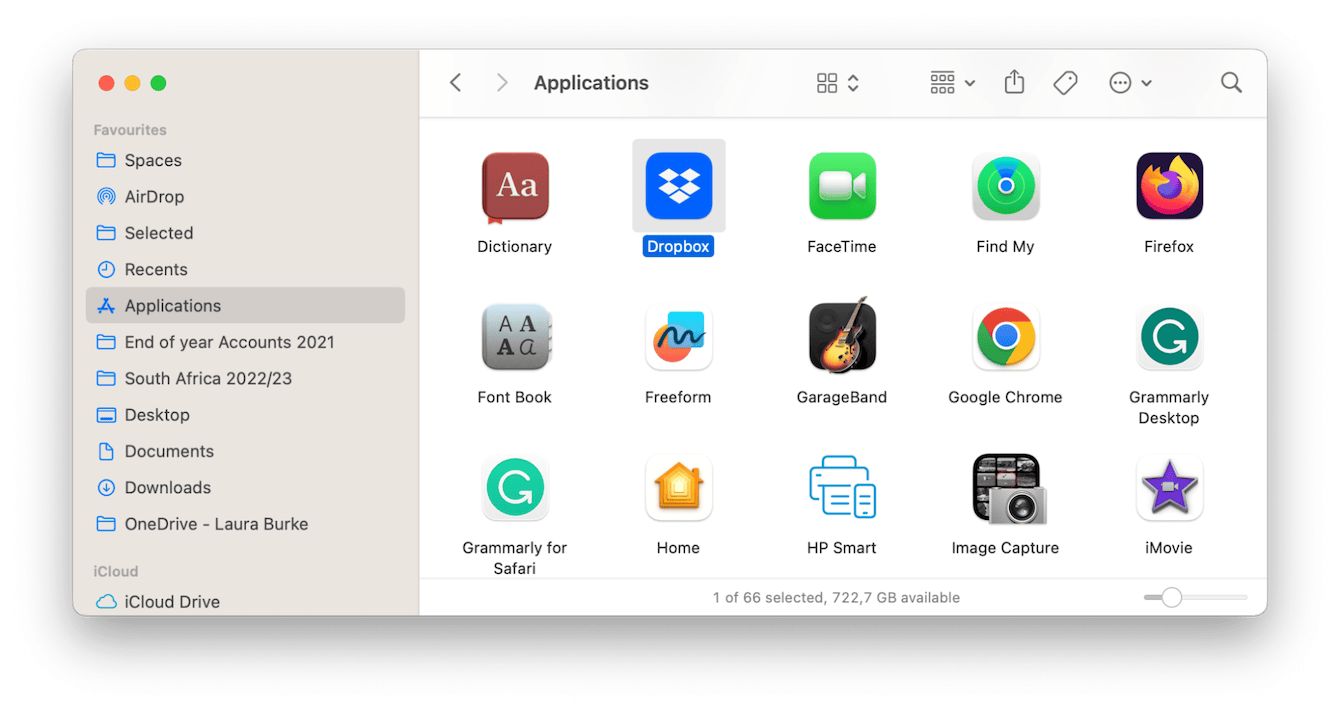
Open Finder > Applications.
-
Find the Dropbox icon and drag it to your Trash bin.
-
Empty your Trash to complete the first step.
Step two: Remove application leftovers
Now, the part that most people neglect. It's time to locate and remove hidden associated application files.

-
Open the Finder and from the top menu bar, click Go > Go To Folder.
-
Enter the below file path and press Return:
~/Library -
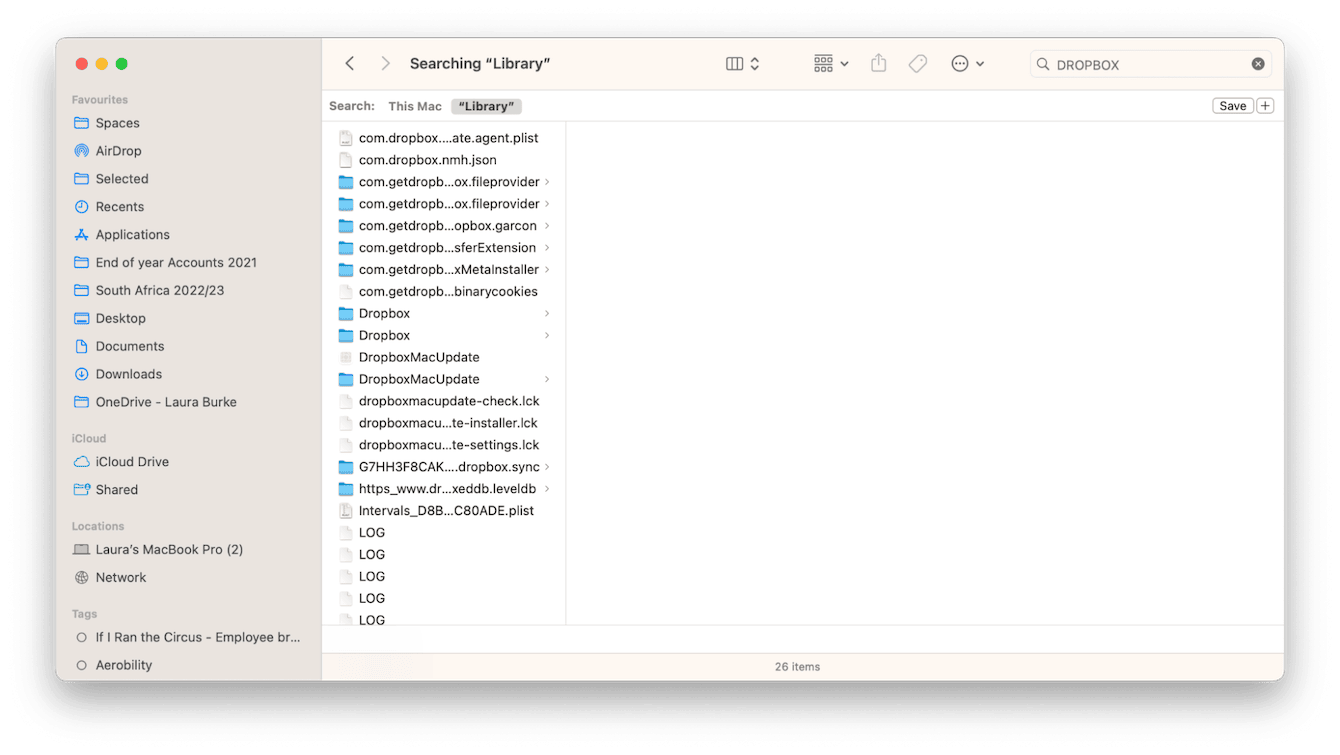
In the search window, type Dropbox and select Library as the search location.
-
All the associated application leftovers will be displayed.
-
Drag them all to your Trash, then empty your Trash.
You'll need to check the below file paths for further leftovers:
-
~/Library/Caches
-
~/Library/Logs
-
/Library/Application Support
-
~/Library/Containers
-
~/Library/Application Support
-
/Library/Address Book Plug-Ins
-
~/Library/Cookies
-
/Library/Preferences
So, now you know how to delete Dropbox from Mac. As you can see, there's a bit more to the manual method, but it's worth doing it correctly; otherwise, application leftovers can clog down your Mac.
If you're looking for more space-saving ideas, here are a few extra suggestions:
-
Clean up your Desktop.
-
Clear out your Downloads folder.
-
Move all your videos and photos to external storage or another cloud solution.
If you are searching for more easy-to-follow tips on this subject, check out this article called How to clean up a startup disk on macOS.
Tip: If you’re using cloud solutions like Dropbox, it’s easy for files to pile up and take more space than you realize. A simple way to manage this is with CleanMyMac’s Cloud Cleanup feature. You can connect your Dropbox (or other cloud accounts), see which files are taking up the most space, and remove large, old, or duplicate items in just a few clicks. Get your free CleanMyMac trial — test the app for 7 days and see how Cloud Cleanup and other tools work.
How to reset the Dropbox app
If the main reason you wanted to delete Dropbox is that the app has been freezing, crashing, or taking ages to load, there might be another way.
Instead of completely removing it, try resetting it. This will put the app back to its original state, which should eliminate annoying glitches.
So, how do you do it? Well, using the app I mentioned earlier, CleanMyMac. Let's take a look.
-
Open the application once again.
-
Click Applications > Scan > Manage My Applications.
-
In the Uninstaller tab, find Dropbox on the list
-
Click an arrow (>) next to its name, select everything except Binaries, and click Remove.
This way, you can reset not only Dropbox but also any other app that misbehaves, even if it comes preinstalled with macOS.

Again, if you really don't want to use a third-party tool, you could try the following ideas instead:
1. Update your macOS
When your MacBook isn't running the latest software, you'll start to experience a few issues, and glitchy apps are one of them. Here's how to check for updates:

- Select System Settings from the main Apple menu.
- Go to General > Software Update.
- Click Update Now and follow the on-screen instructions if an update is available.
2. Restart your MacBook
When applications aren't running as smoothly as they usually do, restarting your Mac is a great way to improve performance, as it clears stored memory and stops any tasks from eating up your RAM.
Just head to the main Apple menu and click Restart.
3. Reinstall Dropbox
The final tip here is to completely uninstall Dropbox using the suggested methods above, then head back to the main Dropbox website and download a fresh install of the application.
Well, we've covered everything there is to know on how to uninstall Dropbox on your Mac. You've got two great ways to remove the app and some bonus ideas on how to free up space and reset the Dropbox application.
If you appreciated this read, be sure to come back soon for more Mac insights, tips, and tricks.

