How to use file sharing on a Mac
Curious about file sharing between MacBooks? It couldn't be simpler thanks to the handy but relatively unknown built-in feature from Apple called file sharing.
There are, of course, multiple ways to share files, including iCloud, email, and external storage devices, but if you are looking for a straightforward way to share files with your family or colleagues, you've landed in the right spot — leave your USB stick behind and join us as we walk you through everything you need to know right here about Apple's file sharing feature.
What is Mac file sharing?
Let's start by explaining what exactly file sharing on a Mac is.
Located in your device's shared preferences, the file sharing feature allows you to seamlessly share files, such as documents, images, and videos, or folders on your Mac with specific users or people on your network. You can also give permission to someone else to access your entire MacBook if you wish.
That sounds great, right? Well, it is. Not to mention, it's free and really easy to set up.
But before diving into the setup instructions, it's a good reminder to clean up your Mac. After all, there's no point in sharing junk and clutter.
Thanks to Mac cleaning utility CleanMyMac, you don't need to spend hours doing this. Two of its powerful modules can reduce system junk and save space in just a few quick clicks. If you haven't tested this app yet, get 7 days free here.
How to locate and remove large and old files instantly:
- Open the app and select Large & Old Files > Scan.
- Enjoy browsing the smart overview and searchable categories.
- Select items that are no longer required and click Remove.

How to quickly eradicate system junk:
- Open the app once again or select System Junk > Scan.
- Once finished, click Clean.

Okay, now that we've covered the essentials, let's return to the shared folder on your MacBook.
How to set up file sharing on a Mac
Let's break this down into two steps to really simplify the process.
Step one: Enable file sharing for Mac
- Go to the main Apple menu > System Settings > General > Sharing.
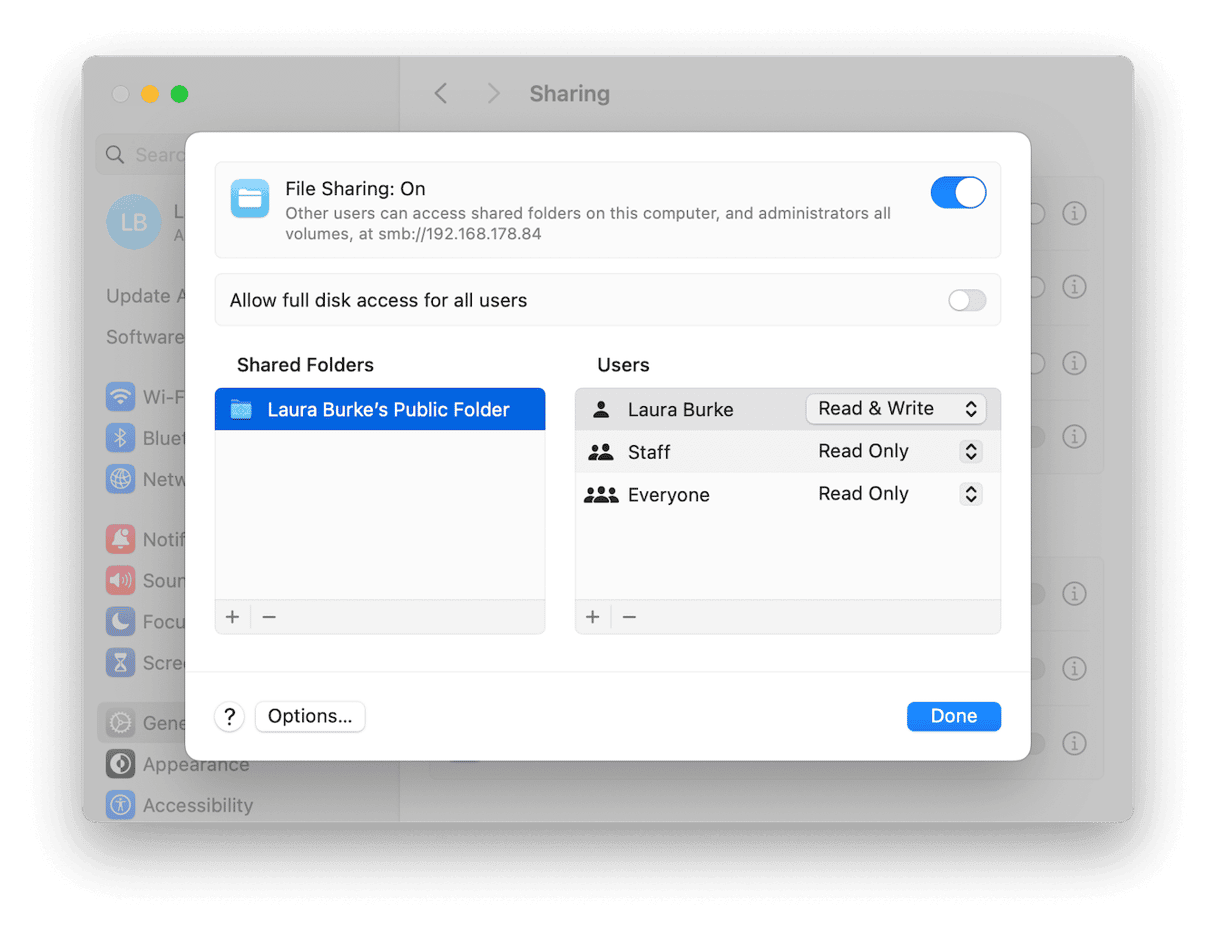
- Toggle on File Sharing and select the information button next to it.
- Under the shared folder column, you'll find a public folder with your username.
- You can add a new shared folder by clicking the + button.
- You can also toggle on Allow full disk access to all users in this window.

Step two: Configuring file sharing
So, it's time to decide what you want to share and with whom, let's take a look:
- Select your chosen shared folder; under the user column, you'll notice three options: your username, Everyone, and Staff. You can decide what access you give by selecting the drop-downs next to each setting.
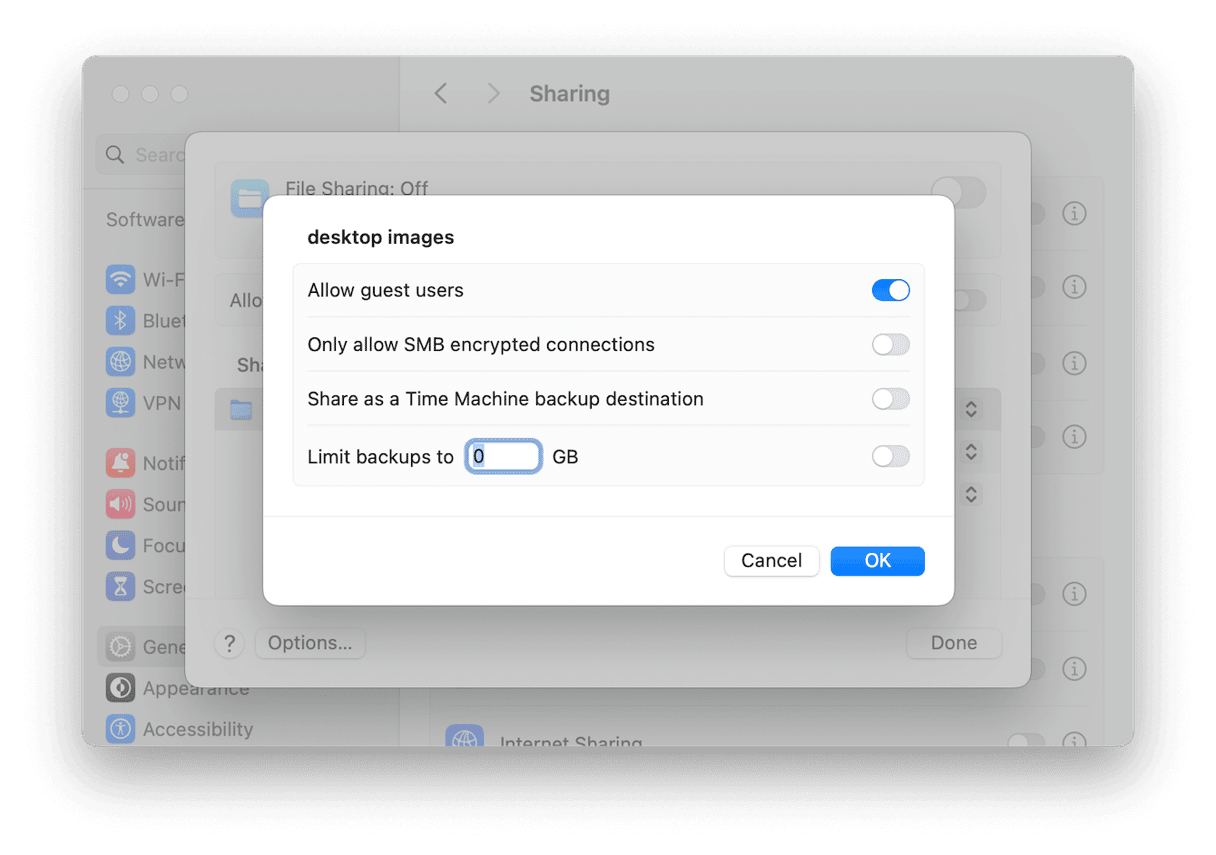
- For more in-depth settings options, Control-click or right-click your shared folder, and then choose Advanced Options from the menu. Here, you can choose from:
- Only allow SMB-encrypted connections
- Allow guest users
- Share as a Time Machine backup destination
- Limit backup size


Okay, so now that we've enabled and set up file sharing, it's time to use it; jump to the next section.
Where is the shared folder located?
Here's how to access your shared folder:
- Open Finder, and under Locations, select your Macintosh HD.
- Go to Users > Folder with your username.

How to share files between Macs
If you want someone else with a Mac to access your shared folder, make sure they have your account login credentials and are connected to the same network as you. Then, they just need to follow the steps below to access the file server.
- Open Finder > Locations > Select your Mac.
- Select Connect As and enter your account password.
If you have difficulty here or need further in-depth information, you can read more on Apple's official setup guide here.
Troubleshooting tips for file sharing on Mac
Users sometimes encounter file-sharing issues, which are most commonly caused by network or Wi-Fi connection issues.
Here's a few quick tips:
- Restart your Mac from the main Apple menu.
- Toggle your Wi-Fi on and off.
- Restart your router.
- Contact your internet provider for local outage issues.
So, before we finish up, let's take a final look at some commonly asked questions.
FAQs: Macintosh file sharing
Why is File sharing not working on my MacBook?
As mentioned above, connection issues are the biggest problem for users. It's also worth ensuring you're running the latest macOS so that any known glitches or bugs with file sharing have been addressed and fixed by Apple. Head to your System Settings > General > Software Update to check.
Is file sharing safe?
File sharing is pretty safe; people can't access your shared folder without your user account password. However, it's worth mentioning: never share passwords with people you don't trust. If in doubt, once you've finished sharing files, you can disable file sharing from the General settings and change your user account password.
Can you share files with a PC?
This question is asked a lot, and the good news is yes. You can read Apple's user guide here for more details.
So, there we have it; now you know how file sharing between Macs works, how to enable it, and how to configure your settings. Until next time.