Fixes and solutions to the “Wi-Fi: No hardware installed” Mac error
Our Macs very quickly become useless when we can't get online. If you use Wi-Fi daily, you're undoubtedly acquainted with some Wi-Fi troubleshooting, but there is one perplexing error message that leaves many Mac users a bit lost. If your Mac suddenly displays the “Wi-Fi: No hardware installed” error, you might wonder what is happening.
Your Mac definitely has Wi-Fi hardware, so what's the issue? Keep on reading, and we;ll explain everything as well as provide some bonus content on fixing another common error — Wi-Fi not configured. Let's dive in!
Why the “Wi-Fi: No hardware installed” error appears on Mac
Before we dive head first into fixing this issue, it's a good idea to try and understand what exactly is happening.
There are two likely reasons you may see the "Wi-Fi: No hardware installed" message:
-
Corrupted network settings
-
Hardware failure
Before you jump to panic stations, we've got all the tips you need right here to help you troubleshoot and get back online. So let's not waste another second; let's go:
How to troubleshoot the “Wi-Fi: No hardware” issue
Now that we've discussed the potential reasons for this issue, let's start with the fixes. Work your way through these tips until you're back online.
1. Restart your Mac
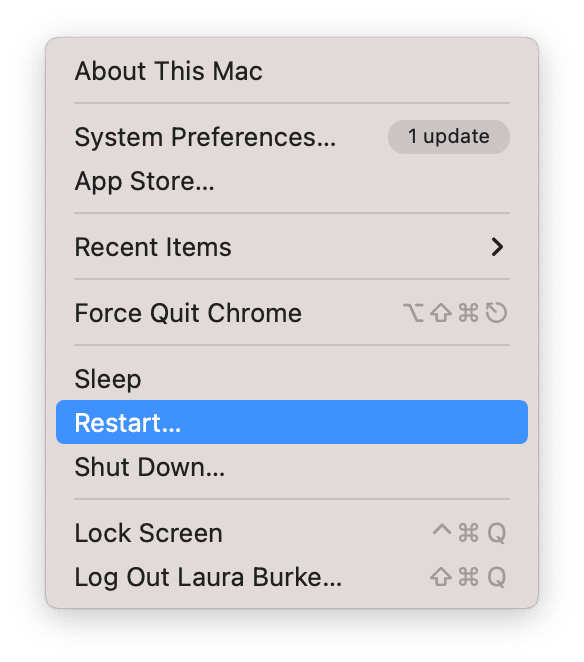
I can already hear many of you sigh with frustration, yes, it's beyond obvious, but a quick system restart always needs to take the top spot on any troubleshooting list. It's surprising how many issues a quick restart can solve, so head to the main Apple menu and select Restart.
2. Reset SMC
If a quick restart didn't work, it's time to reset your SMC or System Management Controller: this controls various things like power management, status lights, and fan performance. Resetting SMC may help you fix uncommon issues on Mac:
For Intel-based Mac:
-
First, shut your Mac down.
-
Disconnect your power cable and wait for around 15 seconds.
-
Reconnect your power cable, and wait for another 5 seconds.
-
Turn your Mac back on as normal.
For M1 Macs:
Many people don't realize that on M1 Macs, you can't officially reset the SMC: this is because the M1 chips now manage all of those functions. Apple says that shutting down your Mac completely, and waiting for 30 seconds before turning it on again, has a similar effect.
Tip: Another common issue is Mac not connecting to Wi-Fi. Here are all the fixes you might need should you encounter it.
3. Reset PRAM or NVRAM
Next, it's time to try a PRAM or NVRAM reset. Not sure which one your device has, but no problem, the process is exactly the same.
For Intel-based Macs:
-
Shut down your Mac via the main Apple menu.
-
Turn your device on and immediately press the Option-Command-P-R keys.
-
After 20 seconds, release the keys or whenever you see the Apple logo or hear the startup sound.
-
Now, let your Mac restart.
For M1 Macs:
Once again, on M1 Macs is not possible to reset your PRAM or NVRAM: instead, your device automatically takes care of issues when discovered or during a shutdown.
4. Run some Mac maintenance
If the above tips haven't solved the error, it's time to run some basic Mac maintenance.
Running a set of maintenance tasjs can help to fix application errors, resolve permissions, and improve your drive performance. This can often solve hardware issues and, in many cases, prevent them from occurring.
Undoubtedly, the easiest way to do this is by using the Performance feature from CleanMyMac. It's designed and built for exactly this, making it simple and effortless. You can test it for free — get your free trial here. Then, follow the simple steps below.

-
Open CleanMyMac and click Performance > Scan > View All Tasks.
-
Select the routines you want to perform and click Run. In relation to Wi-Fi, do not forget to select Flush DNS Cache.
You've just optimized your Mac.
5. Reset your network settings
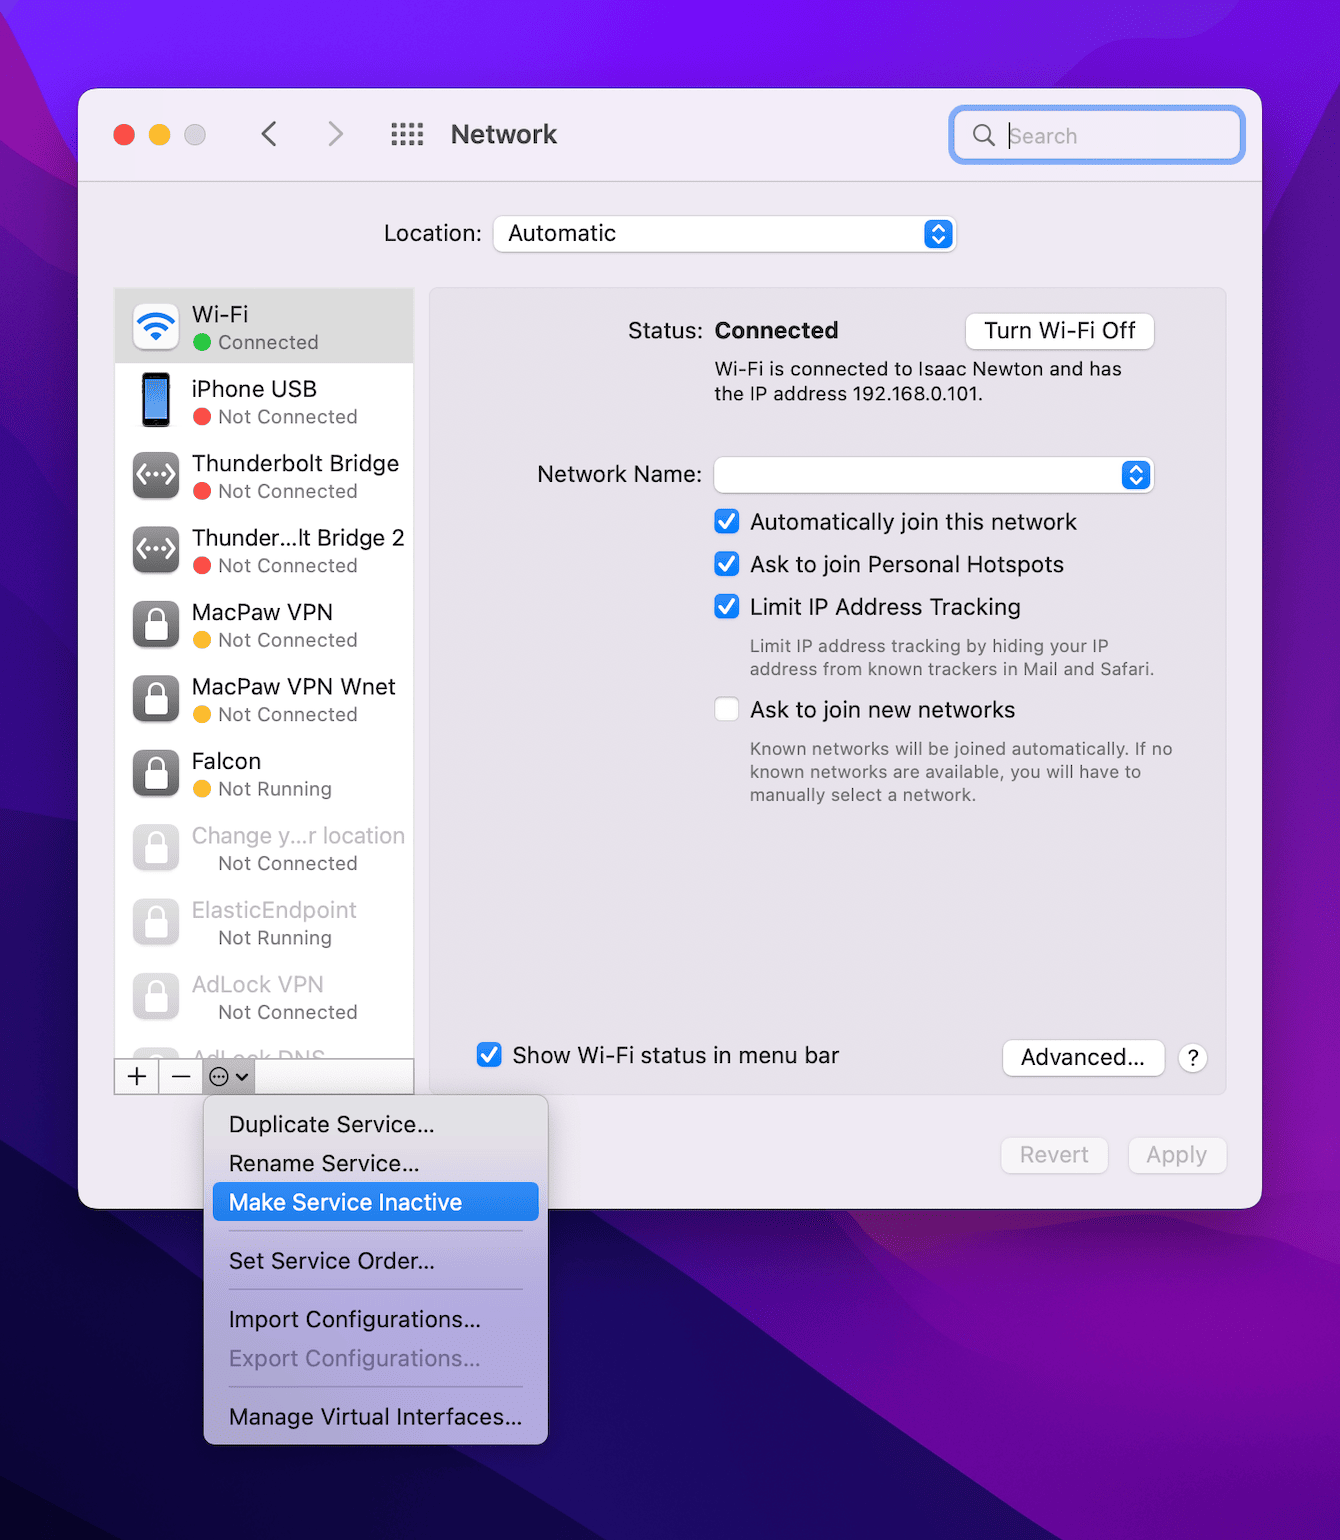
It's possible that your network settings have become corrupted, causing the error message and that annoying exclamation point to appear over your top menu Wi-Fi icon. Here's how to check:
-
From the main Apple menu > System Preferences > Network.
-
In the left hand list, select your Wi-Fi network, then press the additional options icon (circle with three dots).
-
Select Make Service Inactive and press Apply.
-
Now restart your Mac.
-
Repeat the above steps, this time selecting Make Service Active.
Your Mac will now scan for networks and try to connect to any known ones.
Did you know? Wi-Fi glitches are not the only Mac issue you might face. A more annoying message is "Your disk is almost full". Here's how to fix it and free up space on Mac.
6. Forget saved network connections
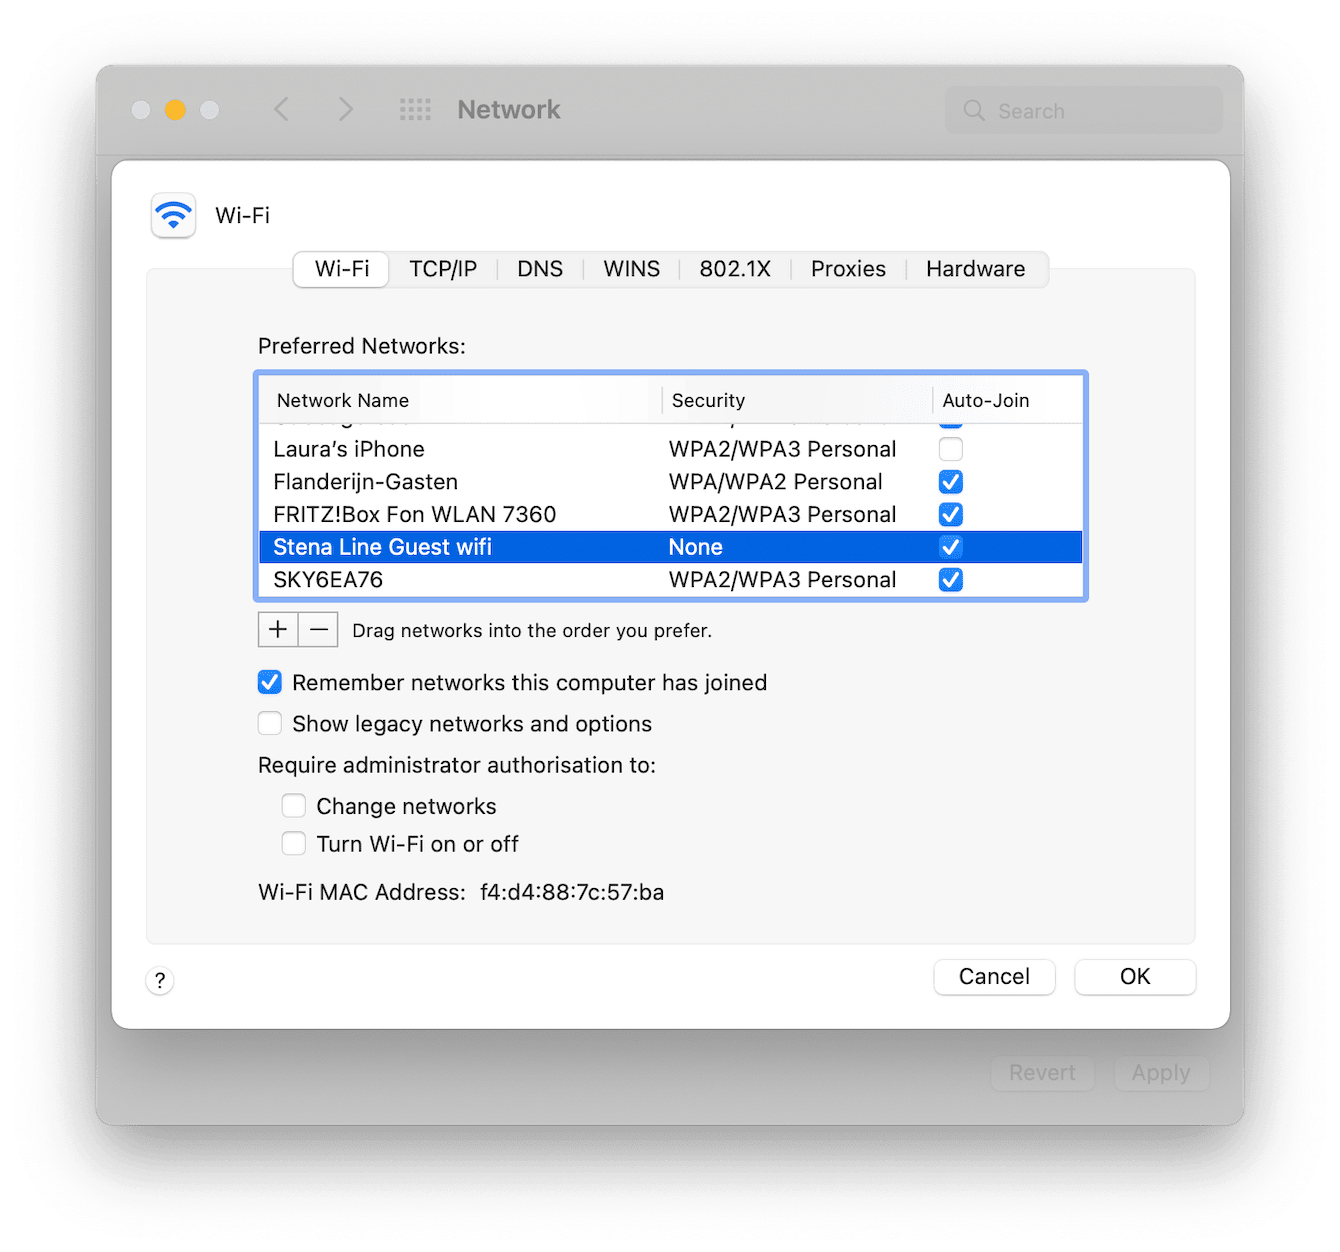
You could also try forgetting your existing network connection and removing it from your system; here's how:
-
From the main Apple menu > System Perferences > Network.
-
Locate your Wi-Fi network, then press Advanced.
-
Under the Preferred Network list, remove all saved networks by selecting them and pressing the '-' key.
-
Press OK once complete, and try connecting to your Wi-Fi network once again.
7. Remove the NetworkInterfaces.plist
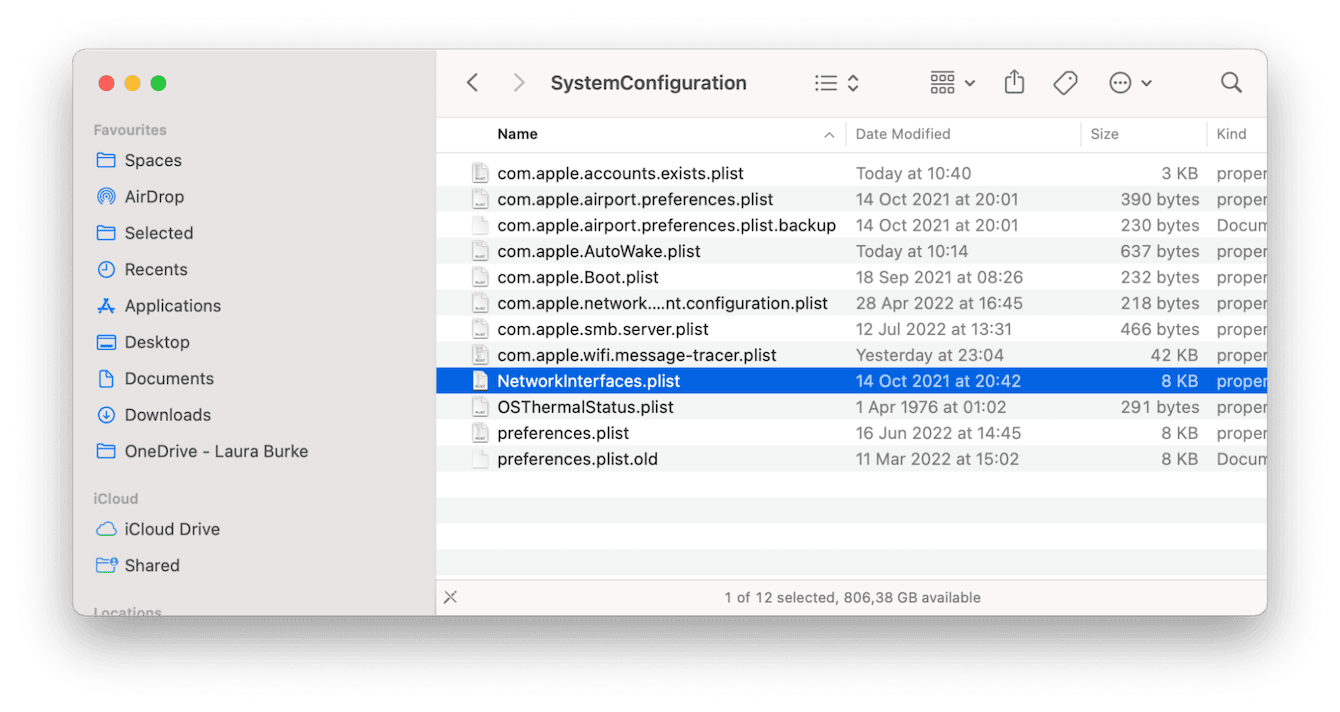
As a final solution, you can remove the networkinterfaces.plist from your macOS. Here's how:
-
Open Finder and select Go from the top menu bar.
-
Click Go To Folder and enter the below location:
/Library/Preferences/SystemConfiguration
-
Locate the NetworkInterfaces.plist drag it to your Trash bin.
-
Finally, restart your machine.
Bonus tips: How to fix Wi-Fi not configured on Mac
You can run into another Wi-Fi-related glitch — Wi-Fi not configured. If you're having this issue, you'll most likely see an X over the Wi-Fi icon in your top menu bar. When you click it, you'll also see the Wi-Fi not configured message.
All of the tips outlined above should help fix it, but there are a few more things you can do.
1. Reconnect your Wi-Fi connector
-
Open your Network settings from System preferences within the main Apple menu.
-
Once open, click the + icon.
-
From the interface drop-down, select Wi-Fi, then come up with a name and press create.
-
From the list, select the Wi-Fi service you just made.
-
Press the Turn Wi-Fi On button.
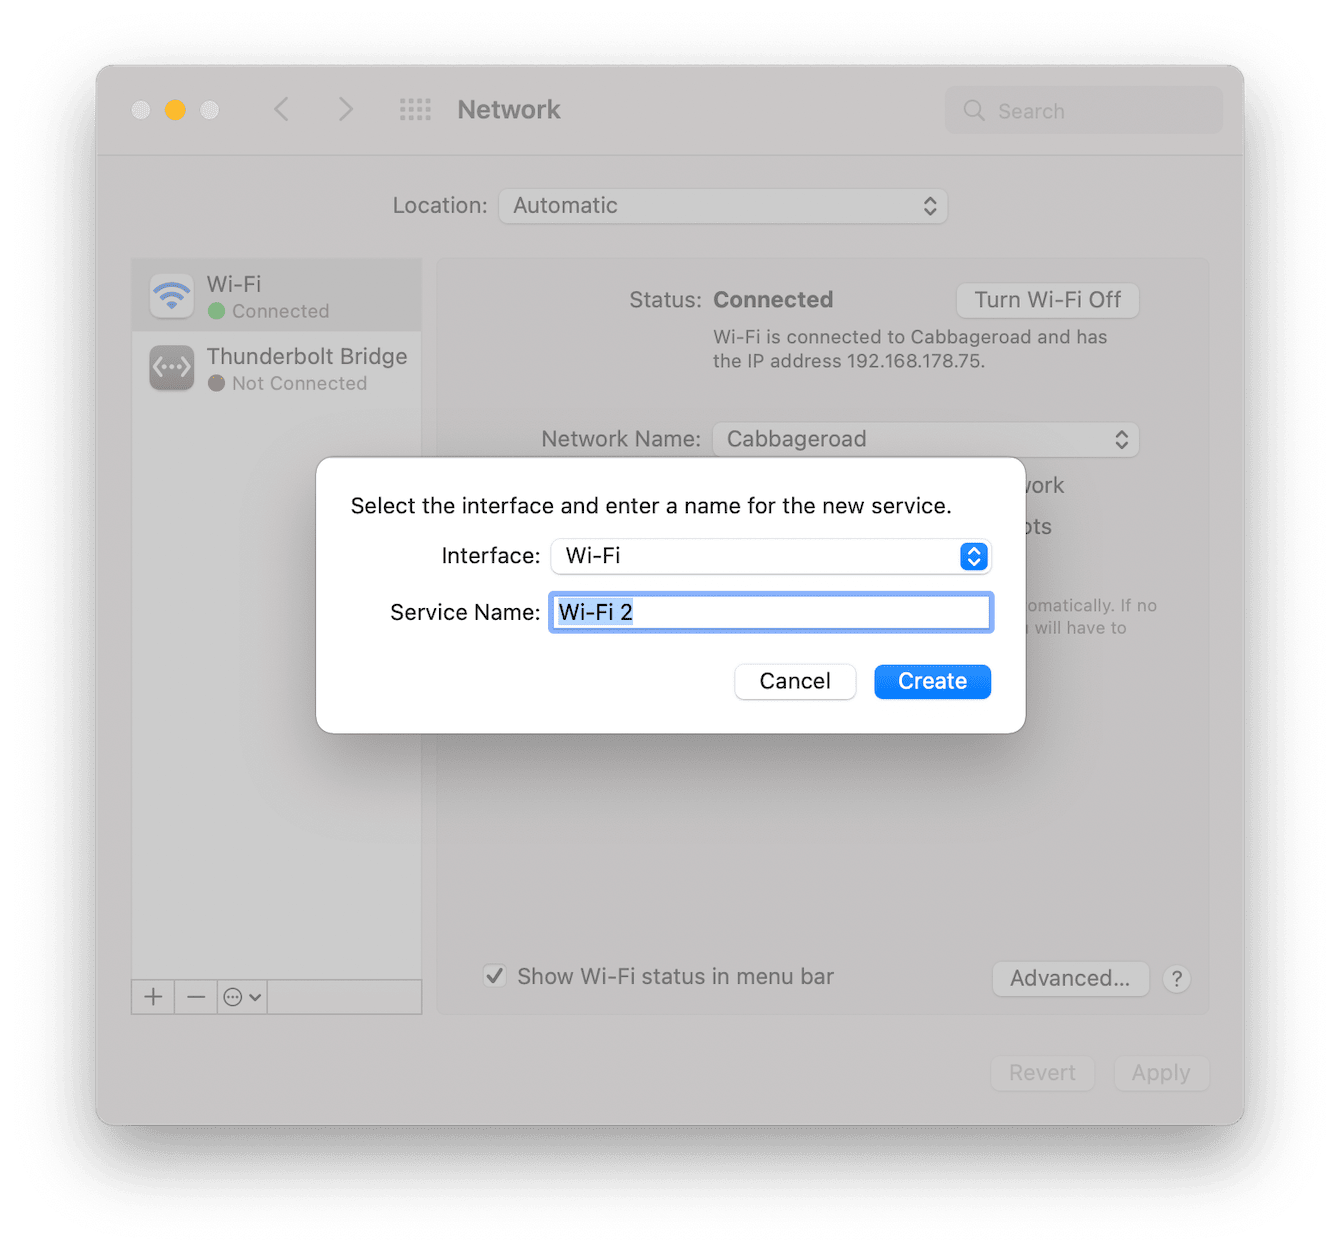
Check if this solved your connection issue; if not, jump to the next tip.
2. Renew your DHCP Lease
Renewing your IP address can resolve many connection issues, including the Wi-Fi not configured on Mac error. Thankfully, it's pretty easy to do. Here's how:
-
Once again, open your Network settings (follow the steps above).
-
Select your Wi-Fi from the list and press the Advanced button.
-
Locate the TCP/IP tab.
-
Press the Renew DHCP Lease button and hit Ok.
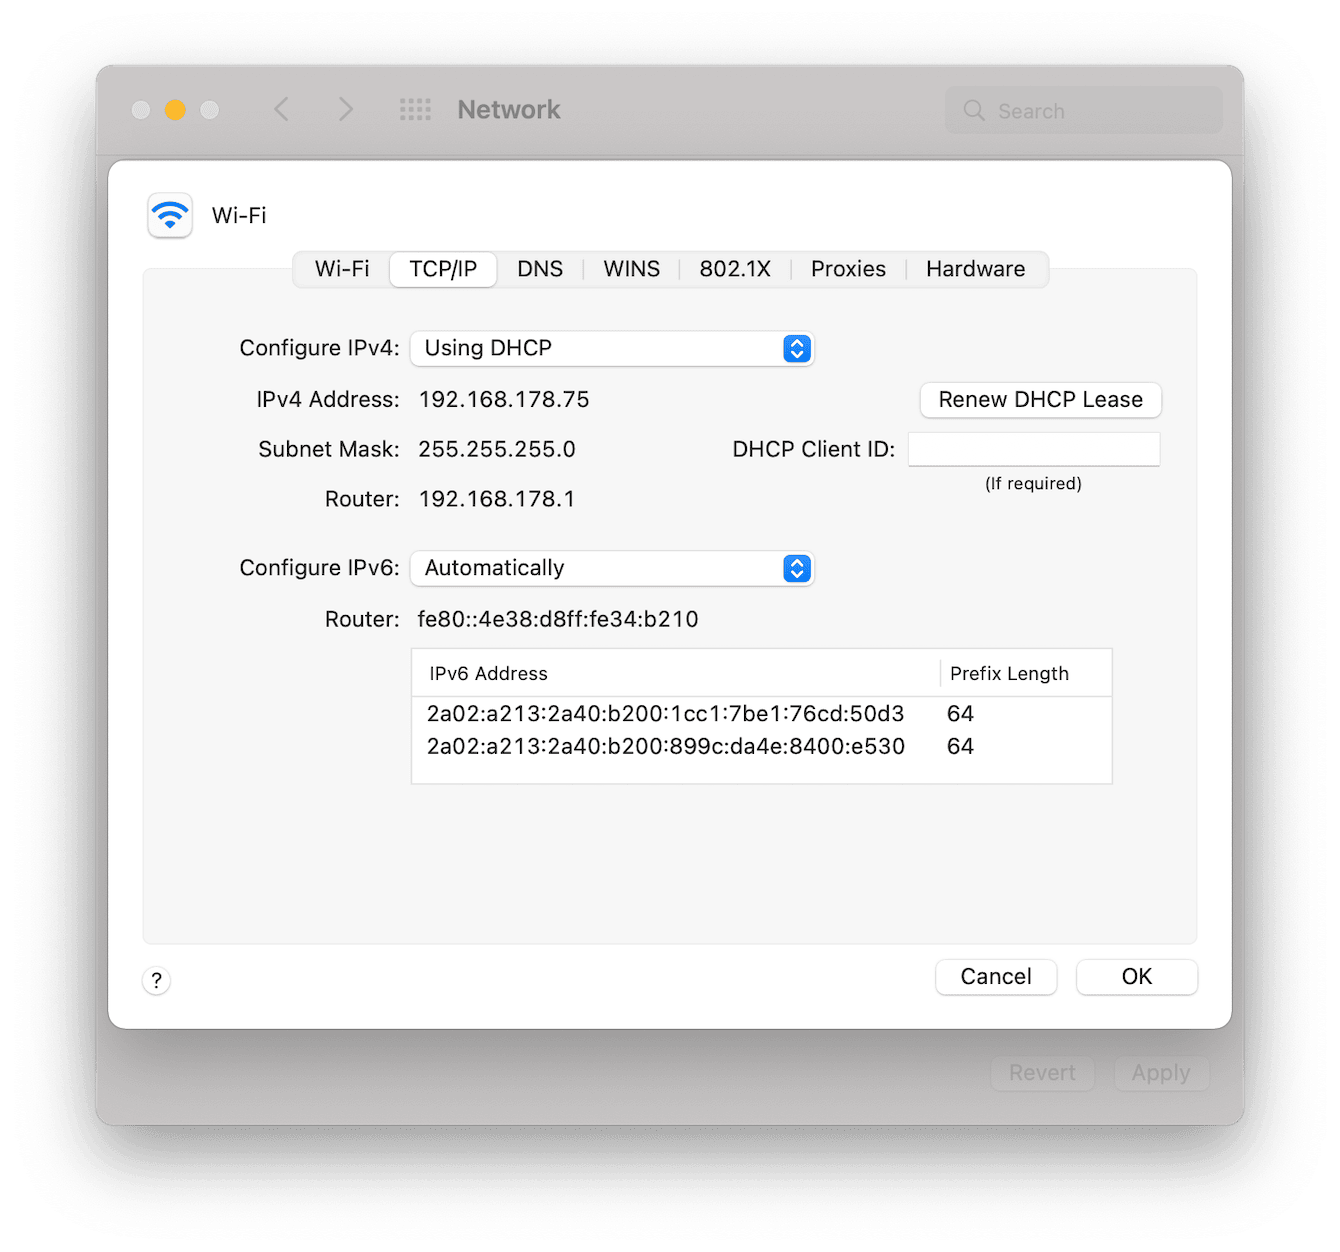
Once again, check your Wi-Fi connection, and move on to the next tip if you're still having issues.
3. Boot your Mac into safe mode
If you've followed the above tips but seem no closer to getting back online, it's time to boot up your Mac in Safe Mode. Let's take a look.
On Intel-based Macs
-
Turn your device off via the main Apple menu.
-
Wait a few seconds, then turn it on while pressing the Shift key. Keep pressing until you see the login screen.
On Apple Silicon Macs
-
Turn your device off from the main Apple menu.
-
Now, press the power button until you see the startup options screen.
-
Choose your startup disk, then select Continue in Safe Mode while pressing the shift key.
When your MacBook has launched in Safe Mode, check your Wi-Fi connection. Restart your device. This should have completely solved the problem.
Troubleshooting hardware issues can be daunting; hopefully, one of these tips has helped you solve the "Wi-Fi: No hardware installed" error on your Mac, along with any configuration glitches. But if you're still having issues, contact your local official Mac repair center for some further assistance.

