What is "Other Users" on Mac storage
The category Other Users in Mac storage can be a source of confusion for many Apple users. If you've ever explored the storage breakdown on your Mac, you might have noticed this category that takes up a significant amount of space.
Unlike more straightforward categories like Documents, Photos, or Applications, 'Other Users' can be puzzling. What exactly does it include? How does it accumulate so much data? More importantly, how can you efficiently manage and clear it to reclaim valuable storage space?
In this guide, we'll demystify the Other Users category, explaining its contents and providing practical, easy-to-follow instructions to help you optimize your system and keep your Mac running smoothly. Let's dive in and tackle this storage mystery together.
What is "Other Users" on Mac storage?
So, let's get started by clarifying what Other Users means in Mac Storage.
Macs are built to handle multiple users, allowing each person to have their own separate account on the same device. This design ensures that each user's data and files are stored in their own user folders, remaining private and inaccessible to others.
So, when you see Other Users in your Mac storage, it essentially contains data and files generated by these user accounts (not the one currently logged in). These accounts can include administrator accounts, standard user accounts, guest accounts, and sharing-only accounts.

If your Mac has only one user, you might still have this category, and it may be large. It usually happens if you've previously had other users. Even if they were deleted, the associated data may still be stored on your MacBook.
It's important to distinguish this from the "Other" category, which includes miscellaneous files that don't fit into typical categories like Applications, Documents, or Photos.
What else is included in this category
Except for user files and documents, some other types of data may be included in the Other Users category:
- Temporary, hidden, and cache files generated by the apps these users have installed
- Browser data (including cache and cookies)
- Time Machine snapshots
- Other hidden system data (including log files)
- Virtual machine files from apps like Parallels
All of these files are usually the main culprit behind the category growing too large because they are harder to manage than "visible" ones like photos, downloads, or documents.
Why is the Other Users category so big?
If you notice that the category is noticeably large, multiple factors could be at play:
- When multiple user accounts are created, each account accumulates its own set of files, applications, and data over time, contributing to the overall storage usage.
- Another possibility is that the Shared folder, designed for collaborative file sharing among users, may contain numerous large files.
- Leftover files from deleted accounts can also linger, taking up space even after the user account has been removed.
Now, to the big question. How can you delete it? Let's head to the next section.
How to delete "Other Users" storage on Mac
Before we get carried away with all the tips and tricks on how to delete Other Users storage on Mac, first, ensure you back up your data using Time Machine. It just protects you against any accidental data removal.
Simply connect a compatible external storage device and head to System Settings > General > Time Machine to set it up and start the backup process.

Once you've backed up your Mac, follow the steps below one by one.
1. Check your Shared folder
When was the last time you had a look at the Shared folder on your Mac?
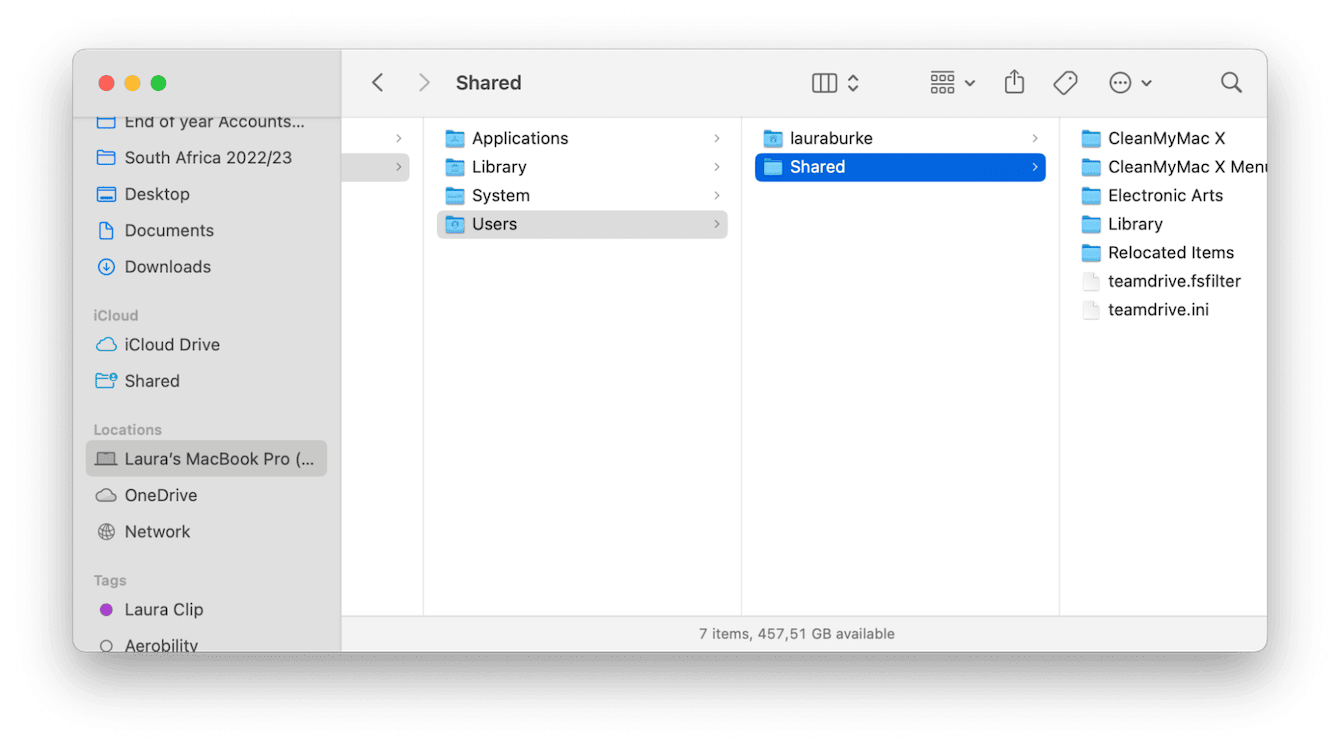
The Shared folder is a central hub for sharing documents, media, and other files. Files placed here can be accessed and viewed by all users on the Mac. So, as you can imagine, files can build up quickly; this is a great place to start to reduce the size of your Other Users storage consumption. Here's how to check it:
-
Open the Finder and click Select Macintosh HD.
-
Now, go to Users > Shared.
-
Review the contents and remove any items no longer needed to the Trash.

Once you've finished, don't forget to empty your Trash. Let's head to the next tip.
2. Clean up your Mac (find hidden files)
Another simple way to reduce clutter and reclaim valuable storage space is to run some general Mac cleanup tasks.
Removing unnecessary items like system cache, user cache files, and user log files can help drastically reduce the Other Users category.
The easiest way to do this is to harness the capabilities of a purpose-built Mac cleaner like CleanMyMac. This app comes with a feature called Smart Care, which scours the hidden and hard-to-reach folders on your Mac, locating junk threats and optimizing performance all in a few clicks. It can also remove any malware that may have found its way to your Mac.
Here's how to use it:
-
Open the app (get your free trial here).
-
Click Smart Care > Scan.
-
Click Run.

If you want to take decluttering to a whole new level, consider removing unneeded stuff from whichever cloud storage you use. CleanMyMac can help you out here, too. It now comes with the Cloud Cleanup feature that lets you scan your cloud storage and shows the largest files so that you can then remove them with a click.
Now that your Mac is tidy, let's head to the next tip.
3. Check and review your Mac's user accounts
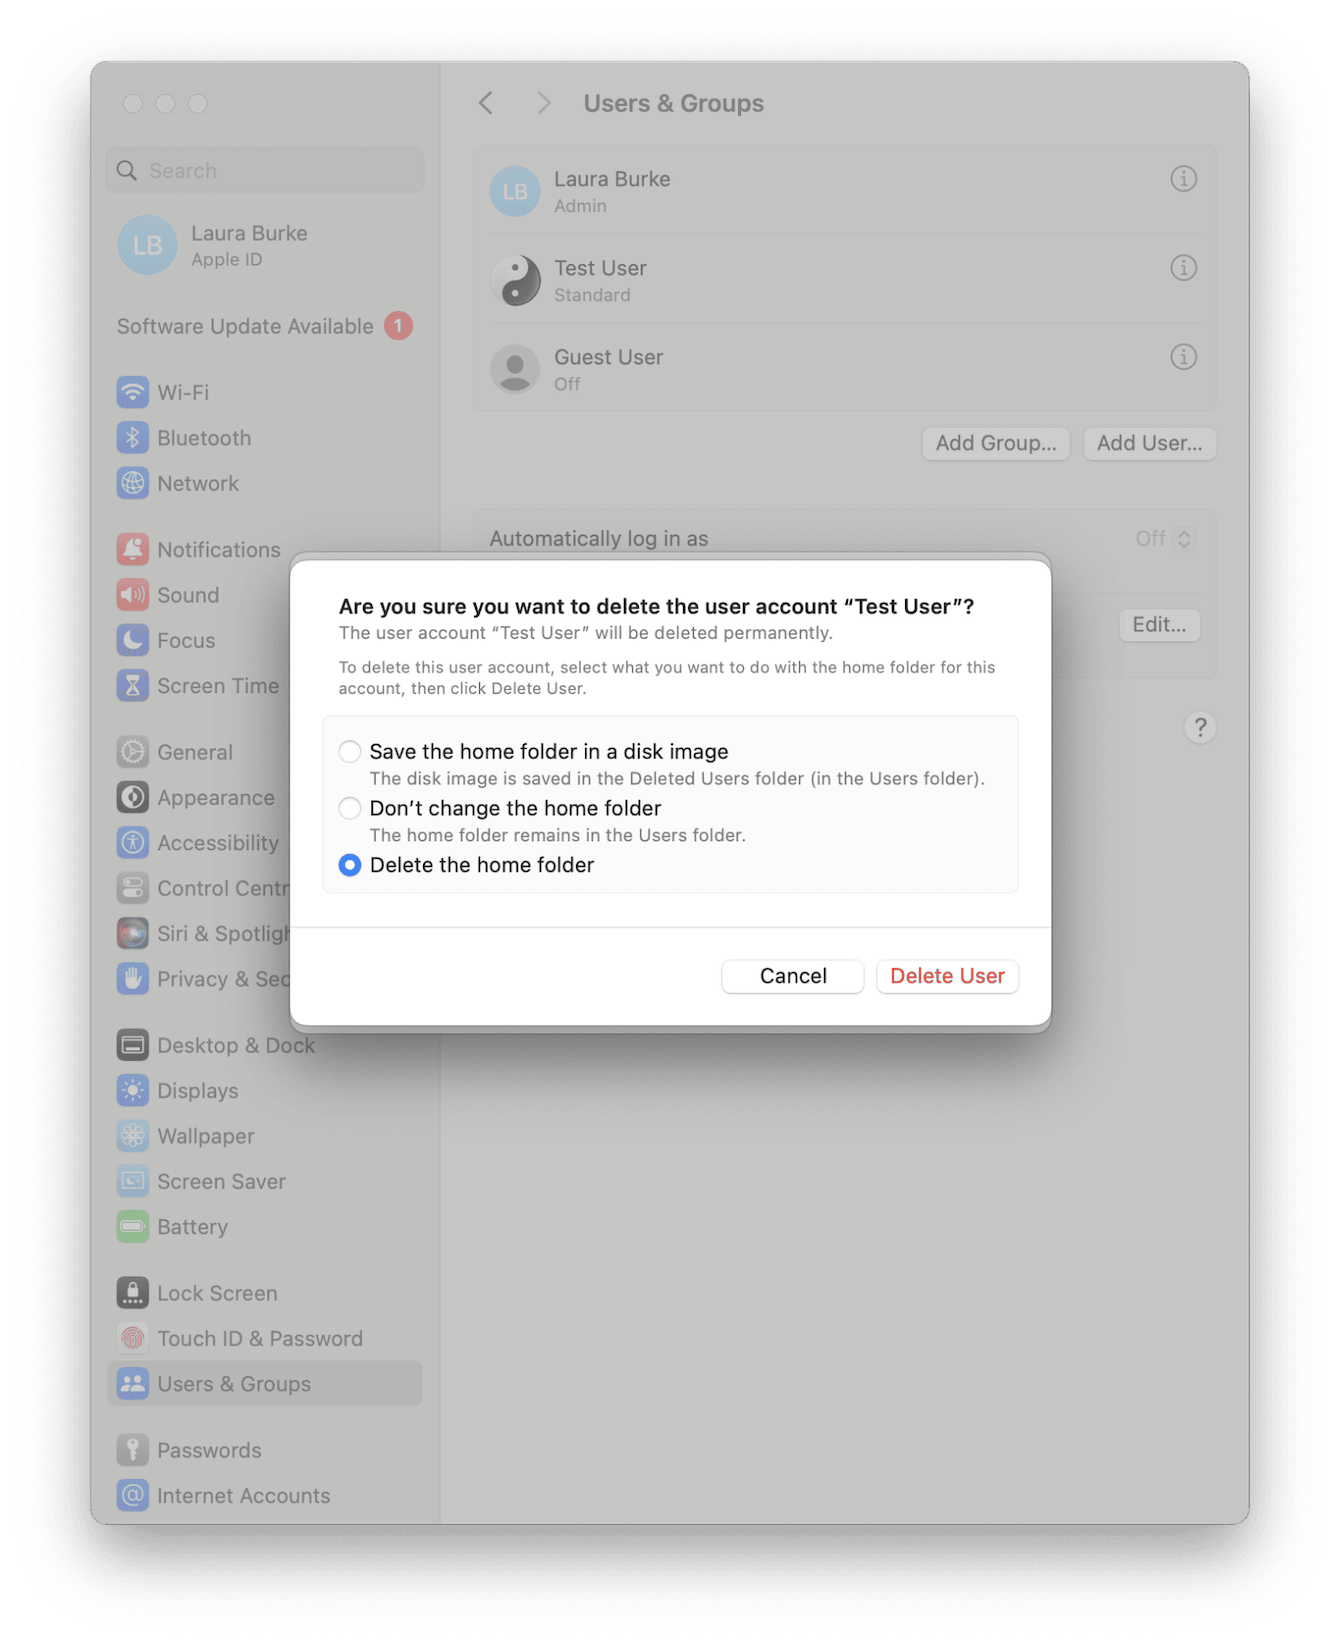
Another great way how to delete Other Users on a Mac is to review how many user accounts are actually in use on your Mac. It's possible some are old and no longer needed, which means you can remove them, saving space. Here's how to do it:
-
Open System Settings (from the main Apple menu or the Dock).
-
Select Users & Groups.
-
Check to see what Users are in the list. To delete one you no longer need, click the information (i) button next to its name.
-
Click the Delete User button and select Delete the home folder.
-
Click Delete User.

4. Check your Users folders
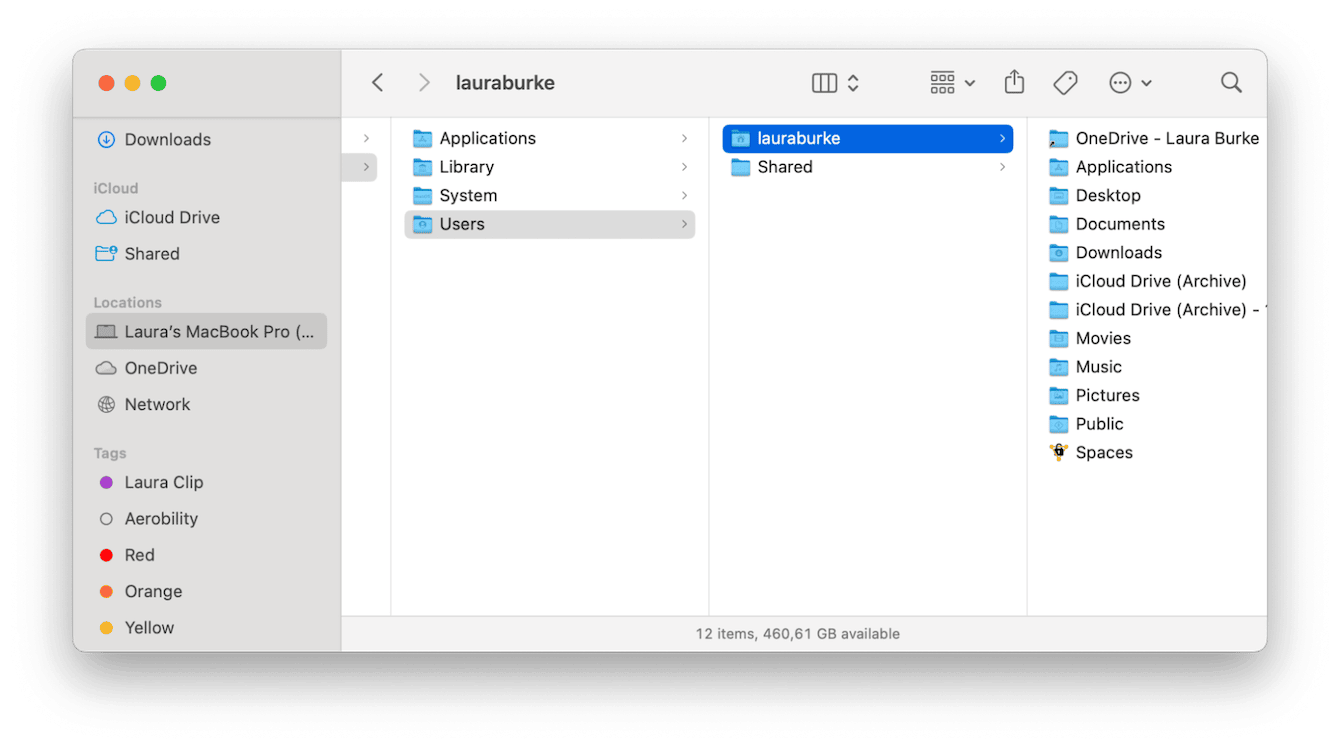
It's also possible that files have been accidentally saved in your User folder; this will also contribute to the storage volume under the Other Users category. It's easy to check and remove items; here's how:
- Open the Finder and select Macintosh HD.
- Select Users and click your user name.
- Review items; if you do discover items that shouldn't be here, relocate them or move them to your Trash.
- Empty the Trash.

5. Delete local Time Machine snapshots
Finally, take some time to remove unnecessary Time Machine snapshots. There are two ways to do it. The first one is automatic (with CleanMyMac — a Mac maintenance app mentioned above), and the second one is to run a few Terminal commands. Let's start with the easy one:
- Open CleanMyMac — get a free trial of the app.
- Click Performance > Scan.
- Click Run in the Thin Time Machine Snapshots tile (note: you won't see it if you've disabled Time Machine backups).

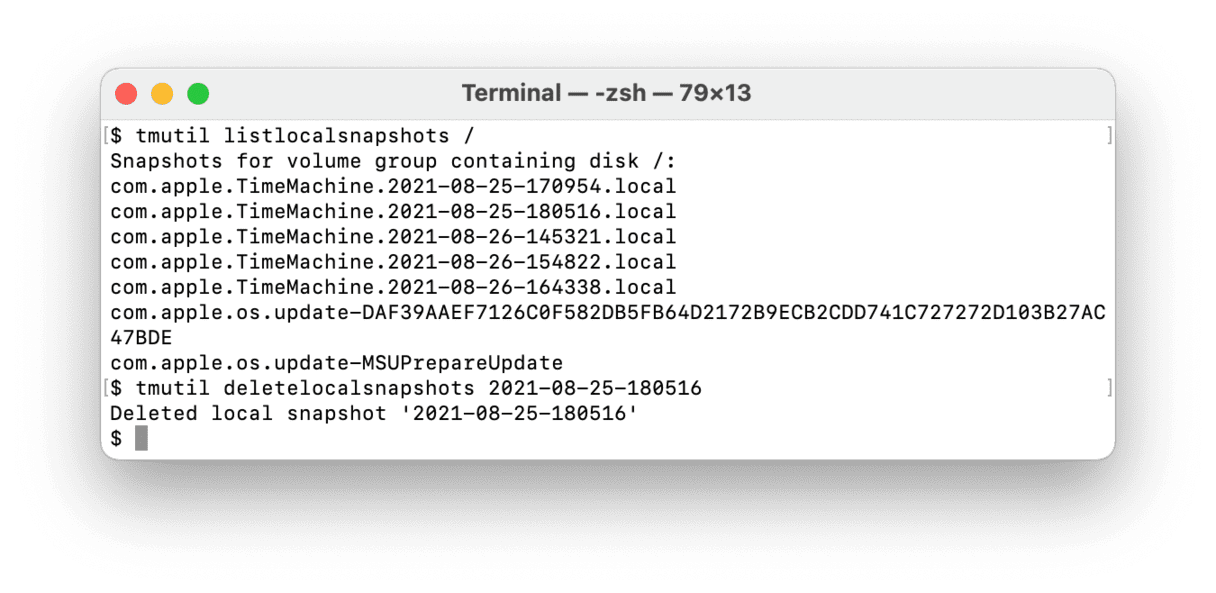
The second way is to use Terminal. Here's what to do:
- Open Terminal.
- Type: tmutil listlocalsnapshots /
You will see a list of snapshots with names like "com.apple.TimeMachine.2021-08-25-180516" - To delete a specific snapshot, run this command: tmutil deletelocalsnapshots followed by the date of the snapshot you want to delete
(like tmutil deletelocalsnapshots 2021-08-25-180516). - You should see: Delete local snapshot '[your date]'
- Repeat for all snapshots you want to remove.

Important: If you're not comfortable with using Terminal, it's better to use CleanMyMac to avoid corrupting the backup process or removing any vital files.
Managing your Mac's storage can be a bit of a puzzle, especially when dealing with the Mac's Other Users storage category. By understanding what this category includes and taking steps to clean up unnecessary files, you can free up valuable space and keep your Mac running smoothly.
So, whether it's checking your Shared folder, removing old user accounts, or using a handy cleaning tool, a bit of maintenance can go a long way. Thanks for joining us, and until next time.

