How to resize an image on Mac [3 ways]
When I first tried to figure out how to resize an image on Mac without losing precious quality, I assumed it would be straightforward, and it mostly is. But depending on the format, your end goal (web, email, or social), and what app you're using, it can get a little messy. That's why I wanted to put together a real-world guide based on my own experience, using macOS Sequoia.
This isn't just a rehash of help articles; it's stuff I've tested myself, from built-in tools to third-party apps, and I'll share what actually works, what's worth skipping, and some cleanup tips for your Mac that can help along the way. I've run into issues like blurry exports, oversized thumbnails, and the Finder previews not updating — stuff you don't always expect.
If you're trying to make this task part of a smoother workflow, especially on macOS Sequoia, these tested steps should save you time and hassle.
How to resize an image on Mac
Now that I've had the chance to test a bunch of methods on my Mac, some clear favorites have emerged. Depending on what you're working with, from one-off screenshots, a batch of product photos, or large image exports, there's usually one method that makes more sense than the others. Below are the tools I rely on most, along with exactly how I use them (and when I avoid them). Let's break it down.
1. Resize images using Preview (built-in, reliable, basic)
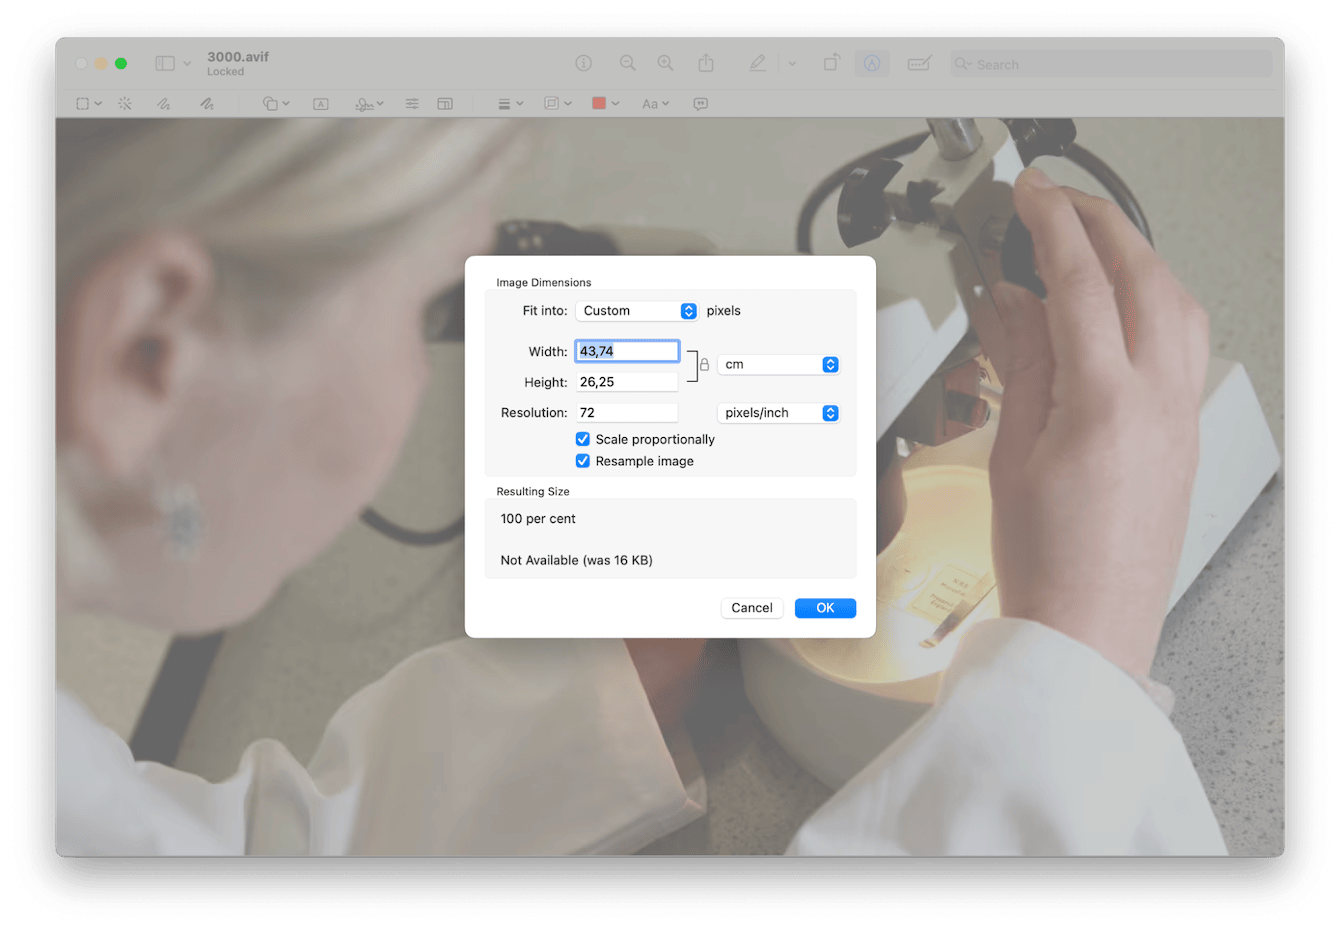
Honestly, Preview is the unsung hero of macOS. I've been using it for over a decade, and Apple keeps it just simple enough to be fast, but not so basic that it's useless. Here's how I resized a few images using Preview:
-
Right-click your image and choose Open With > Preview
-
In the menu bar, go to Tools > Adjust Size.
-
In the pop-up window, enter your desired width or height.
-
Keep "Scale proportionally" checked to avoid distortion.
-
You can also choose from presets like pixels, percent, or inches.
-
Click OK, then File > Save (or Save As if you want a copy).

One thing to keep in mind: resizing an image only changes its dimensions. If you're also trying to make the file size smaller, say, to upload faster or meet an email attachment limit, you'll want to combine resizing with compression.
2. Try Squash from Setapp: My go-to for batch resizing in 2025
I've been testing Squash from Setapp, and it's one of those apps that's worth keeping just for bulk image work.

When I was resizing screenshots for a web redesign project, Squash saved hours. It's not just resizing, it also lets you reduce file size and convert formats at once.
-
Open Squash (from Setapp or direct download).
-
Drag and drop your batch images into the app.
-
Set your resize options (width, height, scale) from the sidebar.
-
You can also enable compression and format conversion.
-
Click Squash Images, and they're all processed in seconds.
Squash uses non-destructive resizing, which means your originals aren't overwritten unless you choose to. That's a lifesaver when working on client assets.
3. Use an online image resizer (fastest, but read the fine print)
If I'm on the go and just need to downsize one image, say, to upload to a blog, I sometimes use online tools. But I'm picky about which ones.
In 2025, ImageResize.org and Adobe Express Resizer are decent, but you have to watch for privacy flags. Never upload sensitive or client images to random free tools.
Steps using ImageResize.org:
-
Visit the site.
-
Upload your image.
-
Enter your target size.
-
Download the resized image.

Only use this for non-sensitive, small tasks. Clear your downloads afterward to avoid clutter (CleanMyMac can help there; more on that below).
Optional but smart: Use CleanMyMac's Cleanup feature first
Before a big resizing project, I always run the Cleanup feature from CleanMyMac. You'd be surprised how much "preview data," temp files, and thumbnails clutter up your disk, especially when working with dozens of large images.
I usually run it before exporting files from Lightroom, just to make sure my Mac doesn't slow down mid-edit. It's not a must-do, but it's one more way to make image workflows smoother; here's how it works:
-
Get your free CleanMyMac trial — use the app for free for 7 days.
-
Open the app and click Cleanup > Scan from the sidebar.
-
Once the scan is complete, click Review all Junk.
-
Select things you no longer need and hit Clean Up.

Resizing vs. compressing: What you shouldn't do
Here's where I see people mess up. Resizing isn't the same as compressing. Resizing changes the dimensions; compression changes the quality/file size.
If you're just uploading to a website or social media, compressing might be all you need. But if you're prepping images for print, resizing should be precise, and high-resolution preserved. And if you compress too hard, especially with JPEGs, you'll end up with artifacts that look unprofessional.
So there we have it, everything there is to know about how to resize an image on Mac. Here's my quick recap.
-
Preview: Best for quick, single-image edits.
-
Squash: Best for batch processing, Setapp users.
-
Online Tools: Best for speed, low-stakes tasks.
And for me? I always start with CleanMyMac's Cleanup feature to keep things running smoothly, especially before a big image export session. In a nutshell, resizing images on Mac in 2025 is easier than ever, as long as you use the right tool for the job.

