How to screen record on MacBook [2026 update]
Knowing how to screen record on a MacBook might sound like a basic task, but once I dug into it, I found a few tricks most tutorials don't even mention.
If you're a content creator, remote worker, teacher, or just someone needing to record a quick walkthrough, knowing how to do it the right way can save time and frustration.
Let's break it down with tested, updated-for-2026 steps, screenshots, and some personal notes I gathered from using the latest macOS build on a MacBook Pro.
Why you might need to know how to Screen Record on a MacBook
I originally started screen recording during client walkthroughs; I found that sending a two-minute video saved me ten back-and-forth emails. Lately, I've also been using it to troubleshoot software bugs or grab moments during Zoom calls I need to revisit, but there are plenty more reasons to use this handy feature:
-
Recording tutorials or app walkthroughs
-
Capturing bugs or UI glitches to report to devs
-
Saving clips from live streams or video calls
-
Recording internal meetings or presentations for teammates
Regardless of how you want to use the feature, let's take a look at your options.
Built-in tools for screen recording on MacBook
Recording your screen on a MacBook is genuinely simple. Apple's native screen recording tool is fast, clean, and already baked into your macOS.
Apple finally streamlined screen recording by making both QuickTime Player and the Screenshot Toolbar use the same built-in system tool, so when you start a screen recording from either one, you're actually launching the exact same interface. This unified approach means Apple no longer maintains two separate recording tools. Here's a quick reminder of what you can do:
-
Capture your entire screen
-
Record a selected portion
-
Record your full screen
-
Choose your microphone
-
Set a timer
So, whatever function you want to use, all that you need to worry about is how you want to open it. Here's a closer look:
1. Use the keyboard shortcut
-
Press Shift - Command - 5.
-
Under Options, adjust your settings and click Record.
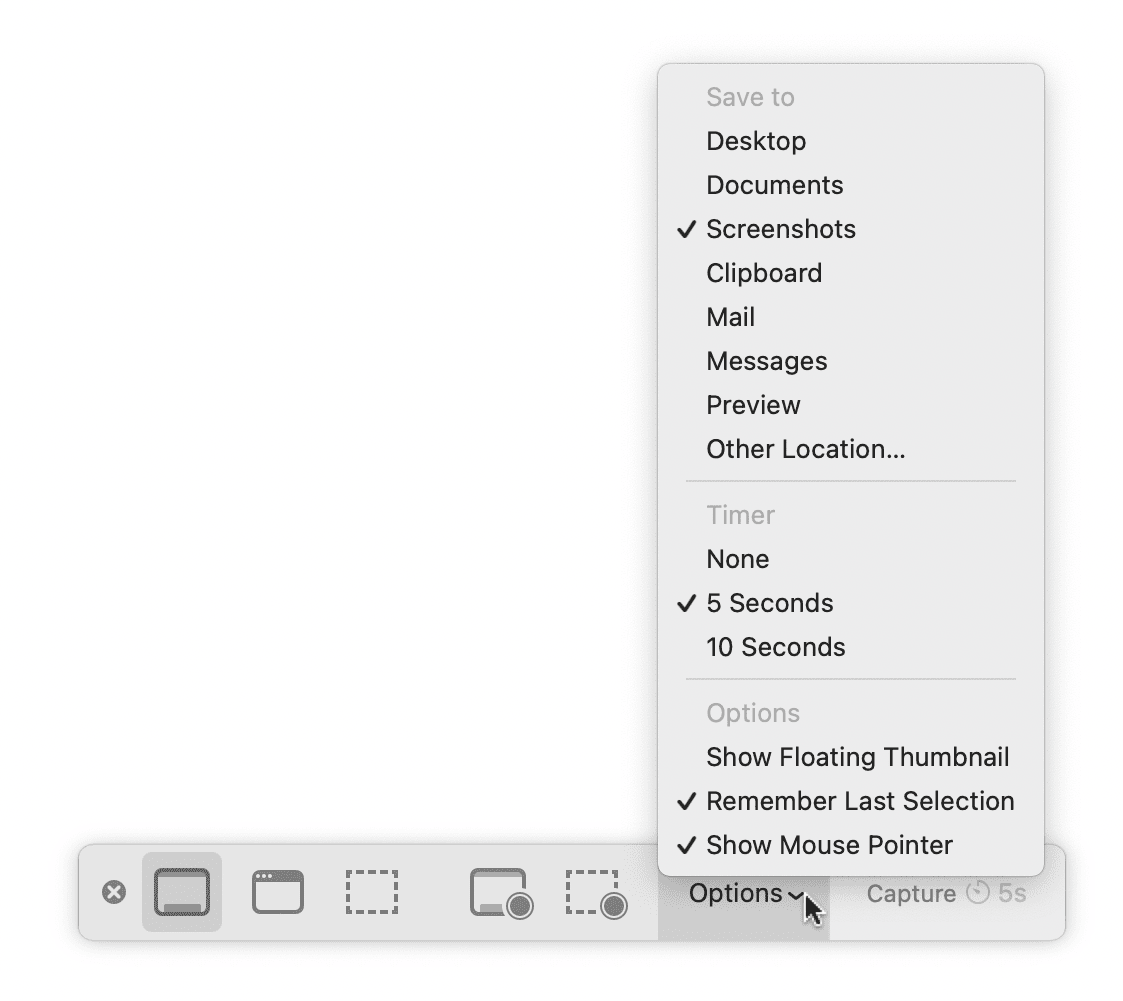
2. Open the QuickTime Player App
-
From your Applications folder, open QuickTime Player.
-
Then choose File > New Screen Recording.
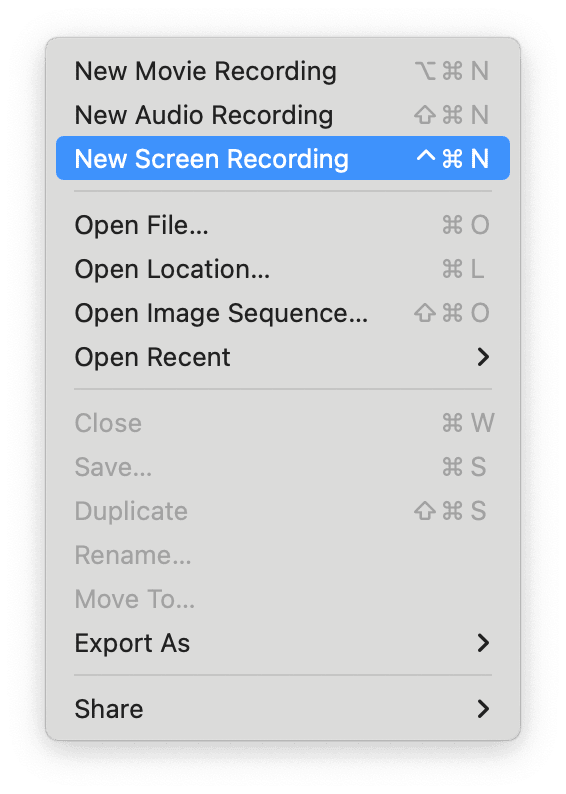
My go-to method is Shift - Command - 5 simply because it's just faster. OK, keep on reading for some more useful tips.
How to record a specific part of the screen on a Mac
This is my favorite part of the toolbar: precision without editing.
-
Press Shift - Command - 5.
-
Click Record Selected Portion.
-
Drag to define your capture area.
-
Hit Record.

This is especially handy for app demos, UI bug recordings, or when you want to hide sensitive info on screen.
How to edit and save your Screen Recording
Once you stop recording, a preview thumbnail appears in the corner of your screen.
Quick edits
-
Click the preview thumbnail before it disappears.
-
Use the Trim tool to cut the beginning or end.
-
Hit Done and save.
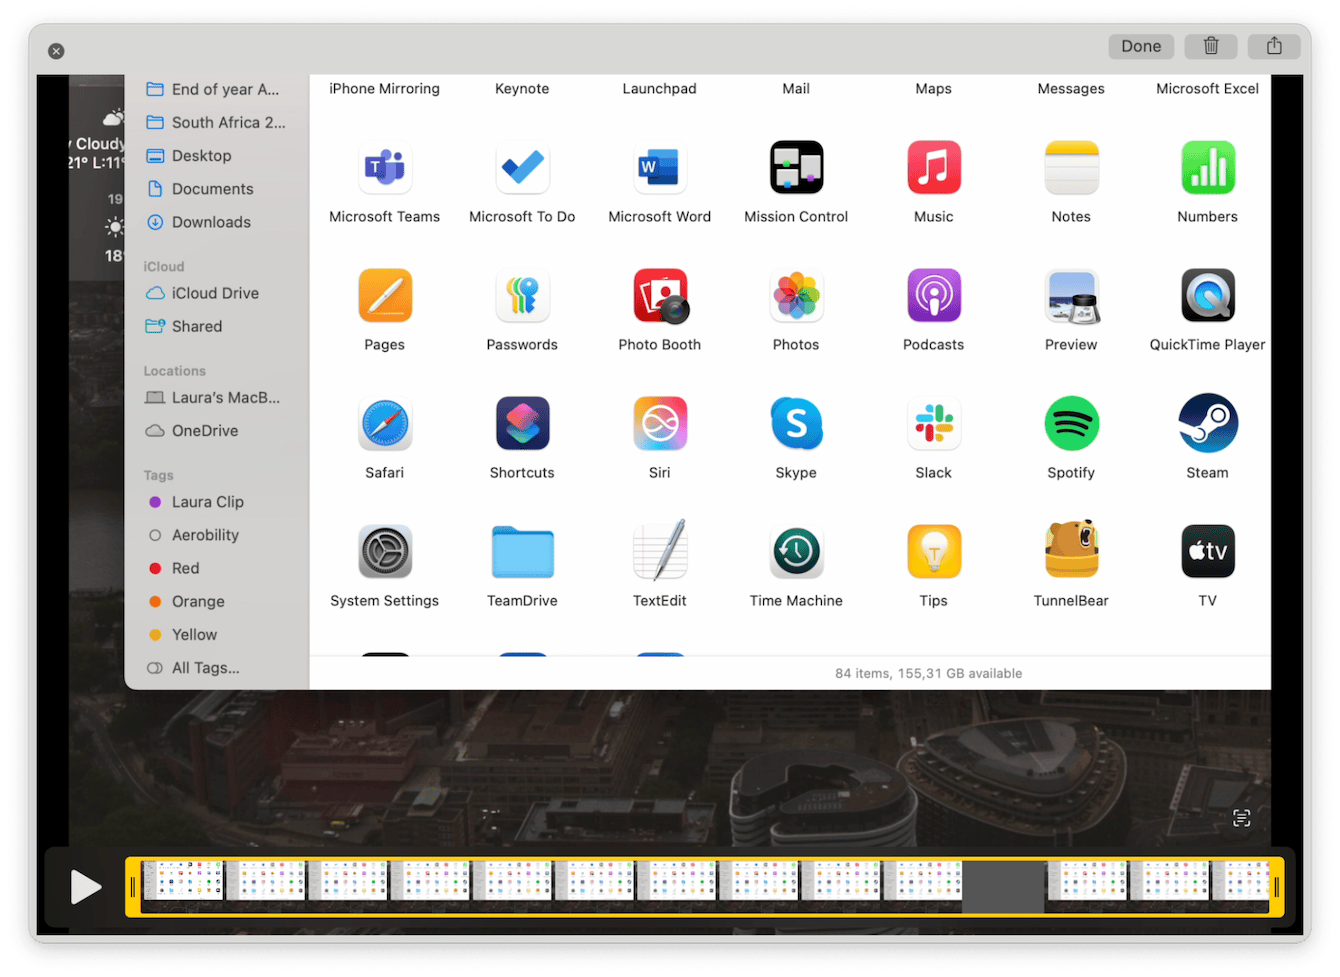
Deeper edits
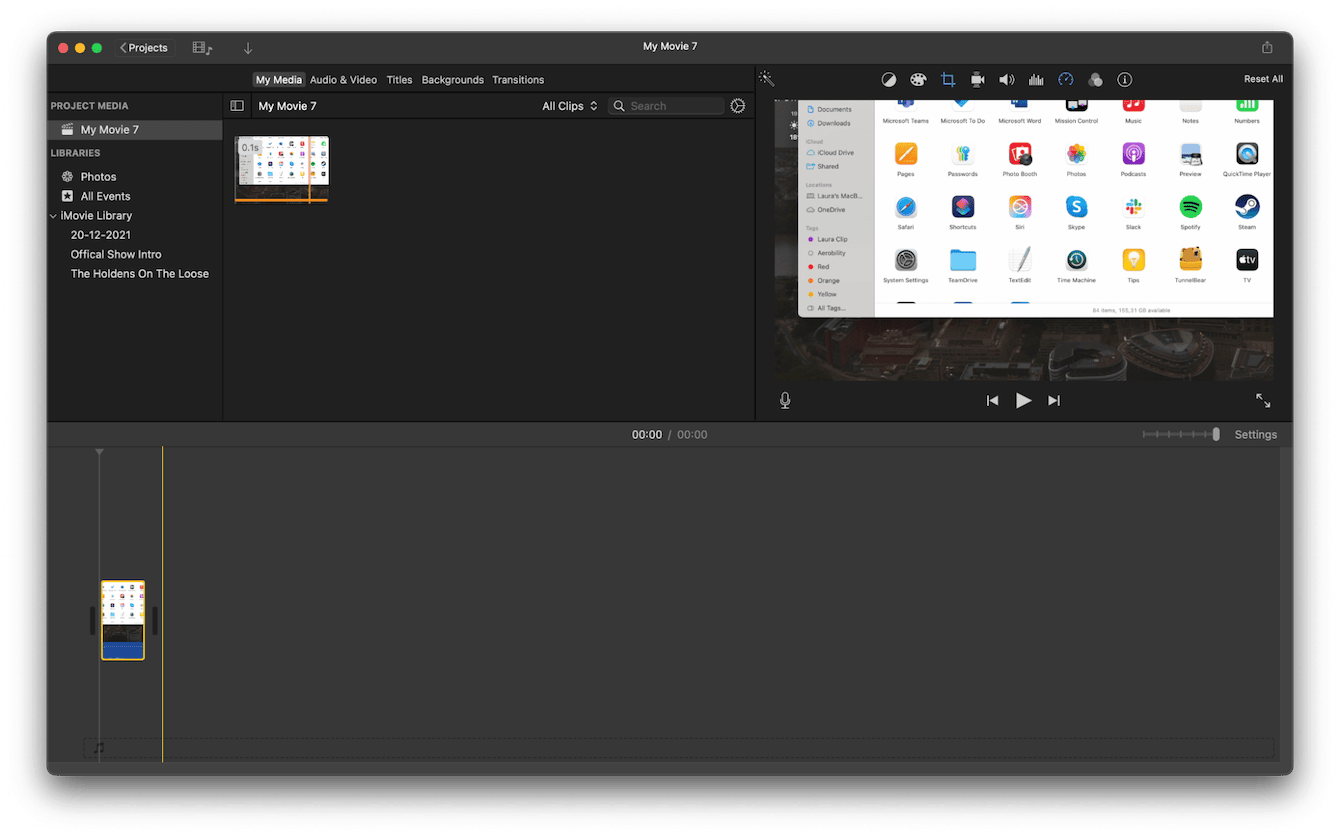
I still use iMovie for heavier edits, like splitting clips, adding annotations, or voiceovers. It's smooth on macOS Sequoia and Tahoe, too, and handles screen recordings without issue.
Where are Screen Recordings stored on a MacBook?
By default, macOS saves screenshots and screen recordings to your Desktop. You can change this by:
-
Pressing Shift - Command - 5.
-
Clicking Options.
-
Choose a new Save To location.
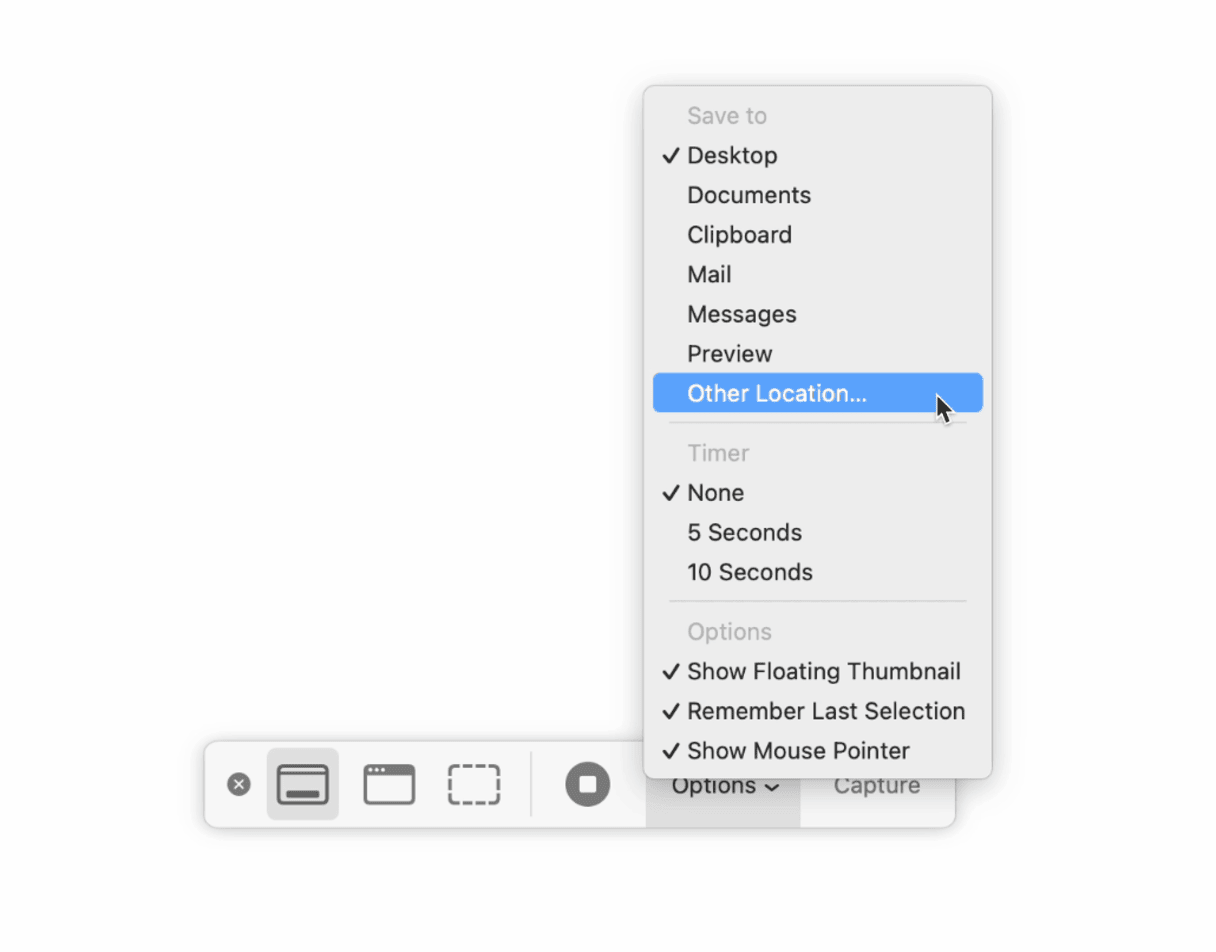
A friendly reminder, here, if you're making tons of screen recordings, don't forget that they will quickly eat up your storage space. It's one thing to know how to make screen recordings on a Mac, but it's another to know how to manage them.
I personally use the My Clutter feature from CleanMyMac. This quickly helps me locate old recordings, screenshots, and other leftovers I forgot about. It groups files by type and age, making it super easy to clean up without accidentally deleting something I still need.
Think of it as a spring cleaning shortcut for your MacBook's digital junk drawer; here's how:
-
Open CleanMyMac — get your free trial here.
-
Click My Clutter > Scan.
-
Once complete, enjoy finding all your forgotten files.
-
Select items and click Remove.

How to record screen with audio on a MacBook
Recording your screen is simple, but once you want to include audio, things split into two categories.
Microphone audio means any sound your mic picks up: your voice, background noise, even your keyboard clacking.
Internal (system) audio, on the other hand, refers to the actual sounds your Mac is producing, like audio from a Zoom meeting, YouTube video, podcast, music app, or even alert sounds from apps.
If you didn't realize it, your macOS won't let you record internal system audio by default for privacy and copyright reasons. Apple doesn't want apps (even its own built-ins) to be able to silently record your audio output without permission. It's a safeguard, but also a limitation when you're trying to create tutorials, capture presentations, or archive video calls.
To record system audio (like a YouTube video or Zoom call), I use BlackHole, a free virtual audio driver that routes internal audio to your screen recording tool. There are also some paid-for options like Snagit and ActivePresenter. Snagit is a professional interface for screen capture that's been around for years. It's got some excellent edit options that include text, callouts, and screen record templates. It does have a free trial, but if you opt for this app, you'll be looking at around $63.00 for the privilege.
ActivePresenter sells itself as an all-in-one screencasting application. Really built for those who are looking to create beautiful tutorials or lessons, it also has a cool green room feature. It's unfortunately not cheap at $199 for a standard membership, but it's extremely professional and one of the best tools out there on the market.
Both of these options are great; they cover different pricing points, depending on what you're looking for, and both offer great tech support and boast tons of built-in features.
There's a great guide from MacPaw that walks you through this step-by-step: How to screen record internal audio on Mac.
Well, now you know how to screen record on a MacBook. If you're running the latest macOS version, Apple's built-in screen recording tools are faster and more reliable than ever. Want audio? You'll need a bit of setup, but it's worth it. No matter your reason, if you're making tutorials, logging bugs, or capturing fleeting moments, screen recording on a Mac is finally intuitive, flexible, and built for daily use.

