How to screen record with internal audio on Mac
For those of you looking for info on how to screen record with internal audio on a MacBook, you've landed in the right place.
First, let's take a moment to clarify what we mean by internal audio. It essentially means the sounds that your Mac makes, like when it plays music, streams videos, gameplay audio, or makes notification noises. It's the stuff you hear from your MacBook's speakers or headphones. The items you can't entirely control in your Mac's sound settings.
You might have been alarmed to discover it's not entirely straightforward, thanks to Apple's security measures to capture internal audio and record your screen at the same time. For instance, say you've got Spotify playing in the background — the music won't capture.
Well, thanks to these tips, we've got some great methods to help you record both. So let's get started.
Screen record on your Mac with internal audio
If you're new to screen recording, you might be wondering why you would want to screen record on a Mac with internal audio. Well, let's take a look at some of the benefits and reasons many users want to know how:
-
When creating tutorials and demonstrations with realistic sounds
-
If you want to record gameplay
-
For podcasting and voiceovers
-
When creating videos for people with visual impairments
As you can see, recording internal audio has quite some benefits. But before we dive into the various available tools in the next section, it's worth reminding users that screen recordings are heavy files that can begin to take up some serious storage space on your Mac.
If you're already low or struggling for space, you'll need to ensure you don't let these monster files build up, or you'll soon discover you run into various performance problems.
Thankfully, if you use a dedicated macOS maintenance tool like CleanMyMac, you can avoid this issue entirely. Its Large & Old Files module is a powerhouse for removing unneeded large files. You can quickly scan the entire contents of your MacBook and sort through all your old and forgotten files by size, file type, or even last accessed date, selecting what you no longer need for instant removal — saving space and time.

Here's how to use this smart Mac cleaner app:
-
Open the app or take a minute to download the free version here.
-
Click Large & Old Files in the left sidebar.
-
Click Scan. Once finished, sort through your files.
-
Select items that you no longer want to keep, select the removal type, and click Remove.

OK, now that we've covered that essential tip, let's look at your internal audio recording options.
How to record screen on a Mac with internal audio
1. QuickTime with a plug-in
QuickTime is a native screen recording app from Apple that comes preinstalled on your device. It can capture microphone audio, but it can't capture internal audio. One way to work around this is to install an additional QuickTime plug-in.
Blackhole
Blackhole is a well-known free, open-source QuickTime tool, a sort of plug-in that allows users to record their screen with internal audio. The setup is a little complex for beginners, and you'll need to switch back and forth between audio settings, but it is a good free tool. Here's how to use it.
Here's how to install Blackhole:
- Install Blackhole — you'll need to enter your email address.
- When you receive the download link, select Blackhole 2ch.
- Open the installer and agree to the terms and conditions on the screen. Click Continue, enter your password, and finally, click Install.
How to setup Blackhole
You now need to configure Blackhole to record internal audio and your microphone sound; here's how:
-
Open a spotlight search (Command - space bar) and type in Audio MIDI setup.
-
Click the bottom + icon and choose Create Multi-Output Device.
-
Select both your built-in Mac speaker and Blackhole 2ch.
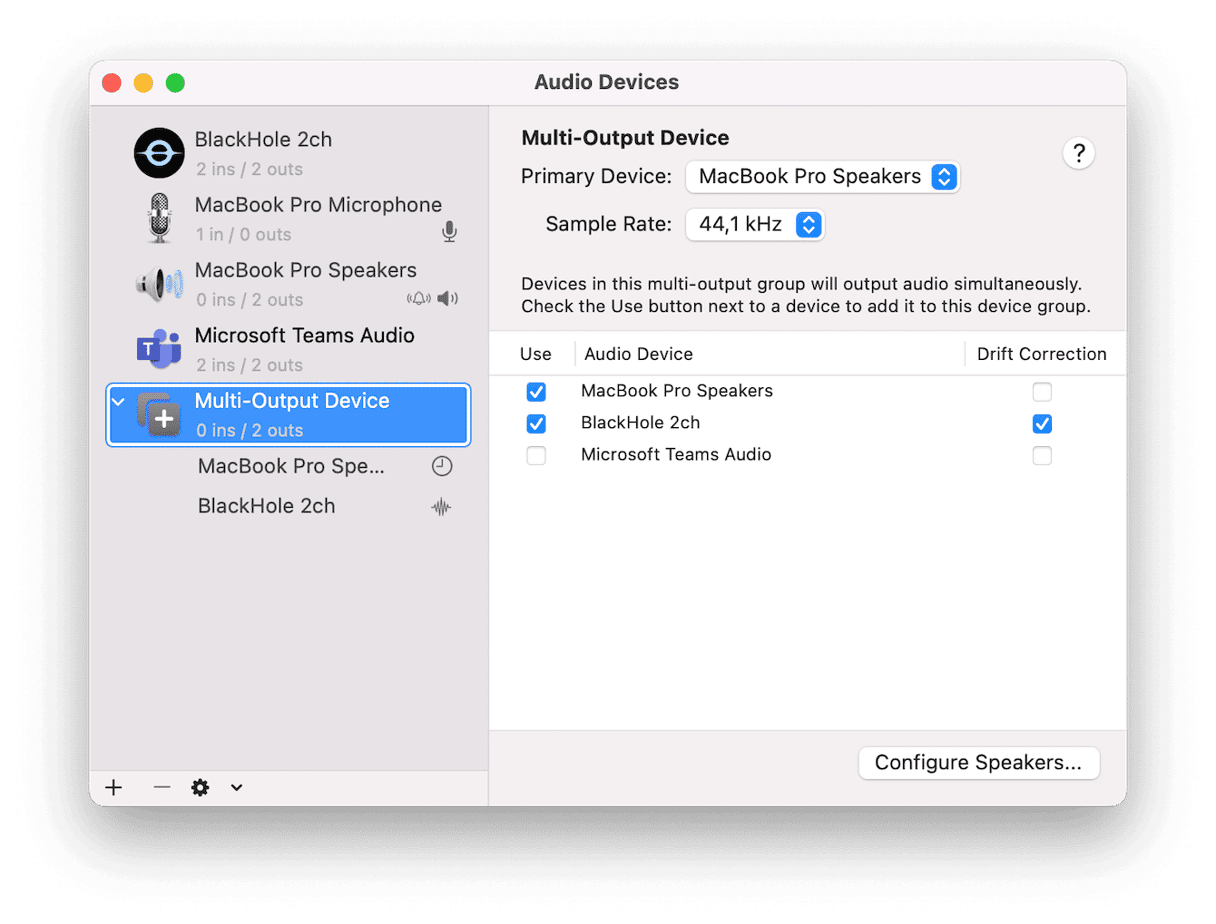
- Back in the left menu, right-click on Multi-Output Device, and from the menu, select Use This Device For Sound Output.

How to use Mac screen recorder with internal audio
Now you've configured BlackHole, you're ready to record with QuickTime; here's how:
- Open QuickTime and select File > New Screen Recording.
- From the toolbar, select Options, and under Microphone, select Blackhole 2ch.
- Finally, press Return to start your screen recording screen with internal audio.
So, as you can see, it's free, but it takes a little patience to set it up correctly. Let's take a look at a few other options out there.
Tip: If you want to record external audio — say, create a voiceover for a video tutorial — check out this guide on how to screen record on Mac with sound.
2. EaseUS RecExperts
If you don't like the idea of installing and configuring a QuickTime tool, then you should opt for an all-in-one solution like EaseUS RecExperts. You can easily record your screen and internal audio without any extra setup hassle required.
Here's how to get started:
- Install the EaseUS RecExperts app directly from the App Store using the link above.
- Once downloaded, open the app.
- From the toolbar, to record your screen with sound, click the sound icon; you can configure volumes if needed here, then click Record.
3. OBS Studio
The OBS Studio is another excellent free open-source option. You can record your screen with internal audio from social networking sites to gaming platforms and more. Download the install package to your Mac and read the setup guide from OBS Studio here.
Thanks to these top three recommendations, you now know all about internal audio recorders for Macs. There's a method here for everyone; no matter your preference, you'll now be able to record your screen and internal audio easily.
Don't forget to keep an eye on screen recording files; don't let them build up and take up precious storage space on your Mac. Thanks for joining us, and until next time.