How to test a Mac hard drive
Performing regular Mac disk checks might sound like a daunting task, but it's actually relatively simple and can help you prepare for disk failure and data loss well in advance.
Hard drives, sadly, don't last forever; although replaceable, often the data we keep on them isn't. Even though most modern Mac computers are equipped with SSD drives these days, plenty of people still own and use devices with physical hard drives, including external storage devices.
We'll show you in this article how to test for disk failure on your device.
What are Mac hard drive health indicators?
There are several reasons a hard drive could fail. Age plays a factor as well as damage or a mechanical fault. Sometimes it happens entirely without warning. That's why working a regular test of your Mac's disk health into your usual maintenance routine is a smart idea. Let's check out some of the benefits:
-
No nasty disk failure surprises
-
Discover other hardware issues
-
Hard drive quality indicator for future reference
Is your disk failing? Let's take a look at some common signals of a failing hard drive:
Frequent overheating
Macs can overheat from time to time. Multitasking applications, fan issues, battery faults, ventilation, and too many browser tabs can all cause your Mac to overheat and damage your hardware. If your Mac is frequently overheating, this could put your hard drive at risk.
Strange noises
Strange clicking or whirring sounds from your Mac or external storage device can also indicate imminent failure. Back up your data!
Data or file corruption
If you encounter difficulty accessing or opening files or notice that files have disappeared, have strange names, or take too long to open, this is another tell-tale sign of disk errors.
Major device slowdowns
If your device becomes suddenly unbearably slow, unable to perform simple tasks, or plagued with stalling, this could also be another indicator that your disk is failing.
Regular system crashes
Constant system crashes, blue screens, or failure to boot are more common signs that your Mac disk health is less than satisfactory.
Act quickly if you recognize any of these symptoms or if you have started to receive disk hardware error or failure messages.
It's too late to back up your data once your disk fails, so if you haven't already, it's time to set up a regular backup schedule. Time Machine is a great option. So is a trusted third-party backup program. Choose whichever method you prefer, and make sure regular backups are on top of your priority list.
How to back up your data with Time Machine
Time Machine is Apple's built-in, easy-to-use backup feature. Once set up, you can regularly back up photos, files, music, emails, and much more. Here's how:

- Connect your external storage device.
- From the main Apple menu, select System Settings > General > Time Machine.
- Press Add Backup Disk and select your connected external storage device and follow the on-screen instructions.
Let's take a look at how to conduct a Mac disk scan.
How to check hard drive health on a Mac
1. Monitor the health of your drive automatically
One of the quickest ways to run a hard drive diagnostic on a Mac is to use a monitor tool like CleanMyMac.
This Apple-notarized and trusted software comes with a handy top Menu app that gives you instant oversight while allowing you to monitor all critical areas of your device quickly and receive important system maintenance notifications and real-time malware protection insights. Here's how to check Mac disk health using it:

- Get the free version here.
- The first time you open the app, notice the application icon appears in your top menu bar.
- To access the CleanMyMac handy Menu, press the application icon from your top menu bar.
- From the Macintosh HD tab, you can press Free Up to instantly launch a system Smart Care scan.
2. Use Disk Utility to conduct a Mac check for disk health
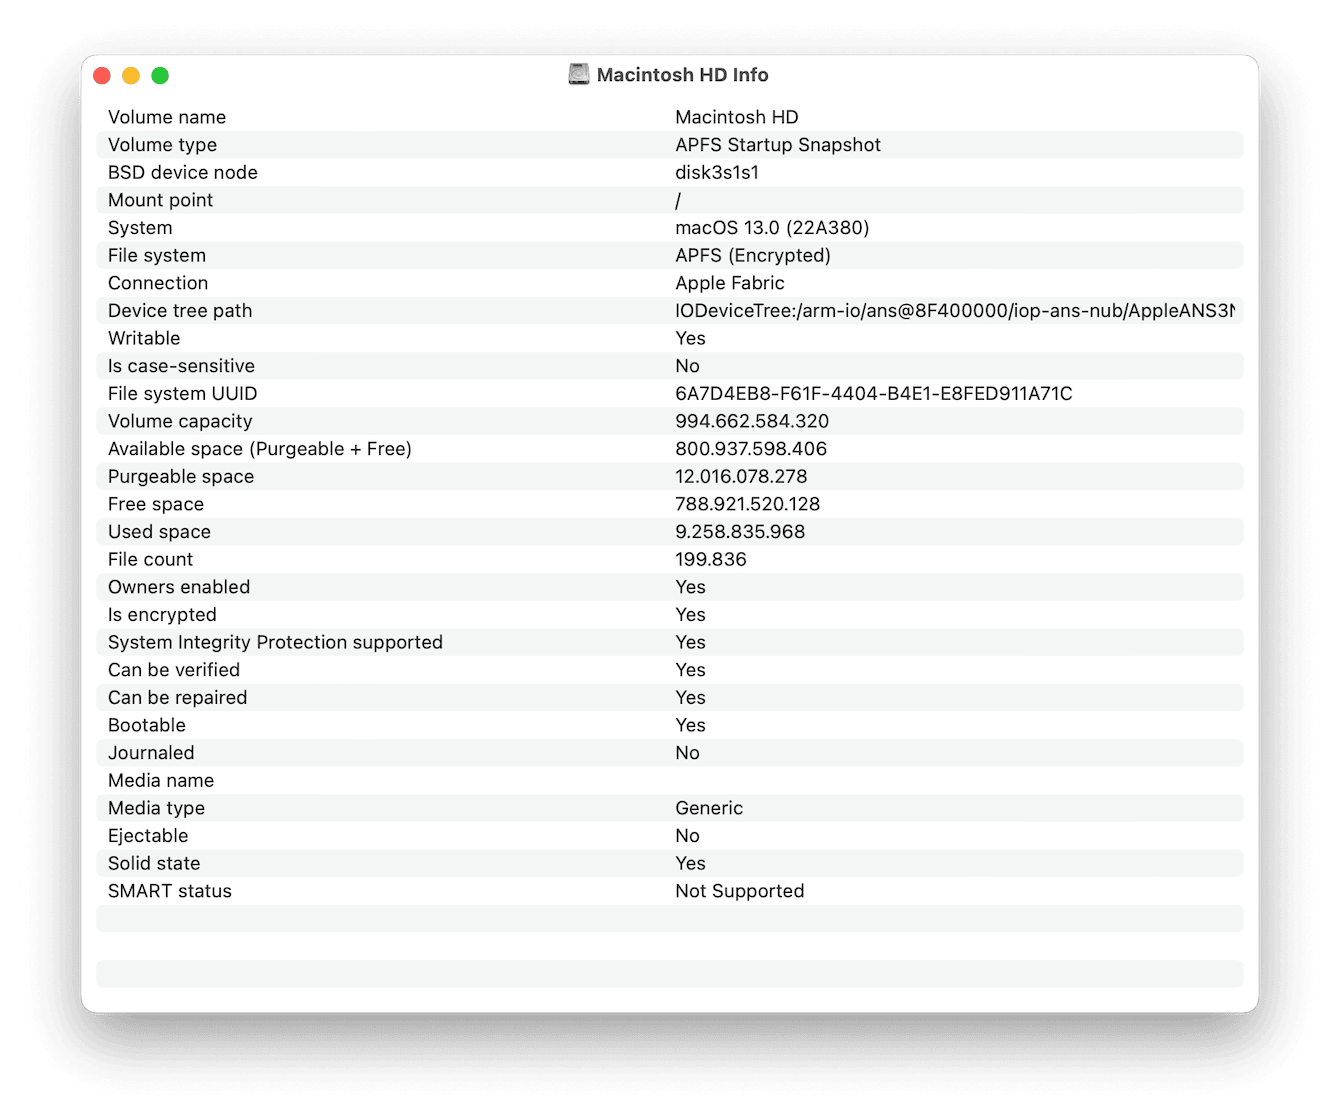
You can easily use Apple's built-in Disk Utility application to check your Mac for hard drive errors. Here's how:

-
Open Finder > Applications > Utilities > Disk Utility.
-
Select your disk from the left side list.
-
Select the info icon from the top right.
-
Look out for any error messages highlighted in red.
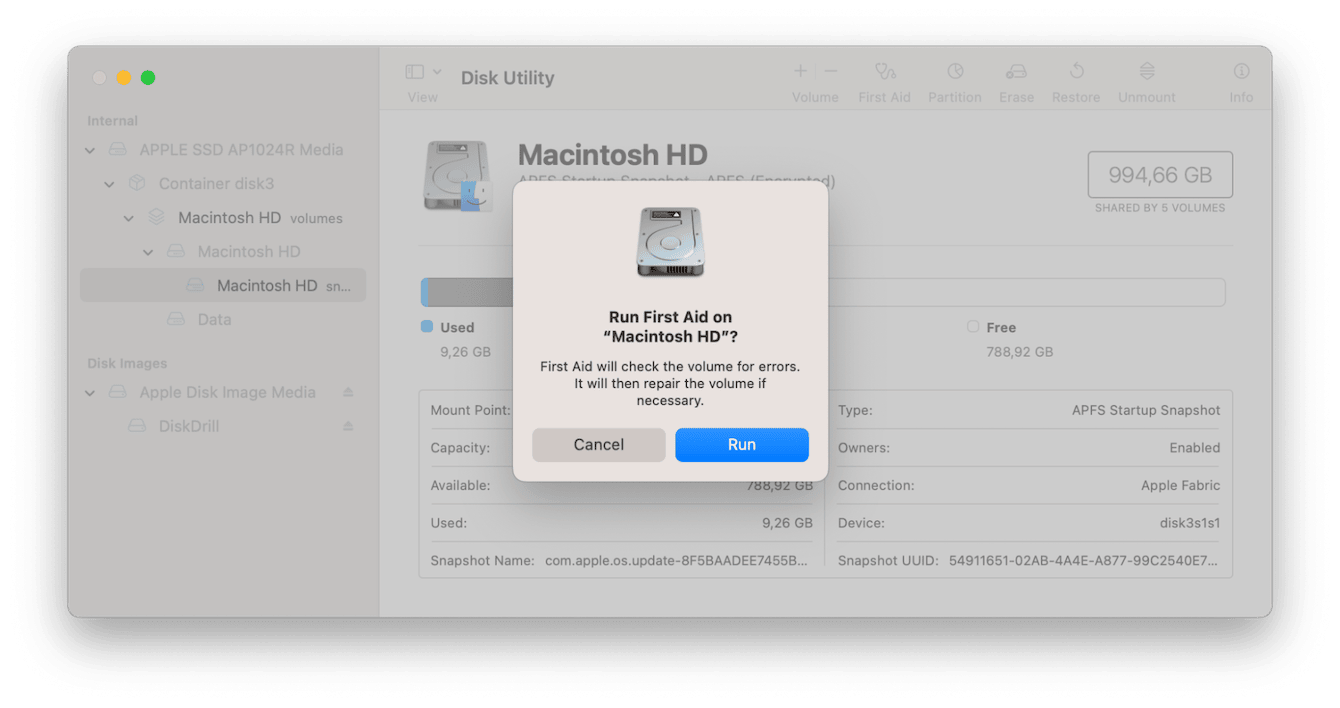
If you don't find any error or failure messages, but you still have issues with your disk, use Disk Utility to attempt to repair it. Here's how:

- Go back to the main Disk Utility menu and once again select your hard drive from the list.
- This time, choose First Aid from the top, then press Run.
If Disk Utility identifies an issue with your disk, it will attempt to fix it.
Did you know? You can use Disk Utility to erase your hard disk. Here an article on how to do it.
3. Check your S.M.A.R.T. Status
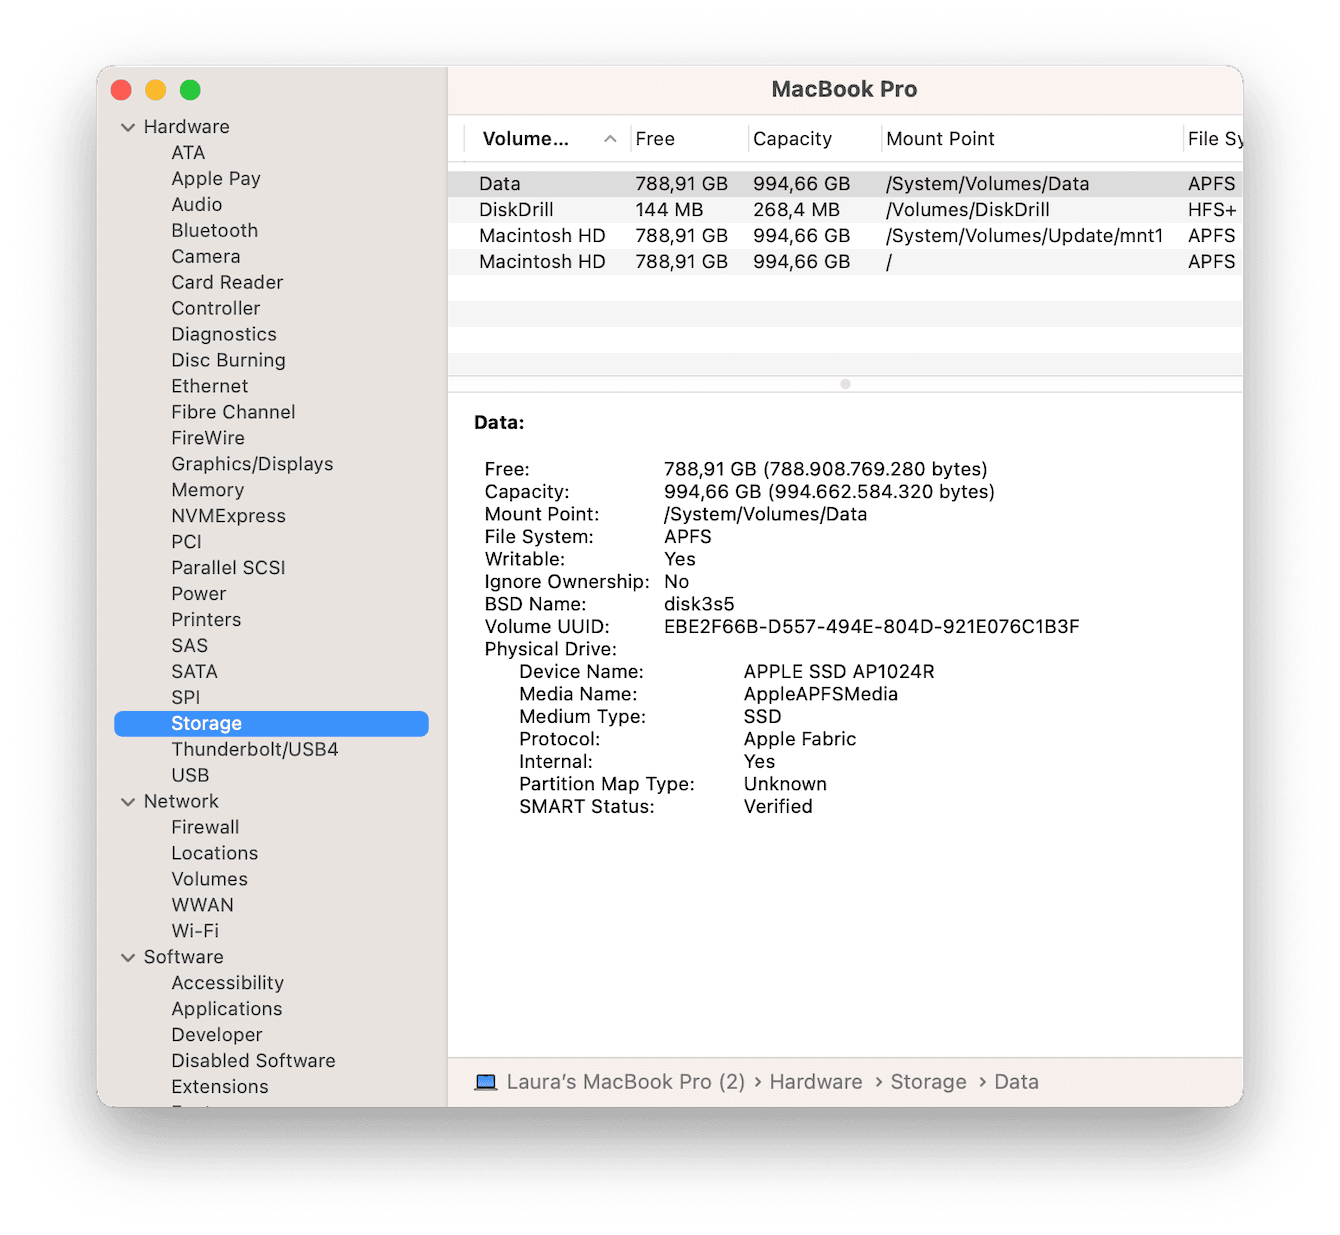
Another way to conduct a Mac check for hard drive health is to utilize your device's S.M.A.R.T. feature, which stands for Self-Monitoring, Analysis, and Reporting Technology.
This handy tool monitors various drive attributes to detect and notify a user about a failing disk before its complete collapse, giving the user enough time to back up data and replace the drive. Here's how to do it.
For macOS Monterey and earlier
-
From the main Apple menu, select About This Mac.
-
Click System Report > Storage.
-
Select your hard drive (often labeled Macintosh HD by default).
-
Under hardware, select Storage and search for S.M.A.R.T. status.
-
Verified = healthy
-
Failing = problem
For macOS Ventura

-
From the main Apple menu, select System Settings.
-
General > About. Scroll down to the bottom and press System Report.
-
Select your hard drive from the list (often labeled Macintosh HD by default)
-
Under hardware, select Storage and search for S.M.A.R.T. status.
-
Verified = healthy
-
Failing = problem
4. Reinstall your macOS
If you haven't found any conclusive evidence that your hard drive is failing, but you're still experiencing symptoms and issues, you could reinstall your entire macOS via recovery mode to be sure it is a hardware issue. Here's how.
For Apple silicon
Turn your Mac on while pressing the power button until the startup options window appears. Select the gear icon marked as Options, then press Continue.
For Intel processor
Turn your Mac on, then instantly press and hold Command-R until the Apple logo appears.
You might be requested to enter your password. Once you've successfully launched recovery mode, select Reinstall macOS from the menu and follow the steps.
5. Get a second opinion
So you've reinstalled your macOS, but issues persist — it might be time to get a second opinion. Plenty of third-party hard drive tester tools on the market offer a complete range of testing options.
Here's a brief look at some of the best tools:
DiskDrill

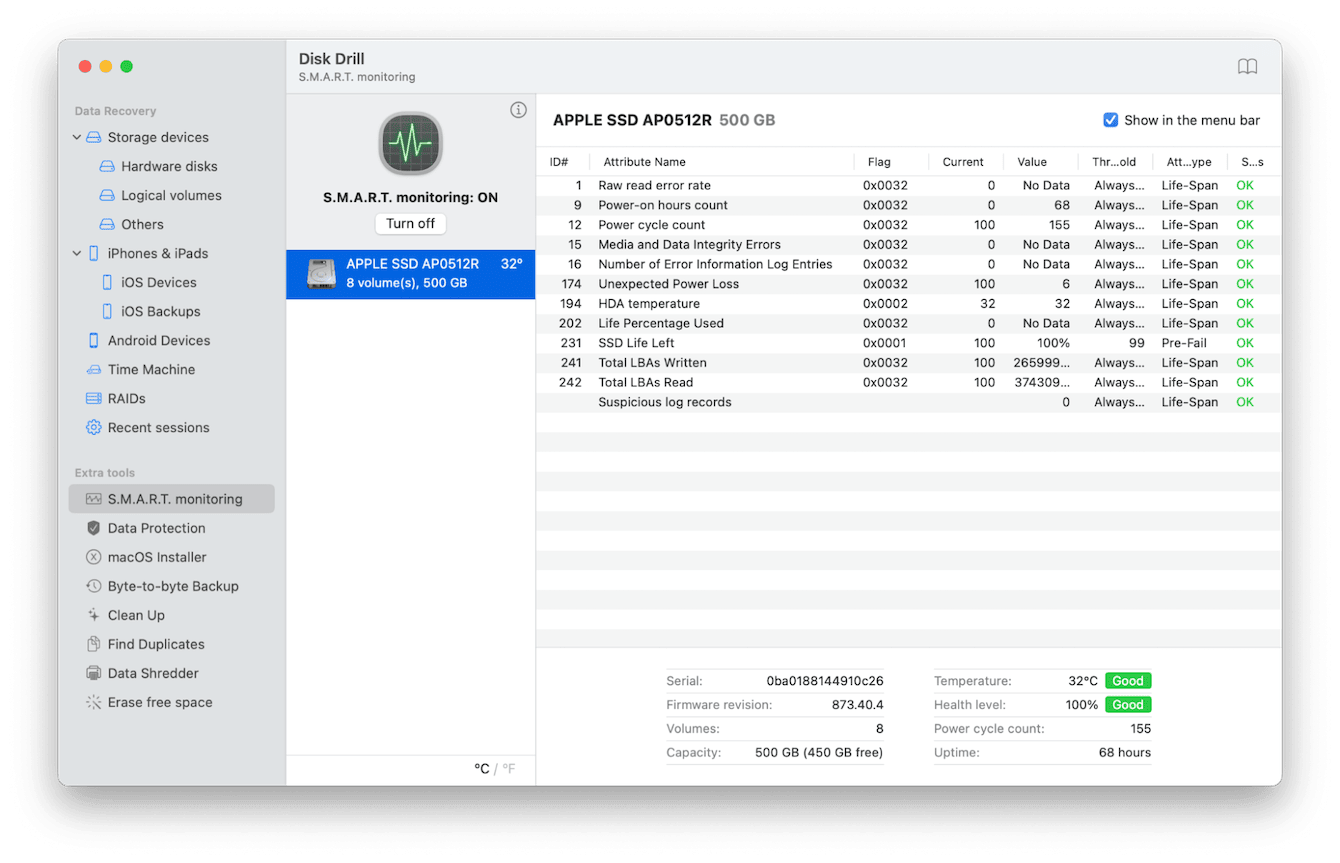
DiskDrill comes with an array of features, including monitoring your drives and checking the hard drive health on your device.
- Install the application and select S.M.A.R.T. monitoring from the sidebar.
- Select your drive and press Turn on to see your drive's information.
Tip: DiskDrill is a great utility that can be used for different operations with your Mac's hard drive. One of them is cloning your drive. Here are the steps to follow should you need to do it.
GSmartControl
GSmartControl is an SSD and Hard disk drive health inspection tool which allows you to inspect your Mac's S.M.A.R.T data and health status while running various tests.
DriveDx
DriveDx might seem simple compared to the other recommended options. Still, it's a powerful tool designed solely to monitor your hard drive health and an excellent choice for those looking for a simple diagnostic.
So we've covered multiple ways to carry out Mac disk checks, but let's talk about what we can do to prevent hard drive failure.
How to prevent Mac hard drive failure
-
Take good care of your device. Knocks, drops, and bumps are all common causes of damage and hard drive failure, so be sure you take good physical care of your Mac.
-
Environment is another important factor when it comes to maintaining the health of your disk. Extreme heat and cold can both contribute to damage — not only to your drive but also to many other Mac components.

-
Regular MacBook maintenance will help keep your Mac optimized and reduce failure risk. The app I mentioned previously in tip #1, CleanMyMac, has an intelligent Performance module designed to resolve errors, fix issues, and keep your Mac running smoothly. Launch the app and select Performance from the sidebar. Start a scan, then run recommended maintenance tasks.
Once you've checked your Mac's drive, you'll see it's not a complex or challenging process. It's important to keep a regular eye on your overall Mac hard drive health, so if you haven't already, make sure you add it to your standard device maintenance checklist.
And as a final takeaway and reminder, be sure to back up your data at the first sign or suspicion of disk failure.

