How to stop Chrome battery drain on Mac
Google states that "Chrome is designed for speed and efficiency." If that's true, why is it that I feel like Chrome is using so much memory and draining my Mac battery?
It's no hidden secret that battery life has been a long-standing issue for the browser legend. Although Chrome is continually evolving and making various improvements, the Mac battery drain remains largely unsolved.
A few years ago, Google set out plans to improve the battery toll for Mac Chrome users by blocking and limiting resource-heavy ads. We've been promised a new, optimized, stable release, but it seems like it's not there yet. So, while they work on a permanent fix, let me show you some easy tricks to help Chrome run faster that, in return, will make Chrome use less battery.
Why is Chrome draining your battery
Chrome uses a massive amount of RAM to allow you to browse in seamless continuity. From watching YouTube videos and browsing over multiple open tabs to running all the extensions and apps installed, a lot is going on for this power-hungry browser. All of this extensive CPU and RAM usage means one thing — bye-bye battery life.
So why exactly your Chrome gets slow?
-
The ongoing data exchange in the background
-
Active tabs
-
Extensions you may not be aware of
-
Other background apps feeding off your RAM
-
Chrome has been running for too long without quitting
The good news is there are lots of ways we can improve this pesky problem and improve Chrome taking up memory.
How to reduce Chrome battery consumption
1. Smart restart
Restart your Chrome if it has been running continuously for a long time. Paste in the following command to the address line:
Paste in: chrome://restart
Applying this command refreshes Chrome while keeping your tabs intact.
Tip: Add this as a browser bookmark when you need to speed up your Chrome in one click.
2. Clean up system junk on your Mac
Your browsing data builds up and causes Chrome to slow down over time. Unknowingly your system can get clogged up with unwanted junk like temporary files, broken items, and cache. Giving these items a regular clean is a guaranteed way to improve system performance. You can easily manage your system junk with a tool called CleanMyMac. It has a nice instrument that specifically searches for outdated system files and massive cache folders. You should expect a bit better browsing experience.

You can test this app for 7 days for free — get your free trial here. It's also notarized by Apple.
After you've started your trial, open the app and click the Cleanup tab in the sidebar. It's right at the top. Then, click Scan > Clean.
Why use CleanMyMac
- On average, users detect and remove 10.5 GB of safe-to-delete junk files after the first scan
- Cleans over 50,000 Macs daily
- Removes over 81,600 GB of junk every minute
Get your free CleanMyMac trial — declutter your Mac in less than 5 minutes.
3. Update Chrome
Okay, I know this one sounds obvious, but you'd be surprised how many of us are running older versions of Chrome. Having the latest version is always recommended. Here's how to check and do a quick manual update.
Check and update Chrome manually:
- Open Chrome on your Mac. Select More in the top right (3 dots)
- If there is an update pending, an icon will show a green, orange, or red alert. Important: If you can't see this, then you're on the latest version. If you want to double-check, click Chrome in the menu bar and choose About Google Chrome.
- Click Relaunch to Update Chrome.

Alternatively, click Chrome from the menu bar > About Chrome. It will check for updates, and you could relaunch Chrome to apply available updates from there.
Did you know? Some mad statistician calculated that users of Chrome and Firefox stay on their jobs 15% longer compared to those who browse on Safari.
4. Manage your open tabs
Stop for a moment, how many browser tabs do you have open? If you're anything like me, there are multiple open tabs just sitting there idly. These seemingly innocent tabs are making Chrome take up vital memory.
For Chrome, it's simple: the more open tabs you have, the harder it needs to work. Each open tab requires resources, and these can be draining. Closing down all unwanted open tabs gives you a quick speed boost.
All you have to do is click the X on any unwanted tab to close it down.
5. Stop unwanted processes
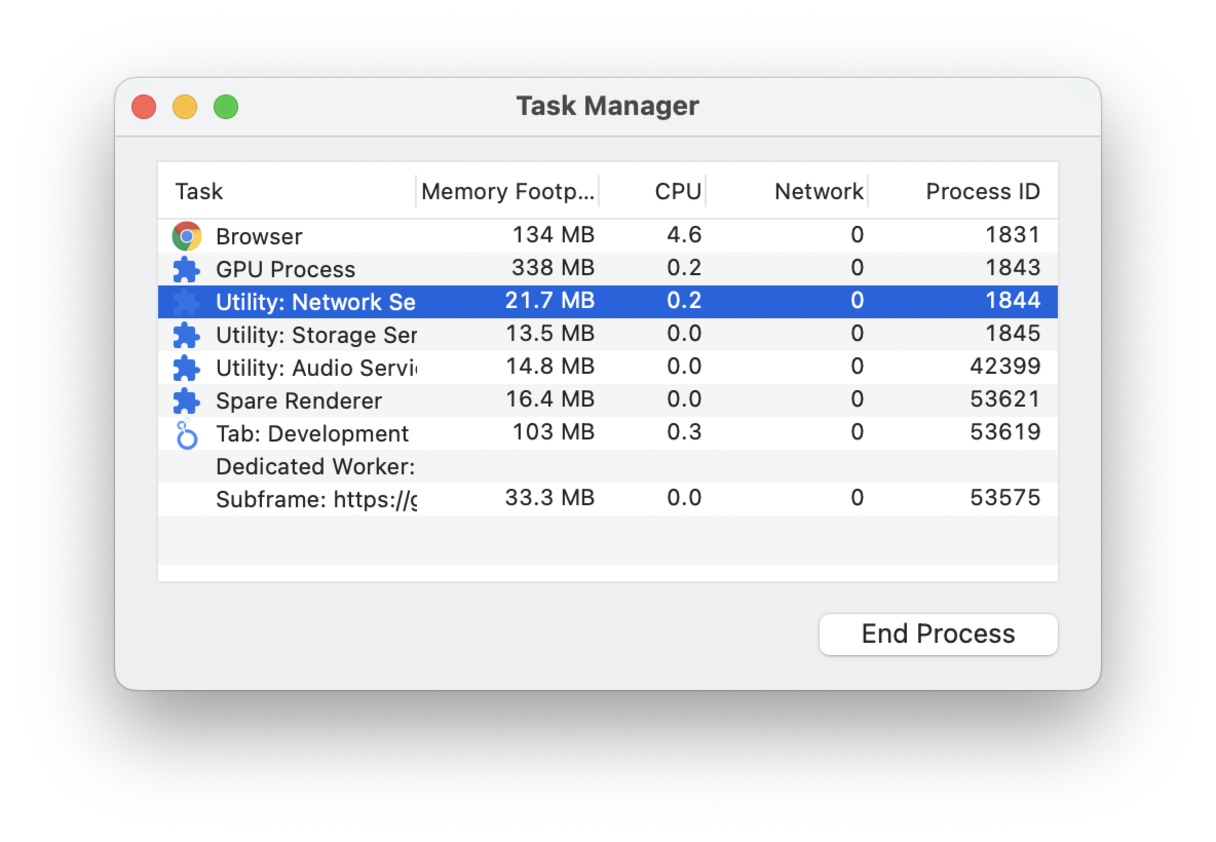
Use Chrome Task Manager to quickly identify troublesome extensions and tabs that could be slowing you down. Task Manager gives you an excellent overview of processes and resources running. Here, you can sort by memory footprint and quickly end unwanted tasks.
How to manage processes with Task Manager:
-
Open Chrome, and in the top right, select More (3 dots).
-
Select More tools and navigate to Task Manager.
-
You can click Memory footprint to sort by memory usage.
-
Select any task that you want to close by clicking End Process.

Tip: Look for items labeled "Subframe" and "Background page" — these can be removed.
6. Open pages faster
Turning on network action predictions, also known as "page prefetch," will let Chrome open pages faster. When the setting is activated, Chrome preloads links it thinks you might open and preloads all associated pages before you even click on them.
How to turn on page prefetch:
-
Open Chrome, top right click More (3 dots).
-
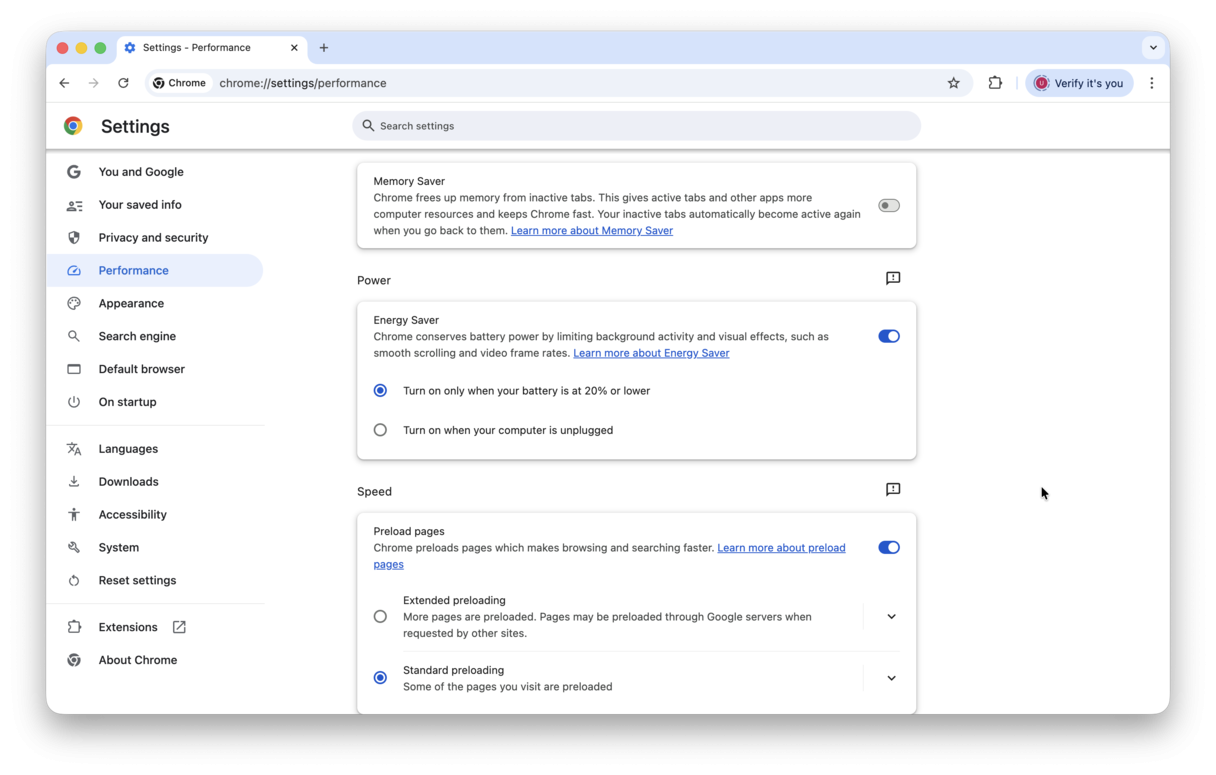
Select Settings and head to the Performance section.
-
Scroll down to Speed.
-
Turn on Preload pages for faster browsing and searching.

While in this tab, enable the Energy Saver option. It will conserve battery energy by limiting visual effects and background activity.
These quick tricks can enhance Chrome performance and stop this greedy browser from sucking away your battery life. Say goodbye to the cheeky Chrome battery drain.
7. Find heavy memory consumers on your Mac
The app I've mentioned earlier, CleanMyMac, has another feature that disables hidden background apps because not all apps can be switched off manually. You can do this in the CleanMyMac Menu available in your Menu Bar.
- Run CleanMyMac (get your free trial here) and click a little iMac icon in the menu bar.
- Click the Memory tab and check Top Consumers at the bottom.
- Inspect Heavy-memory consumers and click Quit to shut down heavy processes.
Alternatively, you can click the CPU tab and force-quit apps from there.

8. Turn off automatic syncing
If you use Chrome across several devices, you may have enabled automatic syncing to make sure that you can always access you bookmars, reading list, payment methods, and other important information. Useful as it is, having this feature enabled may eat up the battery's charge, so consider disabling it at least for some time to see if helps solve your issues.
Here's how to turn off automatic syncing in Chrome:
- Open Chrome and click More (three dots icon top right).
- Go to Settings > You and Google.
- Click Turn off and confirm.

Note that it will sign you out of your account. If you want to stay signed in, you can manage the scope of syncing. To do it, click Sync and Google services > Manage what you sync > Customize sync and turn off anything you do not need to be synced across devices. You can turn off everything. This way, your data will not be synced, but you'll remain logged in.

Bonus tips: Extra cleanup and optimization
There are a few additional things you can do to reduce Chrome battery usage:
📌 Clear Chrome cache and other data: Settings > Privacy and security > Delete browsing data.
📌 Disable hardware acceleration: Settings > System.
📌 Turn off telemetry: Settings > Privacy > Privacy and security > Third-party cookies > Block.
Hopefully, one of these tips helped fix your Chrome draining battery Mac issue. If your Chrome using experience is less than flawless, check out other articles on common problems and how to address them: Chrome consuming too much memory and Google Chrome Helper eating CPU.
If Chrome is still draining the battery, consider switching to an alternative like Safari, Edge, or Firefox to see if they are less demanding. It may be that the problem is not with the browser, but the battery itself.
Thanks for reading, and stay tuned for more helpful tips coming soon.

