How to find duplicate files on Mac
The funny thing about hard drive space is that you never seem to have enough. It doesn't matter how hard sparing you are with it, you could always use more. That’s why cleaning up your digital clutter is so important. I’m sure if you went through almost any folder on your Mac, you’d find duplicates or similar copies of the same file.
Keep in mind duplicate files not only waste space, but they can impact your computer’s performance. Bogging it down and making it slower to load, especially in places like your Desktop.
This article will go over a couple different ways to find and delete duplicate files on your Mac. And get you some more free space on your hard drive in no time.
How to remove duplicate files automatically
Let’s cover the easiest and fastest way to find and delete duplicates. You can use a duplicate finder app like CleanMyMac and its tool named My Clutter to scan your hard drive and help you remove them. I know it sounds too good to be true, but once you get CleanMyMac, it just takes a few clicks and the app will start scanning.
Don’t believe me? See for yourself how easy it is to delete duplicate files with CleanMyMac:
-
Open the app and go to My Clutter from the sidebar.
-
Click Scan. CleanMyMac will now scan your home folder, but you can choose another location, too.
-
Let the scan complete, then click Review All Files > Duplicates.
-
Now, review each group of files, select those you no longer need, and click Remove.

CleanMyMac finds duplicate pictures, archives, music, folders, and other duplicate files. My Clutter tool can also identify similar photos and delete large and old files, so you can free up even more space.
How to remove duplicate files manually
Using a duplicate finder is not the only option you have. You can manually go through your files, searching for duplicates, and getting rid of them. But, it’s going to take some time. Cleaning up your entire hard drive could end up becoming an hours-long process.
So with that in mind, you’ll read about a couple of different methods below. Some of these options will be better than others, depending on your familiarity with macOS.
How to delete duplicate files in a specific folder
If you’re less concerned with cleaning up your entire computer, but know one particular folder is a mess—then this is a great place to start. You might be surprised to see just how messy your Desktop or Downloads folders can get. And if that’s you, you can use these steps to look for duplicates in a specific folder using Finder:
-
Open a new Finder window.
-
Locate the folder you want to go through.
-
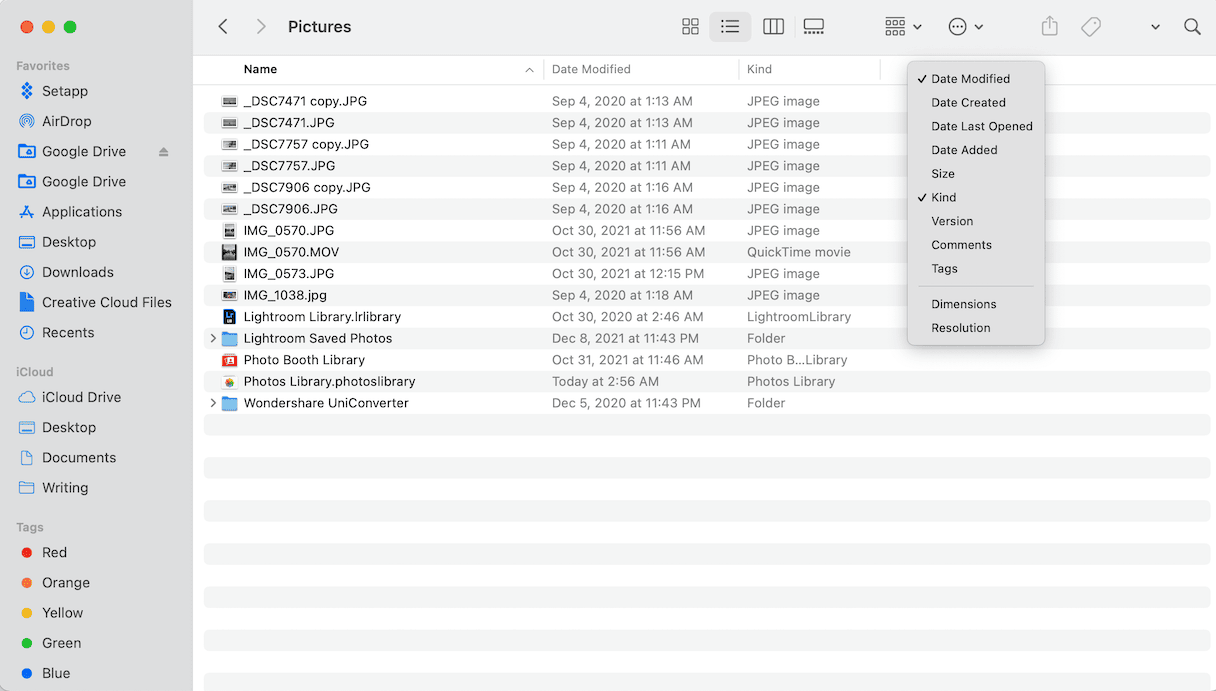
Click on the Size tab at the top.
Note: If you don’t see the Size tab, right-click on any tab and select Size.
-
Select the file(s) you want to delete.
-
Right-click or hold down Control and click.
-
Then, click Move to Trash.

The reason you’d want to view files by size is because that’s the best way to see if something is an exact duplicate. File names and dates can be changed. But if you start with the size of the file, then it might be a little easier to spot the duplicates.
And remember, moving a file to the Trash doesn’t free up space. You’ll have to right-click on the icon in your dock and click Empty Trash to completely get it off of your hard drive.
Tip: Instead of deleting files, you may want to archive them. If you have sensitive files, it's better to password-protect your archives — here's an article on how to do it.
How to find duplicate files on Mac using Smart Folders
If you’re not familiar with Smart Folders in Finder, now is the time to get to know this feature. It can save you so much time while trying to keep everything organized on your Mac. Or for the sake of this article, they can help you manually search for duplicates.
The key is to search by file type with Smart Folders. So, for this example, I used documents. But that can be changed and the following steps will still work:
-
Open a new Finder window.
-
Click File > New Smart Folder.
-
Select “This Mac” and click +.
-
Set the drop-down menus to “Kind” and “Documents”.
And that is all there is to it. Then, you’ll be able to search through the files. Select the files you want to remove. And then, move them to the Trash.
If you need to pick back up on your search later, you can save the Smart Folder by clicking the Save button. When you’re ready to go back to it, just open the folder wherever you saved it.
How to find and delete duplicate files on Mac with Terminal
Earlier, I mentioned that all of these methods have varying difficulties. With that in mind, almost any time you have to use Terminal it should be assumed it’s only for advanced users.
Terminal is a pretty robust tool that can screw a lot of things up if you’re not sure of what you’re doing. The steps below have been verified and tested. But you should still double check and verify what you type into Terminal. The last thing you’d want is to accidentally delete or corrupt the folder you were attempting to scan.
-
Open Terminal from your Utilities folder.
-
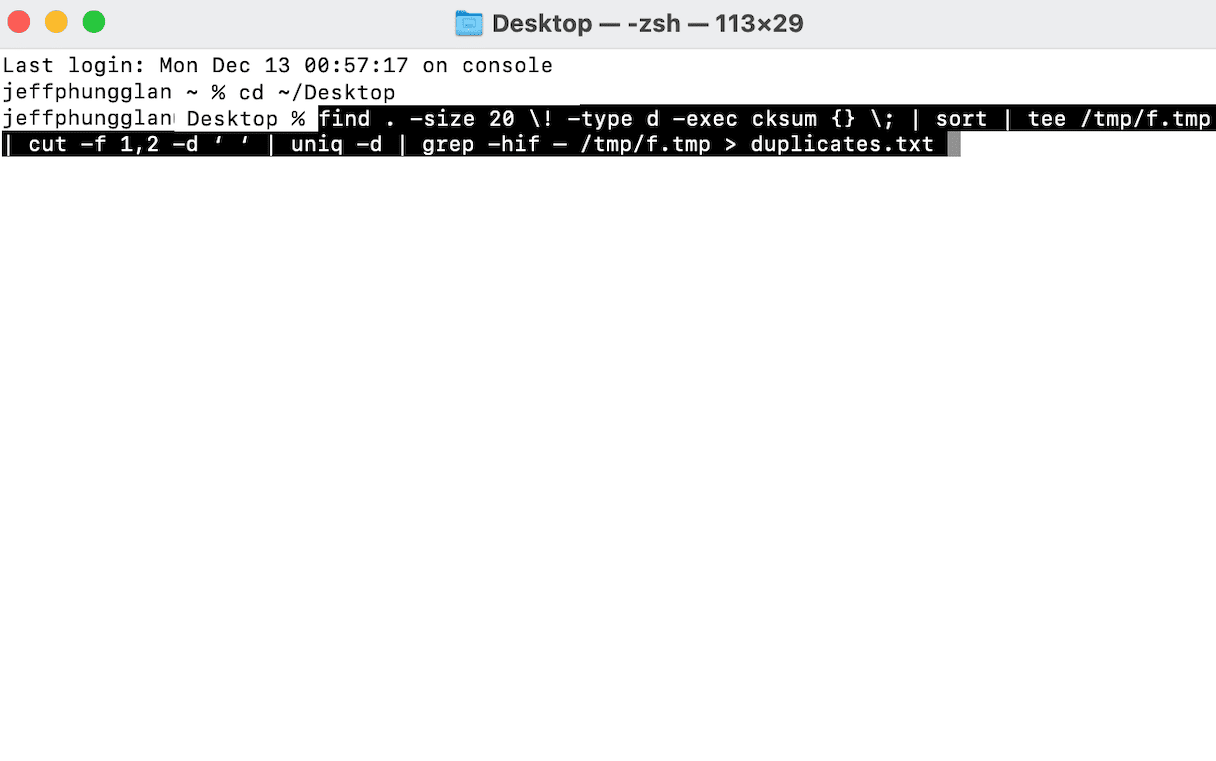
Then, you’ll need to set Terminal to the folder you want to scan. Say you wanted to scan your Desktop, then you’d type cd ~/Desktop
-
Press Return.
-
Now, copy and paste this into the Terminal window:
find . -size 20 \! -type d -exec cksum {} \; | sort | tee /tmp/f.tmp | cut -f 1,2 -d ‘ ‘ | uniq -d | grep -hif – /tmp/f.tmp > duplicates.txt
-
Then, press Return once more.

What this command does is it creates a text file listing the duplicates in the folder you’ve scanned. The file now lives in that same folder. So, you’ll still need to read the file and then delete the duplicates mentioned. But, this will at least spare you some of the work of having to try and find those files.
Tip: Wondering how to locate different files on Mac? Here's how to search for files on MacBook.
Cleaning up your digital clutter and organizing your files is definitely no small feat. But, you’ll be glad you did. Not only does it free up hard drive space on your computer. It will also help you find the files you need faster. And can potentially make your Mac run a little faster. Hopefully, this article was helpful and now you can get started deleting duplicates.

