How to fix the “Startup Disk Full” error on Mac in 10 steps
When the “Startup disk full” message pops up, it’s a sign that your main drive is running low on space. But did you know that a Mac lacking free space is almost 20% slower than a Mac with enough free storage? It can even crash. Luckily, there’s a lot you can do to fix it. Keep on reading, and we’ll show you the best tips.

What does it mean when your Mac says the disk is full?
When a Mac startup disk is reaching full capacity, it is bad news for two reasons:
- Soon, you’ll run out of space entirely.
- A disk that is full (or even near full) is going to perform slowly.
What most people don’t realize is that their Mac actually converts the available space on their startup disk into virtual memory, which you use for day-to-day operations. Ideally, 10% of the disk should be free to leave your Mac’s OS enough space to operate. Therefore, if you’re running low on space, you’re heading for big problems.
Did you know? Startup disk is the primary hard drive where macOS lives and where crucial system processes run.
How to check disk space on Mac
To get to the root of the problem and find the solution, you must discover what is taking up all the space on your startup disk drive. To have an overview of how your space is being used, simply follow these steps:
- Click the Apple Icon.
- Choose About This Mac.
- Click More Info > Storage Settings.


From here, you’ll be able to see exactly how much space you’ve got left and what’s eating up the used one. Browse the categories below the colored graph to learn more about the main space hoggers. Luckily, your disk will be full of movies, photos, and audio. Why luckily? Because these files are easy to remove or move to another location. Any external drive or cloud storage will do the trick, and your Mac’s going to thank you for leaving it space to breathe.
However, there’s another scenario in which other data is taking up the free space, with files you cannot or do not want to delete. This situation’s a bit trickier, but don’t worry. Our 10 tips will surely give your Mac some extra space. So, let’s start fixing your Mac right now.
10 essential tips to clear the startup disk on a Mac
Believe it or not, one of your Mac’s occupations is to create junk. But don’t blame it; it’s just doing its job. macOS, like any other operating system, depends on creating temporary files, caches, and backups to perform correctly. However, after this data has done its part, it remains latent on your Mac, killing space for no purpose.
The good news is that it’s extremely simple to remove these useless files, freeing up gigabytes and fixing your startup disk full problem without affecting your personal data. So, here is how you can fix the “Your startup disk is almost full” error message by deleting the files you don’t need and never use.
1. Delete app cache (system junk)
Cache files are both helpful and troublesome. Initially created to speed up processes, they quickly turn into useless junk once their job is done. If left unchecked, they pile up and take up valuable space on your startup disk. The good news? You can easily fix this by clearing them out. And don’t worry; your apps will soon refresh their caches and be back up to speed in no time.
To remove app cache files and clean up a startup disk, follow these steps:
- Navigate to Finder and click Go > Go to Folder from the menu bar.
- Type in ~/Library/Caches and press Return.
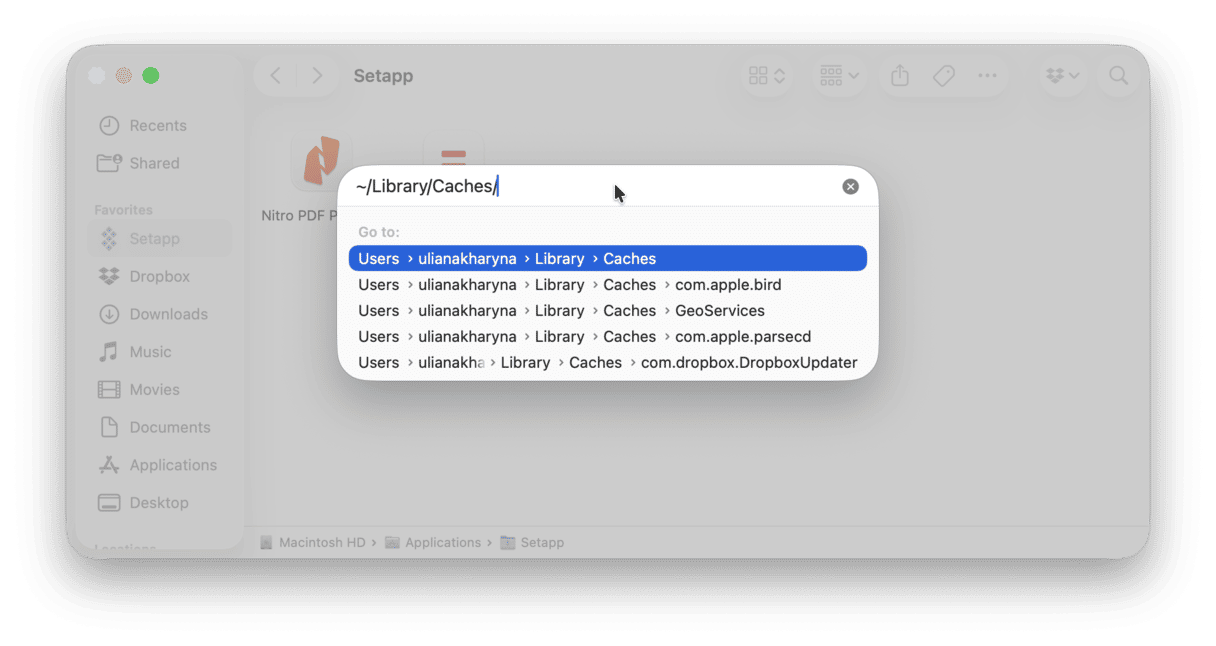
- Go into each folder (or just the ones taking up the most space) and delete the files inside. Do not delete the folders.
- Now, do the same for /Library/Caches (without the ~).


Note that there is always a small risk: when manually deleting files, you might pick the wrong folder. So, consider backing up these folders before you start deleting them.
Alternatively, you can clean up all caches in a fraction of the time and with 100% confidence if you use a dedicated Mac cleaner app. We recommend CleanMyMac. It comes with a smart Cleanup feature that scan your Mac, looking for all kinds of unnecessary stuff, including cache files. The best part? It lets you remove only those that are safe to delete, so you do not risk losing files vital for the operation of macOS.
This is how easy it is to delete tons of system junk at the same time using this flow:
- Get your free CleanMyMac trial — use all tools and features for 7 days at zero cost.
- Click Cleanup > Scan.

- When the scan finishes, click Clean.


The benefits of using CleanMyMac:
- Cleans more than 50K Macs daily
- On average, users remove over 10 GB of junk files
- Helps delete not only junk but also malware: on average, users find at least 1 malware
- Rated 4.7/5 on Trustpilot
Did you know? If you use Photoshop, it can take up a lot of space. You may even get an error message saying that Photoshop scratch disk is full when you open the app. One way to free up Mac space is to clear this scratch disk. Here's an article on how to do it.
2. Take out the trash
Sometimes, we overlook the most obvious solutions because we think the fix must necessarily involve some complex operation. But when there’s not enough disk space, Mac can be saved through the simplest trick.
The fact is that your Trash is a graveyard for files you no longer need. Still, these files keep taking up space on your Mac’s drive. So, you’ve probably guessed it: take out the Trash — just click “empty” to completely get rid of those piles of useless data.
We’re also going to satisfy your need for secret solutions by pointing out something you might not have thought about: every single app has its own trash folder that also stores useless gigabytes. The Mail app is one example, but there are many more. Just like the general Trash, you need to empty these folders in order actually to remove the junk and clear up disk space.
Once you empty all the trash folders in all the apps, you’ll be ready to move to the next tip. Ready? Let’s go.
3. Remove Time Machine backups
We love Time Machine because it creates important backups. But when your Mac can’t function due to a lack of disk space, there has to be a sacrifice. You can start with removing past Time Machine “snapshots” stored locally on your Mac. So, the first step towards removing the “startup disk full” message is to take care of these backups. Yes, by taking care, we mean removing them. To do it, all you need is to temporarily turn off your Time Machine.
- Open System Settings > General > Time Machine.
- If it is set up, click Options > Backup Frequency > Manually.


Then, you should give it a few minutes to take effect. Your local Time Machine snapshots will be deleted.
4. Delete browser cache
Your internet browser creates caches every time you visit a new page to load it faster on your next visit. However, doing this literally for every page keeps your browser folder cluttered, creating an even bigger problem.
So, if you’re wondering how to safely clean a startup disk on Mac, removing browser junk is definitely a priority.
Every browser has a different cache removal process, so to remove unnecessary files, follow the steps below based on the browser you’re using.
How to delete cache in Safari:
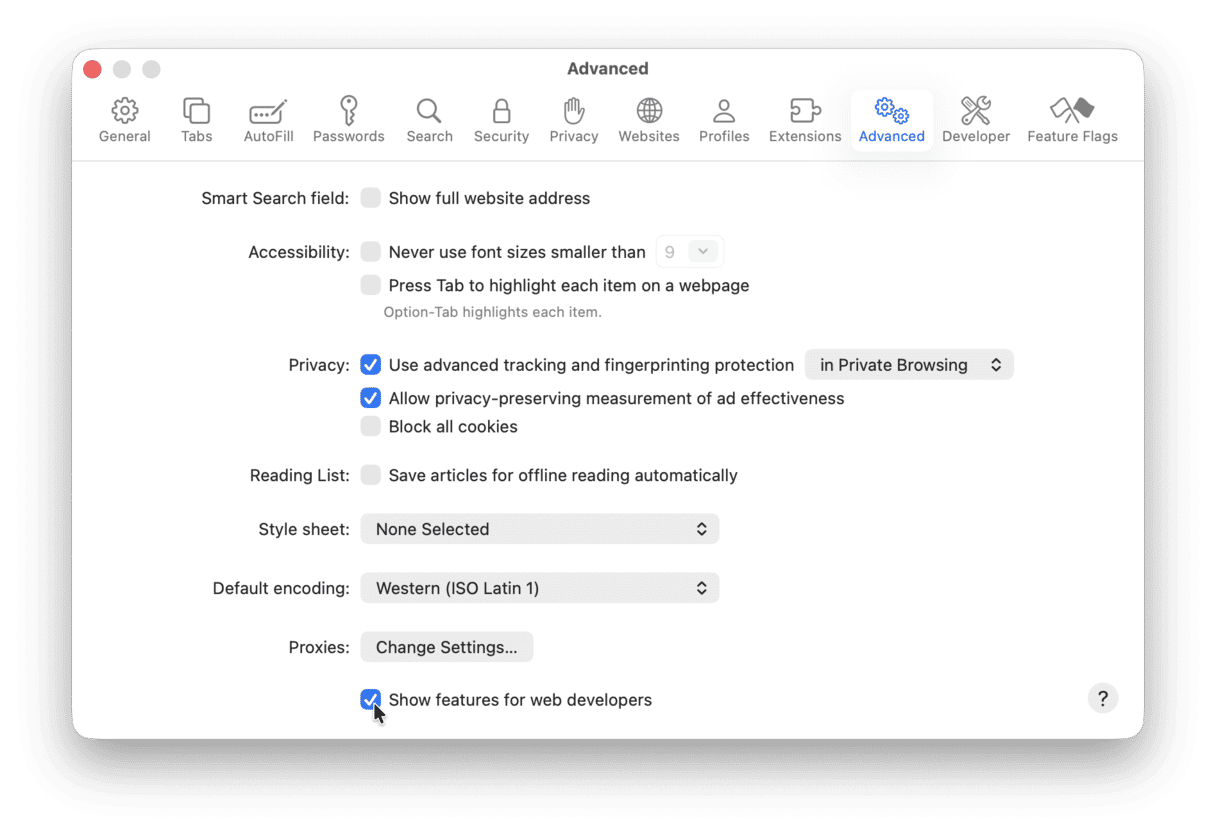
- Open Safari, click Safari in the menu bar > Settings.
- Go to the Advanced tab and select Show features for web developers/Show Develop menu in menu bar (depending on your macOS version, you can see either of these).
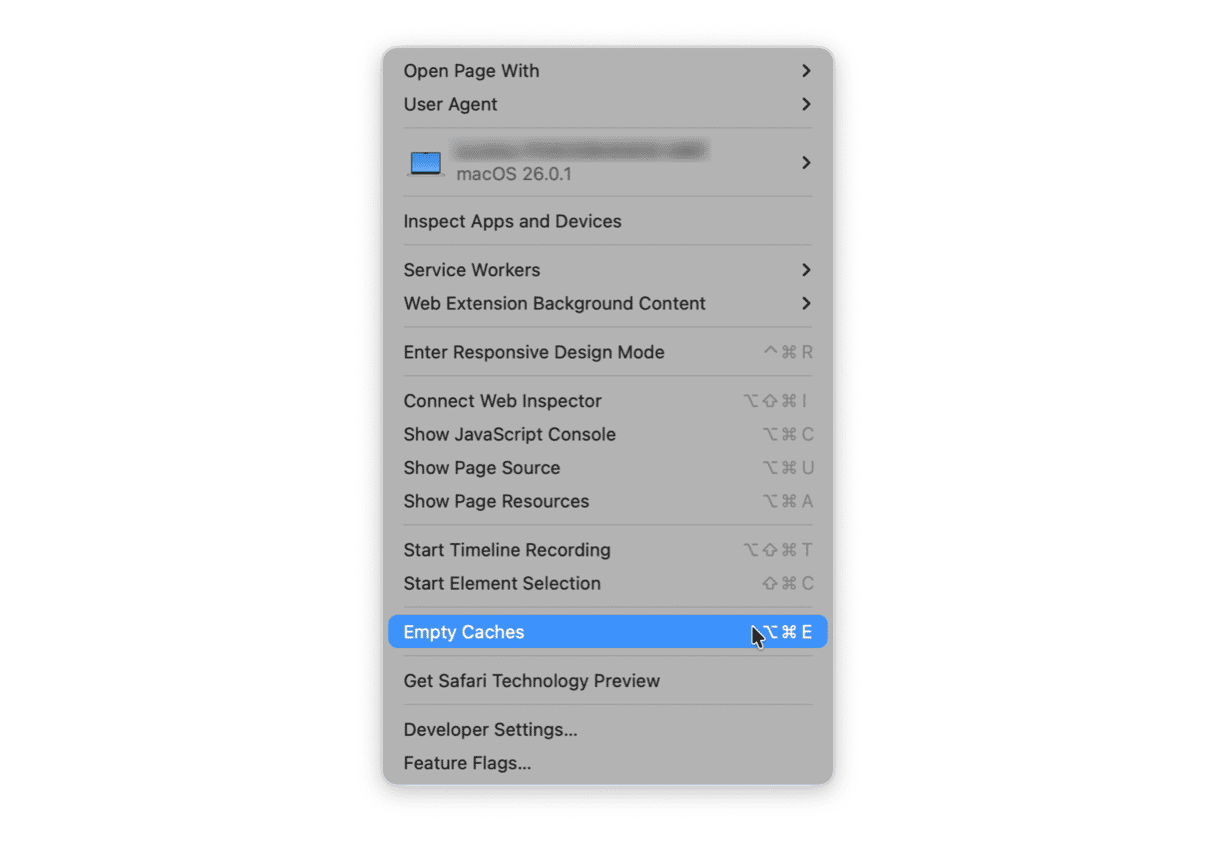
- Open the Develop menu and then choose Empty Caches.


How to delete cache in Chrome:
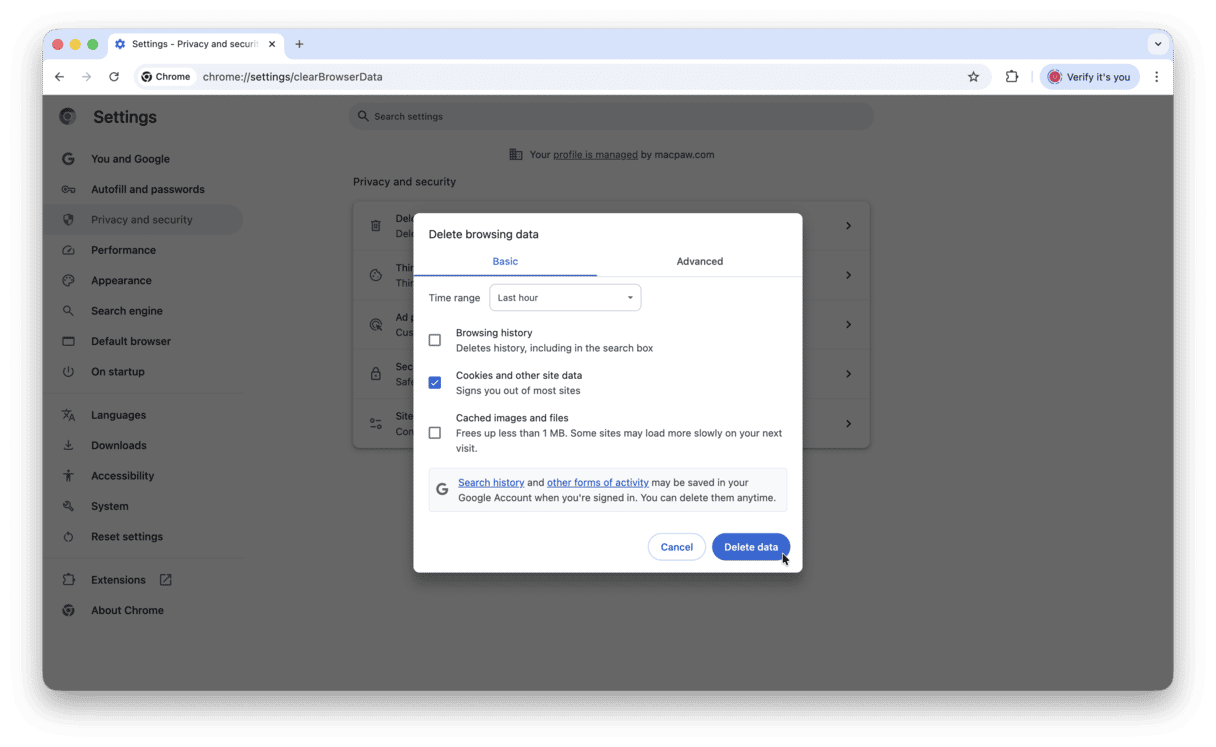
- Open Chrome and at the top right, click three dots > Settings > Privacy and security > Delete Browsing Data...
- Select boxes next to Cached images and files. You can also select cookies and other site data.
- Click Delete data.

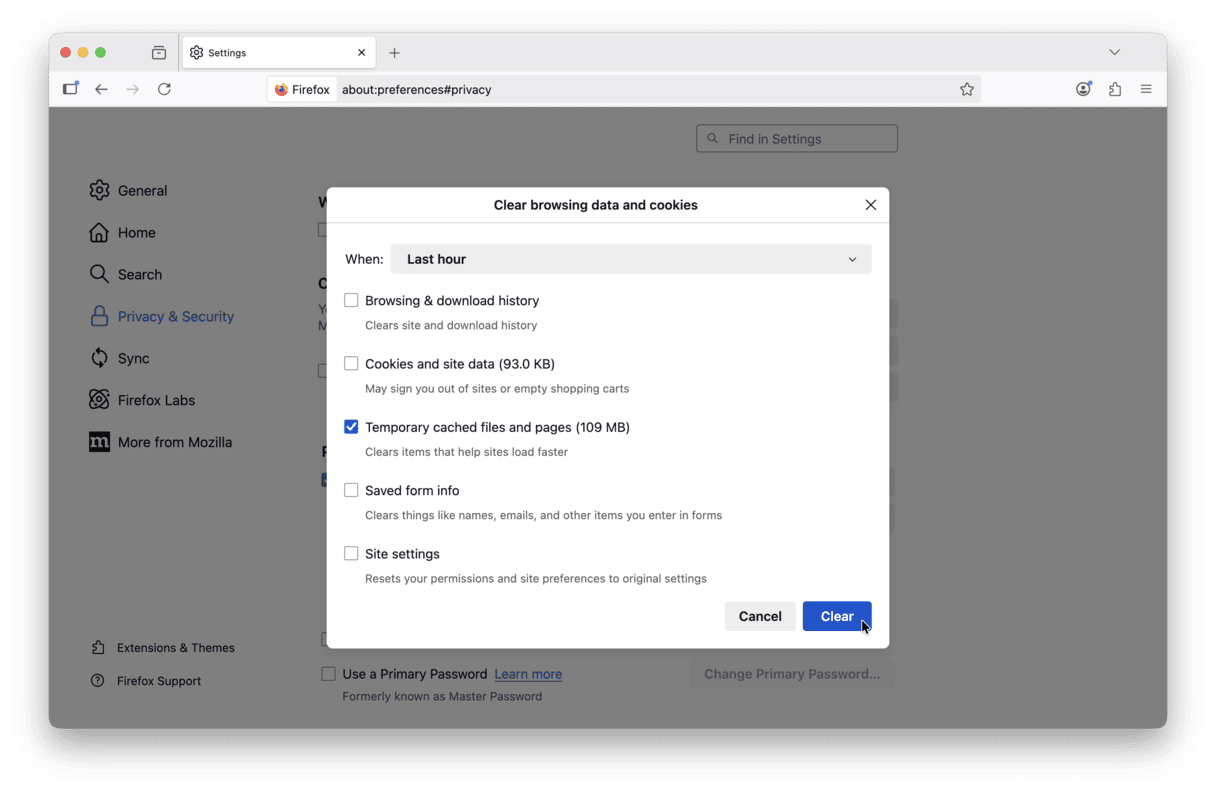
How to delete cache in Firefox:
- In the menu bar at the top, click Firefox and go to Settings.
- Select the Privacy & Security tab.
- In the Cookies and Site Data, click Clear Data.
- Select Temporary cached files and pages and click the Clear button.

But there is an easier alternative to clearing the browser cache — CleanMyMac. Simply go to the Cleanup in the sidebar, click Scan, and then Review All Junk. Then, click User Cache Files and clean it up!

5. Delete users or groups on Mac
If your Mac is set up for multiple users, delete users that no longer need access to your Mac. Their associated files, documents, and settings will be removed from your Mac, freeing up valuable space.
-
Go to Apple menu > System Settings > Users & Groups in the sidebar.
-
Click next to the user or group you want to delete, then click Delete User or Delete Group.
-
Sharing-only users will be removed immediately.

Tip: Another disk-related error is SMART hard disk error. If you've ever encountered it, here are the fixes to try.
6. Clear System Data storage
Mac System Data includes macOS system and temporary files, app extensions or plug-ins, old backups, cache files (system cache, browser cache, etc.), and others. You have to be very careful not to do any damage to the system when trying to clear those up by yourself. If you have no idea what you’re doing, then don’t! Otherwise, use Finder to delete System Data files from the Library folder on your Mac.
Follow these instructions to clear system data storage in Finder:
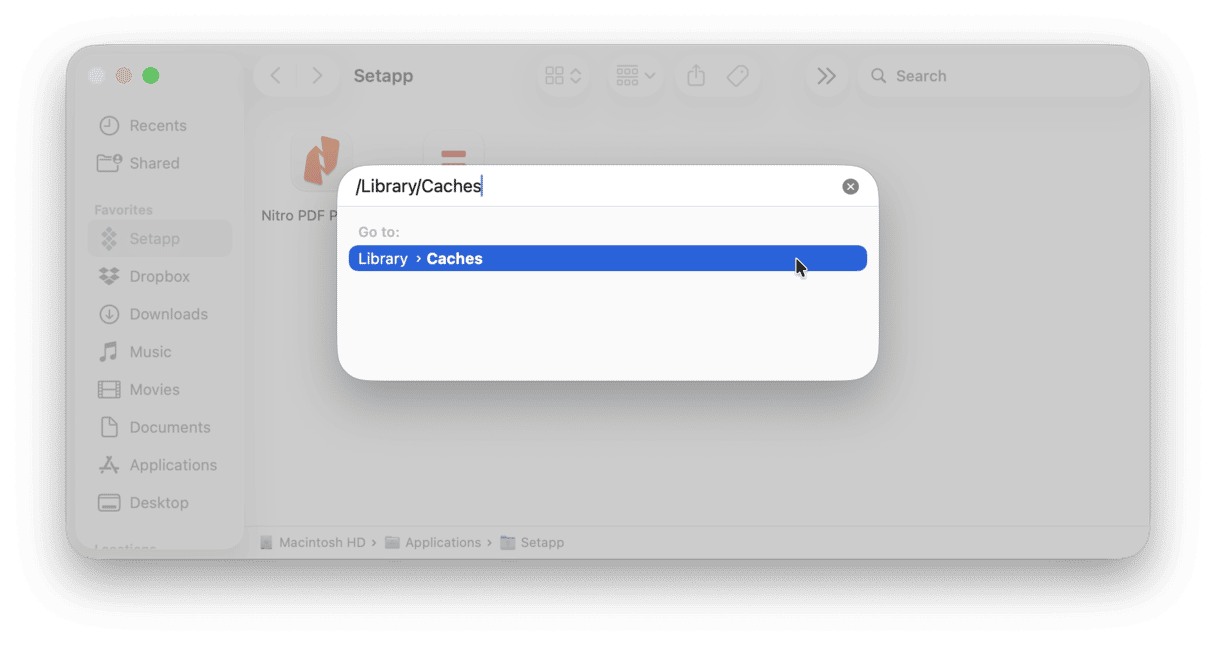
- Open the Finder and choose Go > Go to Folder.
- Type in ~/Library and press Return.
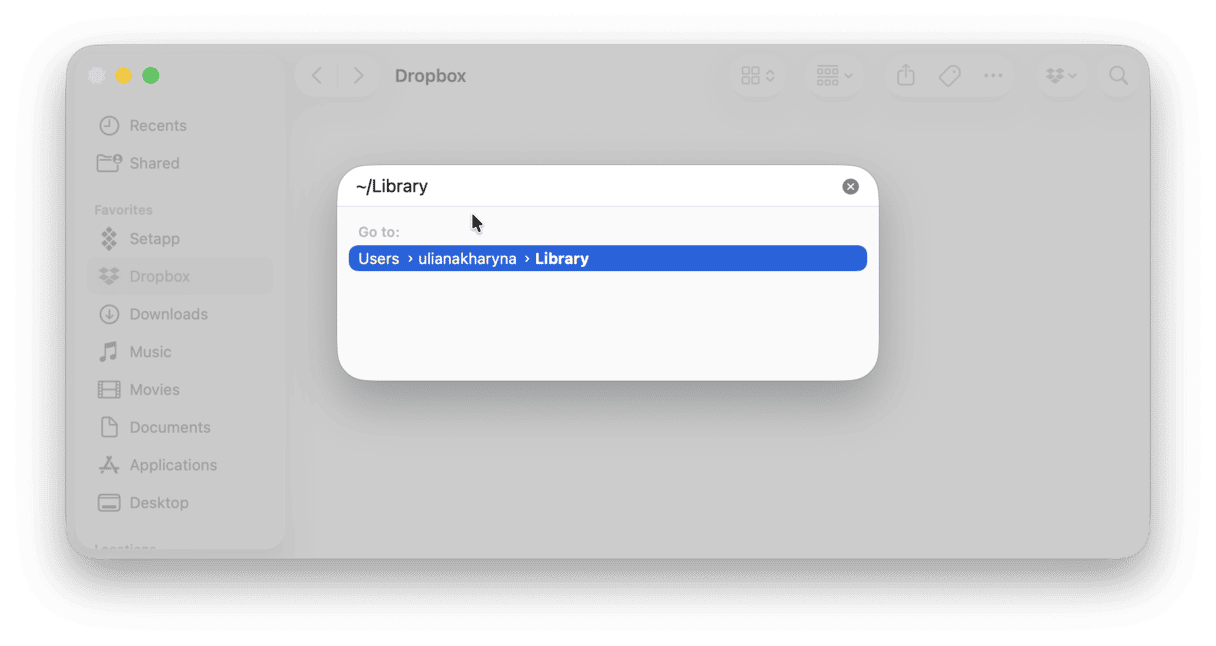
- Go through each folder to find files you no longer need. Drag them to Trash.
- Empty the Trash.


What else to remove to reduce System Data storage:
📌 Language files. Either run the Cleanup feature in CleanMyMac or do it manually. Go to the Applications folder and right-click an app for which you want to remove unneeded localizations. Choose Show Package Contents > Contents > Resources. Locate .lproj files you do not use and send them to the Trash. For instance, Chrome comes in 100+ languages, and each one has a file. If you only use English for the interface, why keep files for all other languages?
📌 Screensavers. Aside from clearing up the Pictures folder, open the Finder and press Shift + Command + G. Paste this path followed by Return to access screensavers: /System/Library/Screen Savers/
📌 Mail downloads and attachments. Like with language files, either run the Cleanup feature in CleanMyMac or do it manually. For manual deletion, open the Finder and press Shift + Command + G. Paste this path followed by Return to access downloads:
~/Library/Containers/com.apple.mail/Data/Library/Mail downloads
There are also attachments in ~/Library/Mail/V6 (there may be another number after V). Empty subfolders.
7. Remove iOS backups
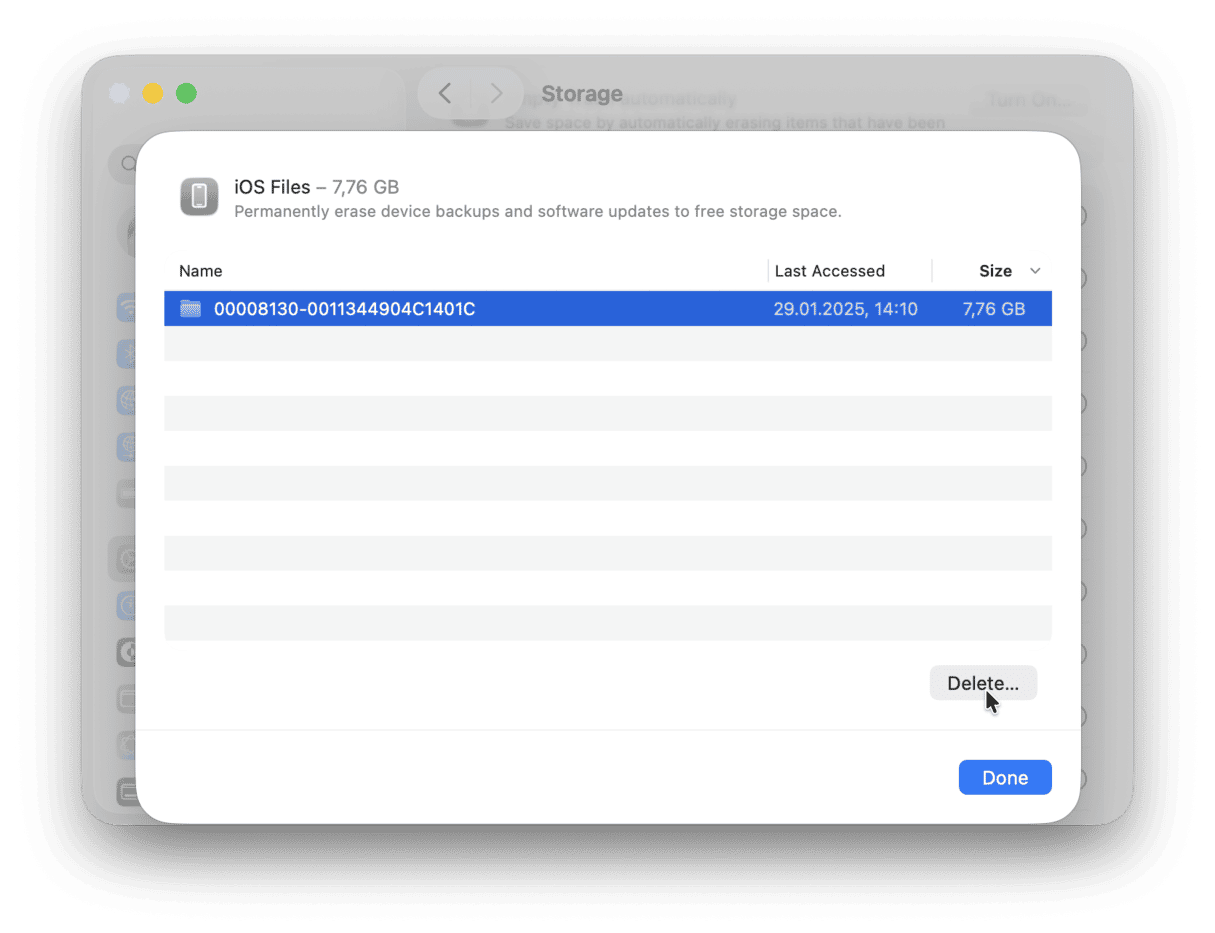
Do you own an iPhone or iPad? Have you ever updated those devices using your Mac? If the answer is yes, then you most likely have old backups taking up valuable space on your startup disk. The fastest and easiest way to delete heavy iOS backups is with macOS’ Optimized Storage feature. Here’s how:
- Go to Apple menu > About This Mac > More Info > Storage Settings.
- Look for iOS Files on the list and click the i icon next to it. You should see a list of iOS backups in the main window, together with their size and the date they were last accessed.
- Select the backup you want to delete, then click Delete and confirm.
- Repeat for each of the backups you want to delete.
8. Uninstall unused apps
How many apps do you have on your Mac? Let’s be honest: how many of them do you actually use?
Most people have at least a handful of apps that they never opened. You might think: so what? But these apps are wasting space, potentially even wasting other resources like RAM if running in the background.
So, take a moment and have a look through your applications to see if there are some apps you can let go of and remove for more space and speed. Dragging them to the Trash will uninstall the app, but it will also leave behind lots of hidden files associated with the app, like app logs and crash reports.
To see the list of all your unused apps and remove them completely, use CleanMyMac’s Applications feature. For a hard disk, it is a great startup cleaner that will free up all of the space that apps are taking up on your Mac. Why great? Because it will remove all app-related files, not only the app binary. It can even show you apps you have not opened for a long time.
Here’s how to delete apps without having to hunt down leftover files:
- Open CleanMyMac.
- Click Applications and run a scan.

- Click Manage My Applications and select apps you no longer need in the Uninstaller section.
- Click Uninstall.


Also, check out the Leftovers tab to remove files associated with the apps you've removed before installing CleanMyMac. This will ensure leftover deletion and help you reclaim some extra space.

Get started with a free CleanMyMac trial
9. Clean up your files
If, when checking what takes up storage on your Mac, you noticed that music, photos, and documents occupy a lot of space, it’s time to get rid of these files. Here are a few tips for you:
- Move files to an external hard drive or cloud.
- Use built-in Finder tools to find the largest or oldest files and remove them once and for all. Simply open your target folder and use Size or Date Added filters to find these files. Or you can use CleanMyMac’s Large & Old Files tool to do the detective job for you.
- Remove unneeded files from the Downloads folder. Do the same for Movies and Music folders and photo library in the Photos app. Finally, clean up your Desktop.
- Remove duplicate files and photos from your Mac. For more information on how to find these files, check out this article.
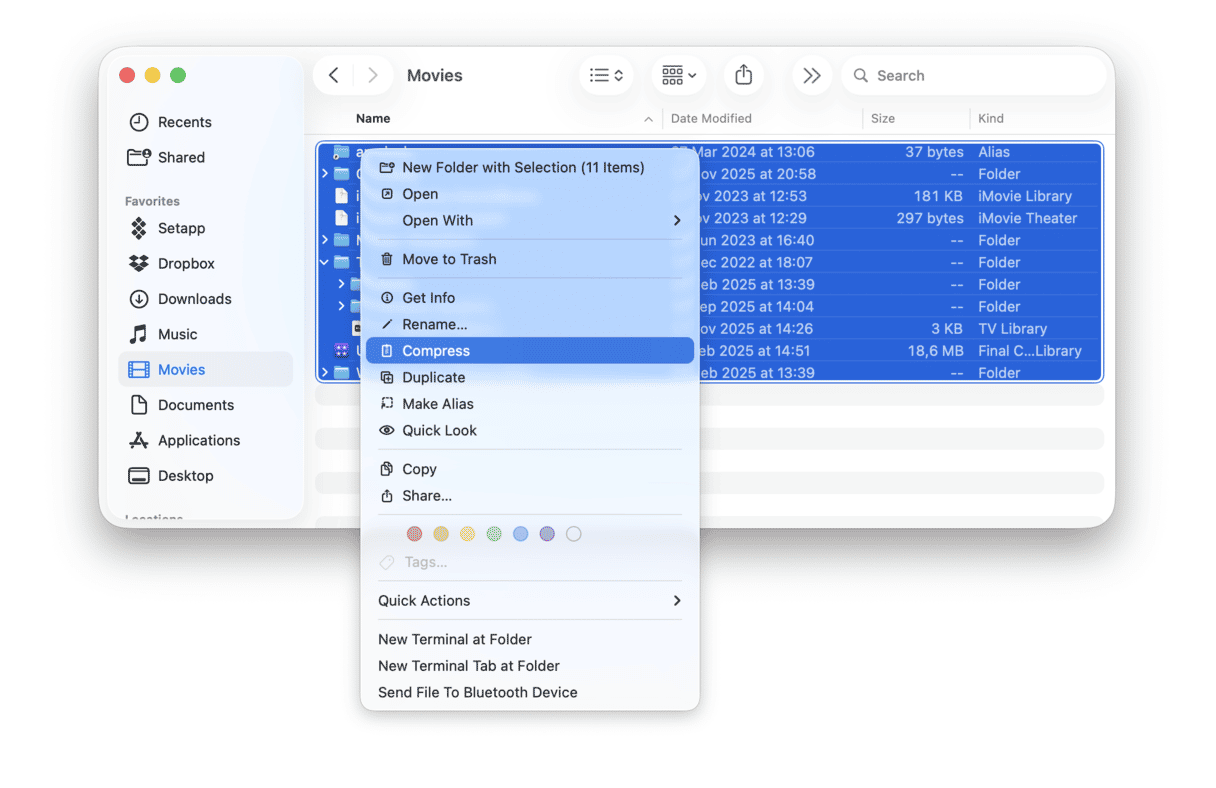
- Compress the largest files: just control-click files you want to archive and choose Compress. It works best for old videos or photos.
Tip: If you choose to move files to a cloud storage, scan it for clutter from time to time. But what is the quickest way to reveal space hoggers? This is CleanMyMac and its Cloud Cleanup feature. You can connect your cloud account to it (like iCloud Drive, OneDrive, and Google Drive) and let it identify large files. You can then remove or unsync them with a click, so there's always room for new files.
Use smart folders to detect large files
Did you know that the Finder comes with the feature that lets you automatically collect files meeting certain criteria? This feature is named smart folders, and if you create one, you can return to it from time to time to remove large files.
Here's how to do it:
-
Open a new Finder and click File > New Smart Folder in the menu bar.
-
Click + and add all the needed filters.
-
Click Save.
-
Add it to the sidebar to quickly access it.

When you no longer need it, you can delete it.
If you have doubts while cleaning up your Mac, you can always turn to the CleanMyMac Assistant. This AI-powered helper gives fast, clear guidance based on CleanMyMac’s built-in knowledge, so expert help is just a prompt away.
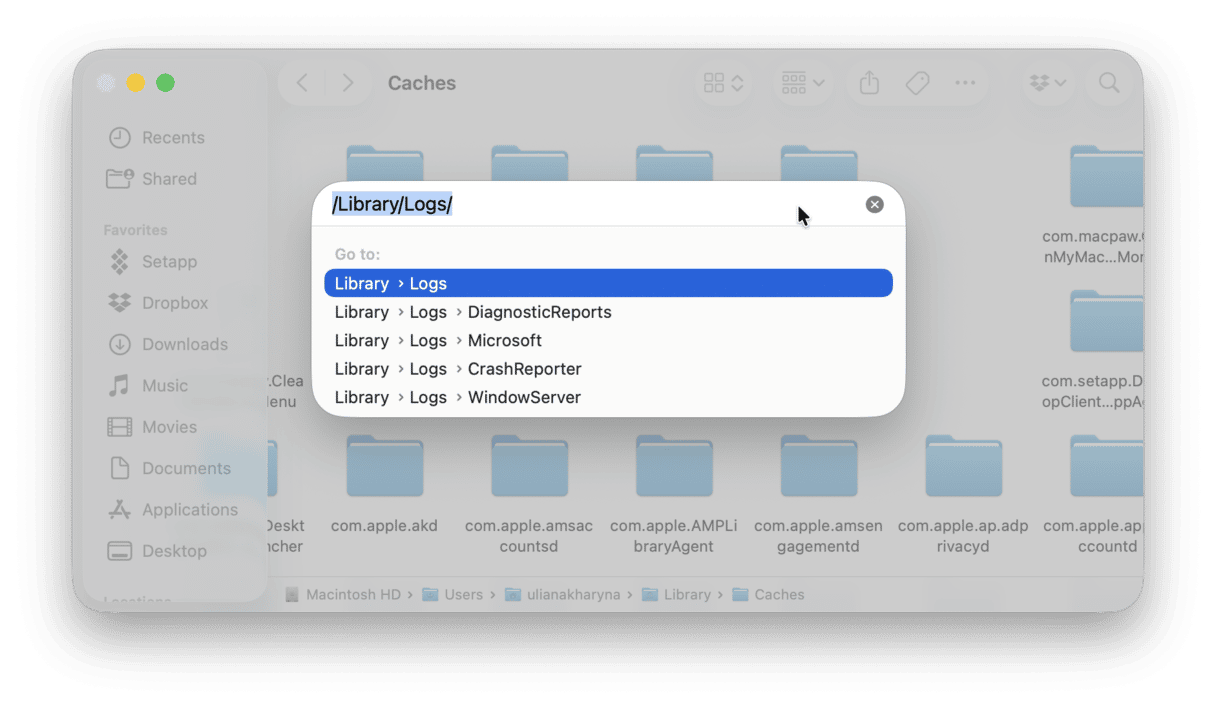
10. Remove log files
Log files are plain-text files that record all events taking place on macOS and third-party apps. They may not take a lot of space, but deleting them is another way to fix the “Your startup disk is almost full” error. Just follow these steps:
- Open the Finder and click Go > Go to Folder.
- Type the following path: ~/Library/Logs and press Return.
- Delete those you no longer need.
No more “Startup disk full” error message
When wondering how to free up space on a Mac startup disk, it’s hard to tell where to begin. With these 10 tips, you have everything you need to get rid of the “Your startup disk is almost full” message for good.
Certain tricks like deleting cache with CleanMyMac and emptying your Trash should become part of your routine. This way, your startup disk will be able to focus entirely on smoothly operating your Mac. So, bookmark this page and use these tips regularly to ensure the problem never returns.
Frequently asked questions
How much free space should I keep on my Mac?
Ideally, keep around 20% of the storage capacity free. If it is impossible, strive for 10-15% to avoid reducing the life of your Mac's drive. The thing is that insufficient space can damage the drive, and it cannot be replaced without replacing the logic board. Usually, it is very expensive, so a user ends up having to purchase a new MacBook.
How to back up files before cleaning if Mac won't boot?
If Mac won't boot, you can use target disk mode to back up files. In this mode, one Mac serves as an external drive, so you can transfer files to it by dragging and dropping them. To learn more about target disk mode, check out this article from Apple support.
How often should I restart Mac after cleanup?
Restart a Mac immediately after the cleanup — it will remove temporary files, thus freeing up some extra space and cache files. Beyond that, restart your computer about once every week or two for general maintenance.
How to delete files using Terminal in recovery mode?
First off, consider this option only if your Mac won't boot because of a full startup disk. Also, it is for advanced users only since the risks of deleting vital system files are too high. If you are comfortable using Terminal, boot into recovery mode and use the rm command to delete unneeded files. You will have to make your way through different directories and find clutter there.